js加解密入门-web
前言
常见的加密方式
| 描述 | 单向加密 | ||
| 密钥数量 | 无 | ||
| 应用场景 | |||
| 常用算法 |
常见的加密场景
- 网站进行
RSA+AES/SM2+SM4传输数据,其中SM4的密钥通过SM2进行加密 - 对称加密数据包
常用的js加解密函数定位方法
特殊变量名定位
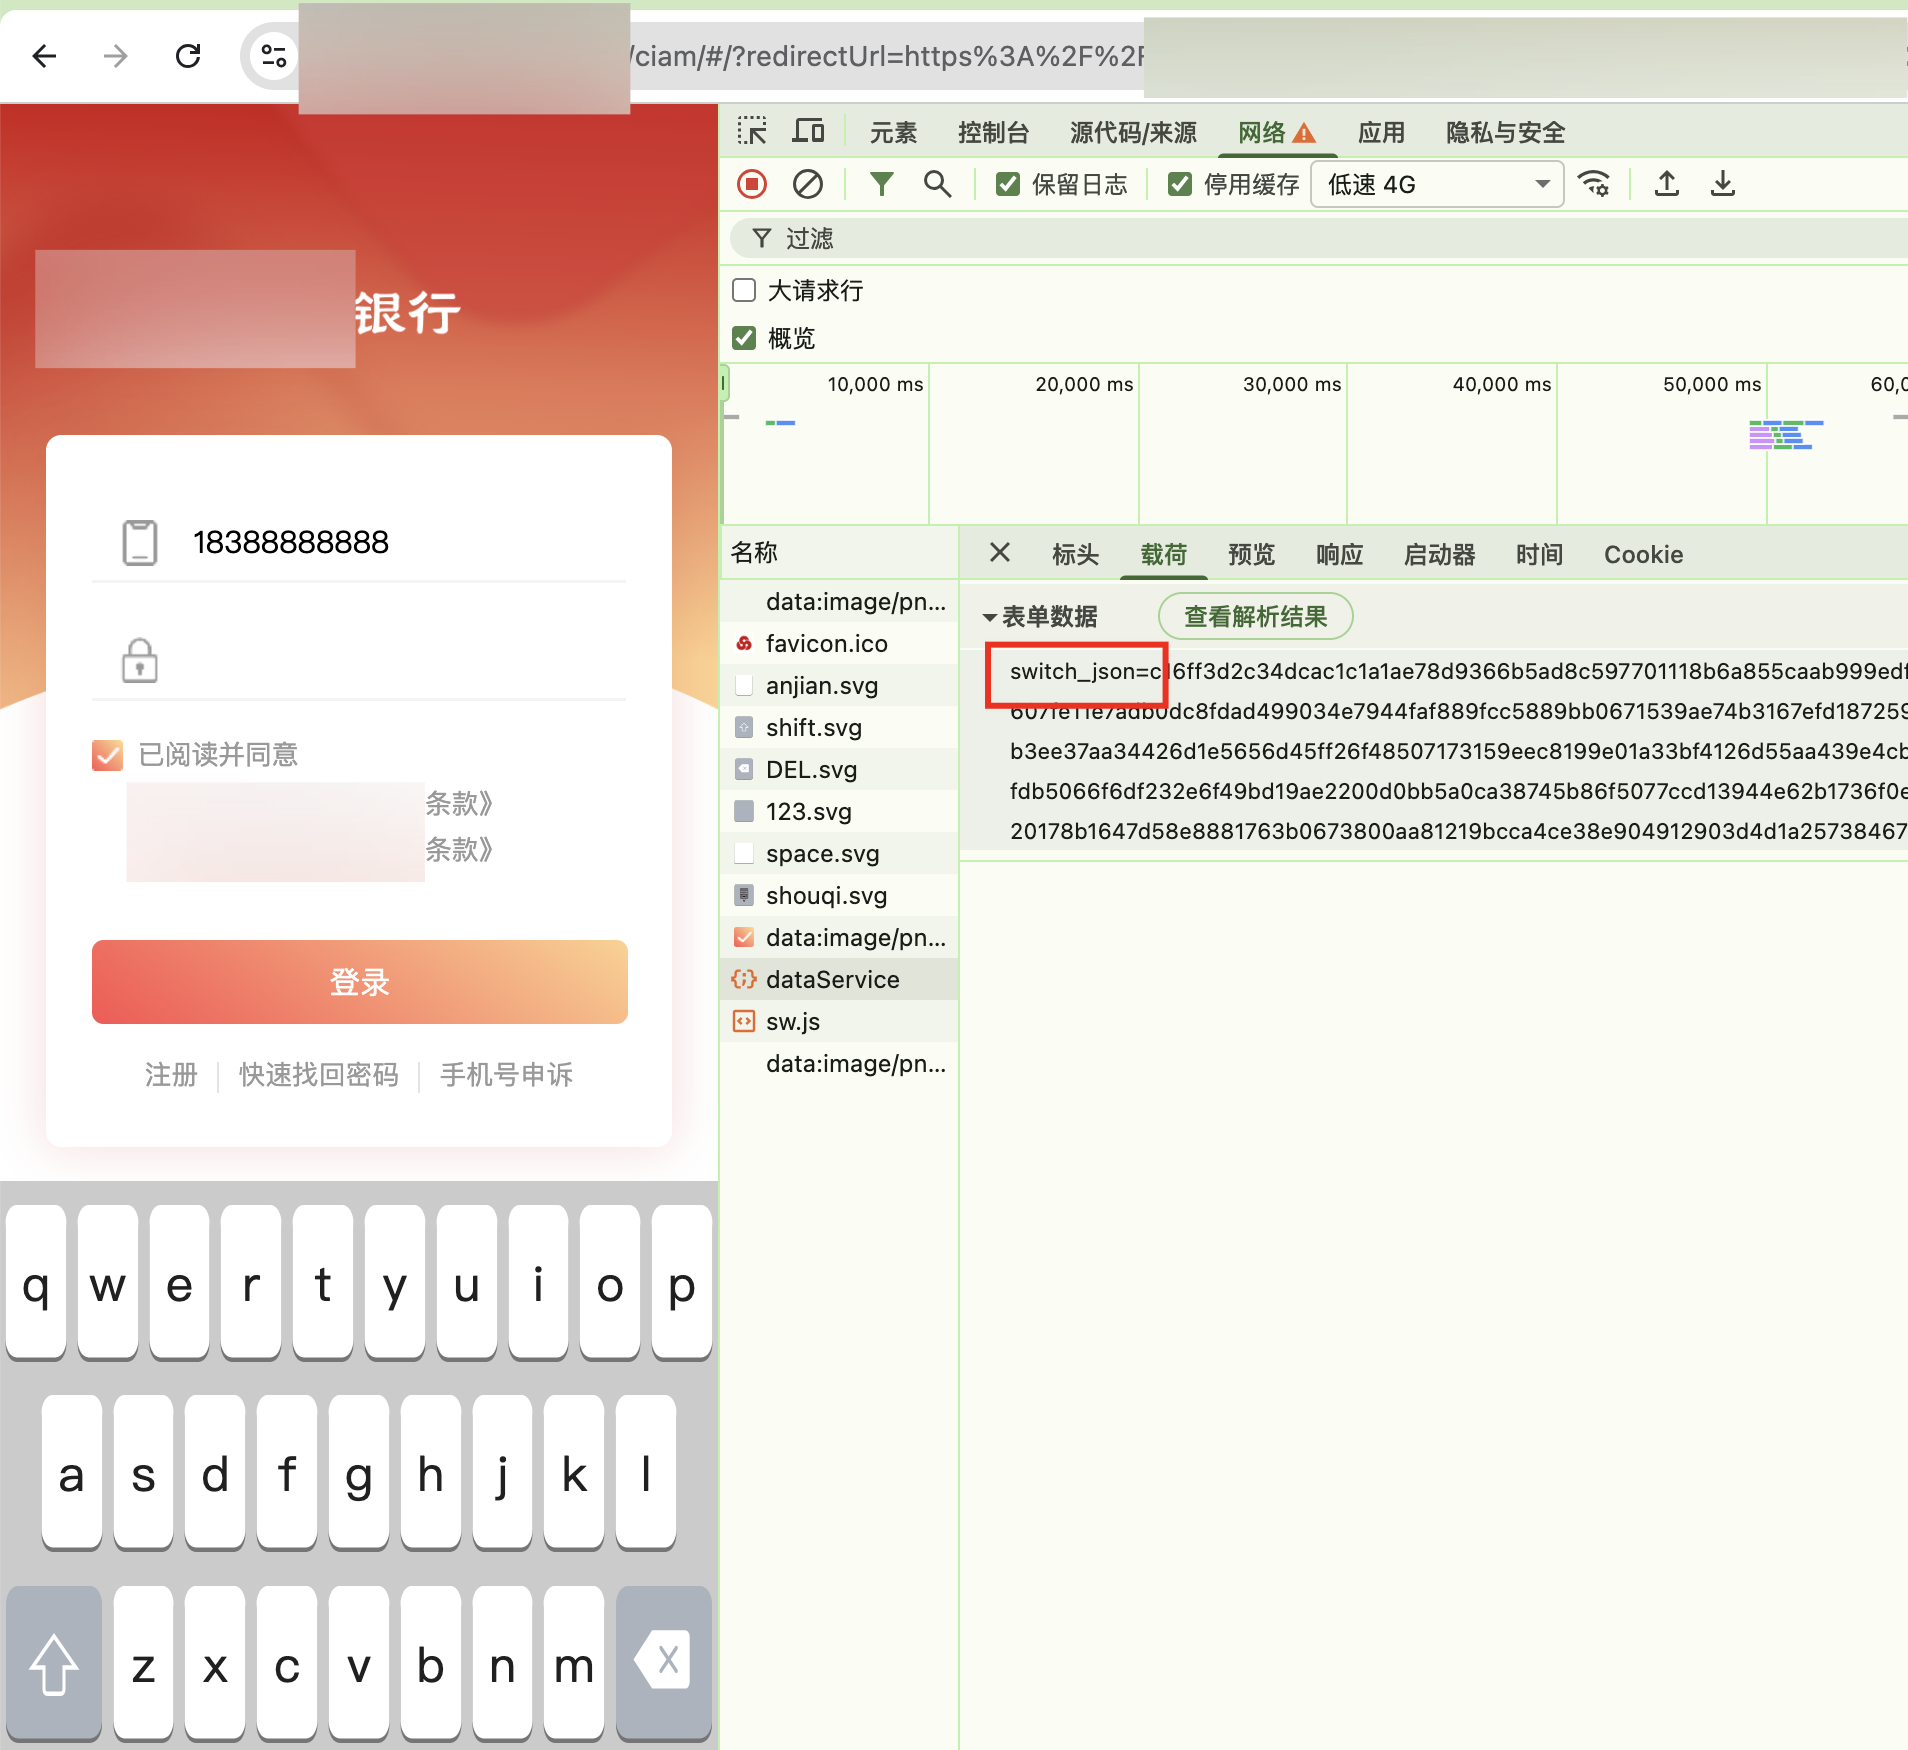
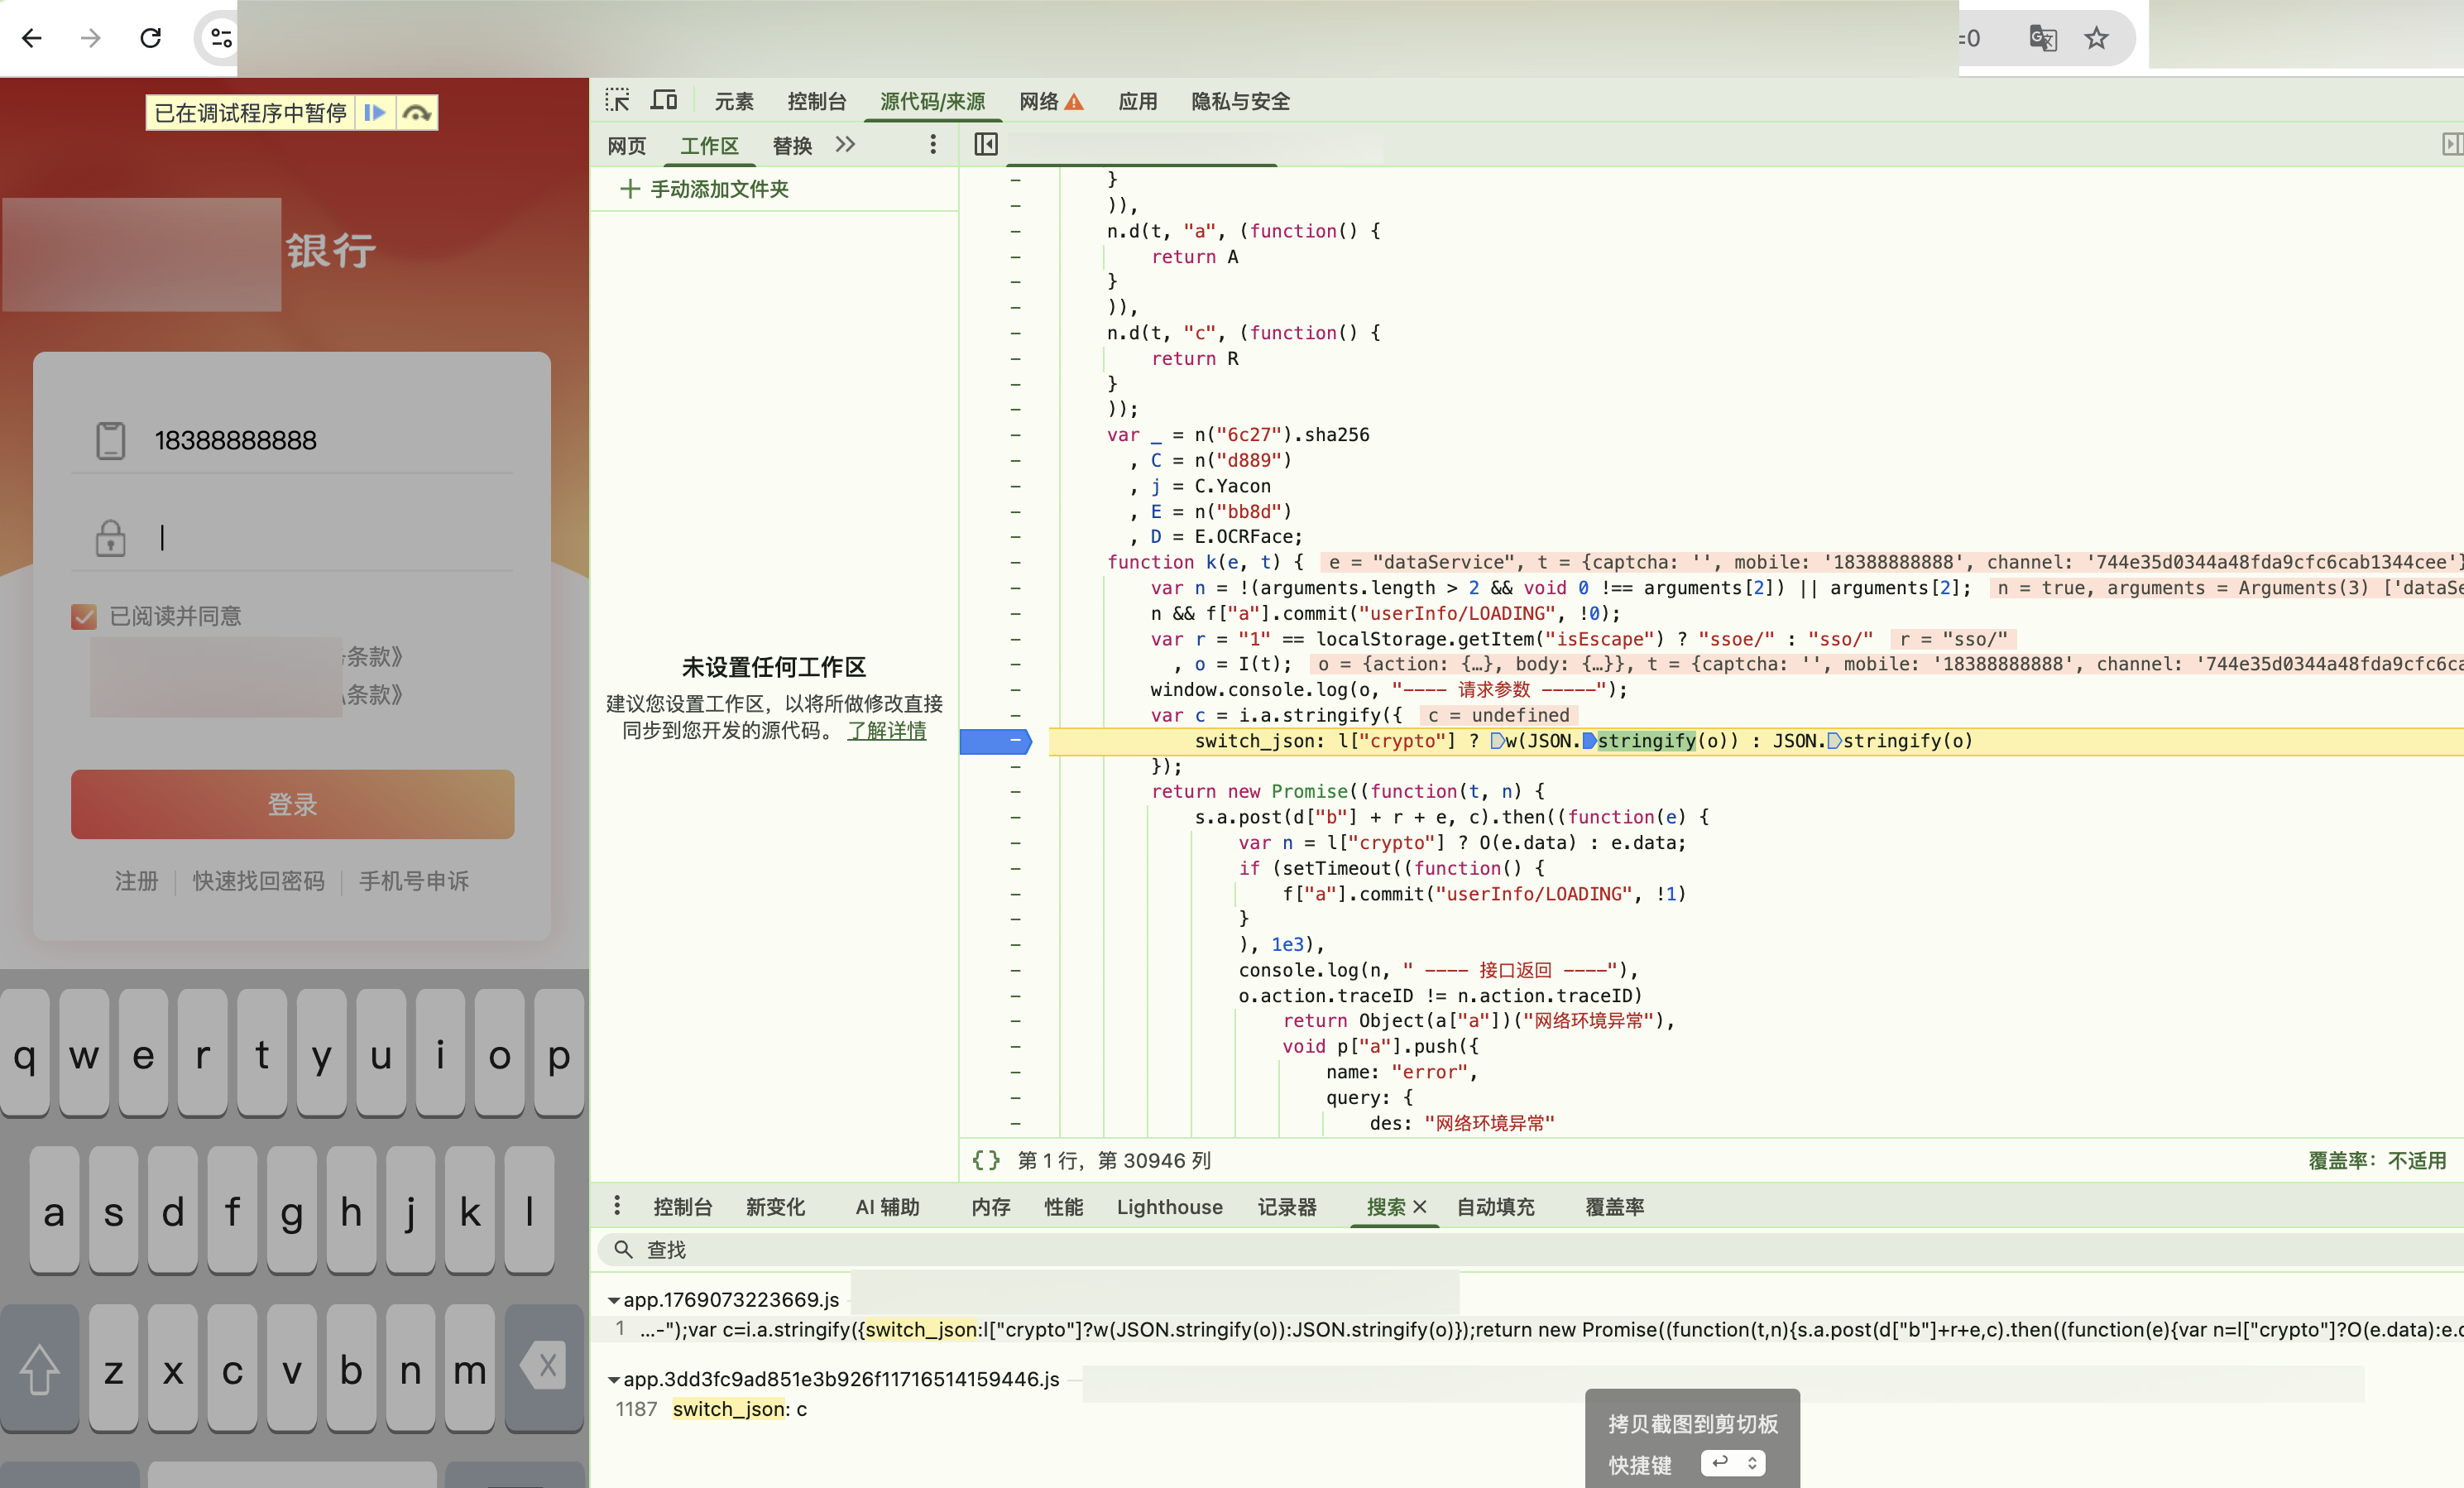
w就是加密函数
接口路径定位
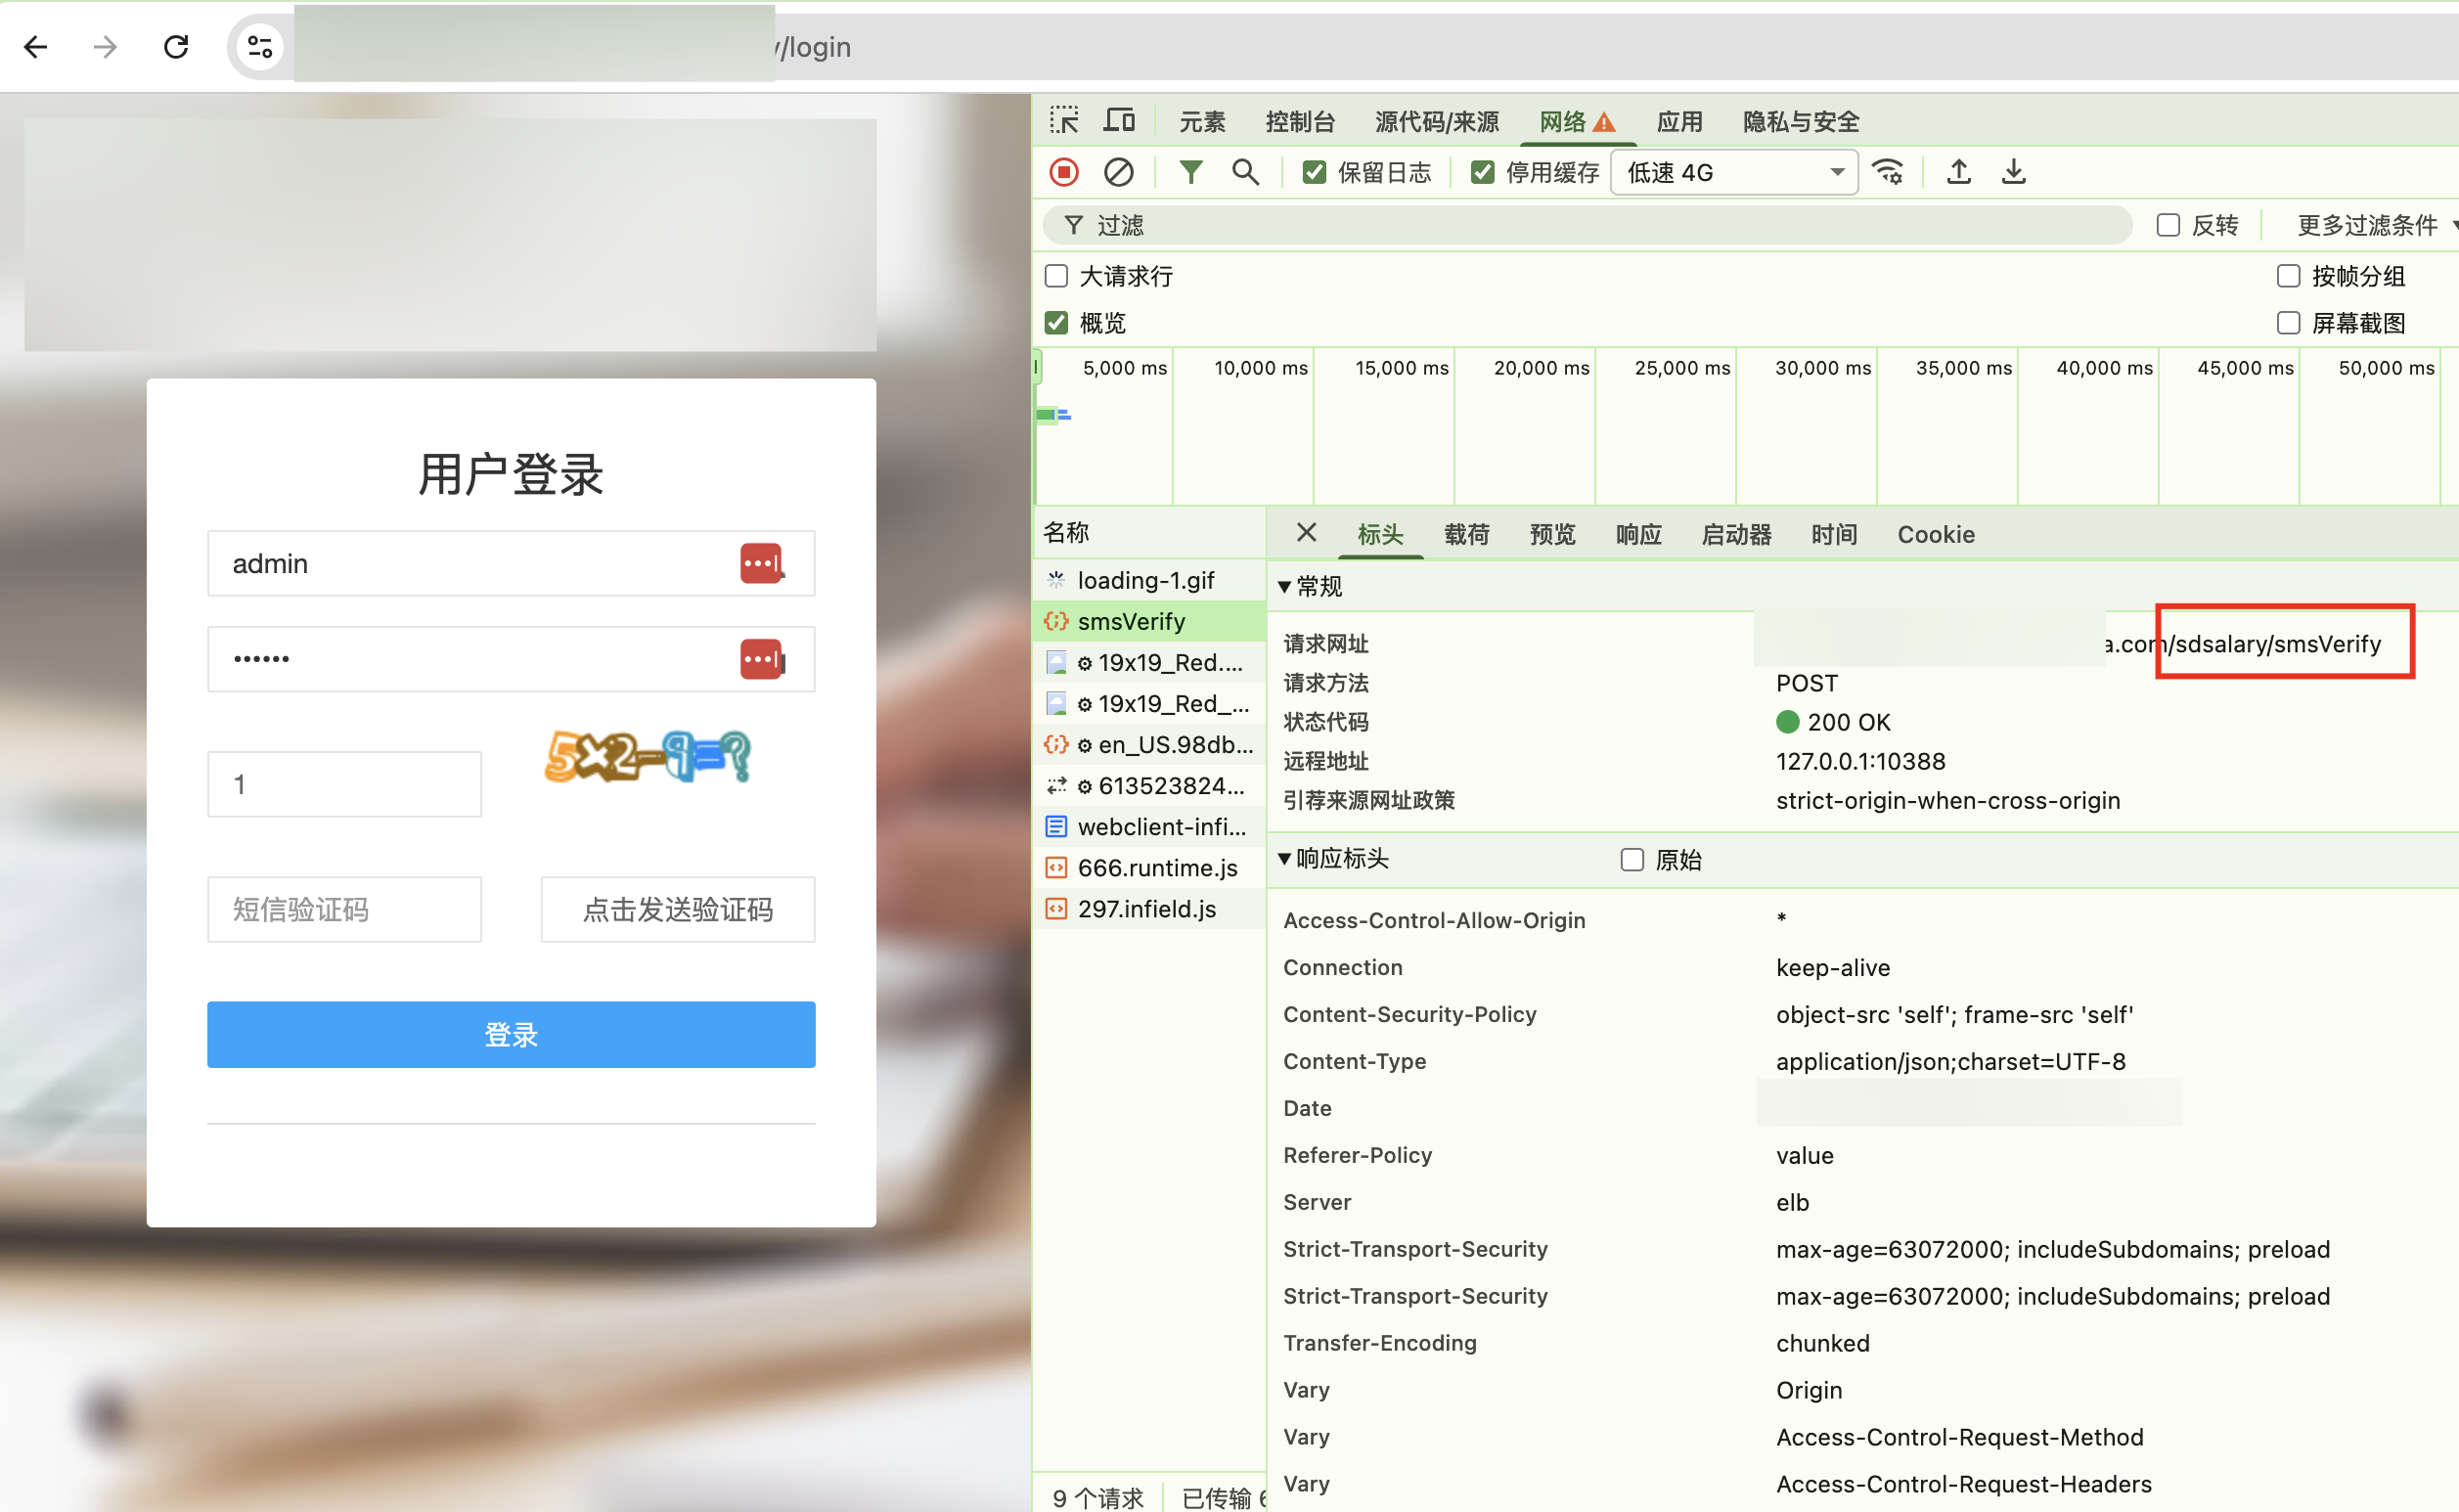
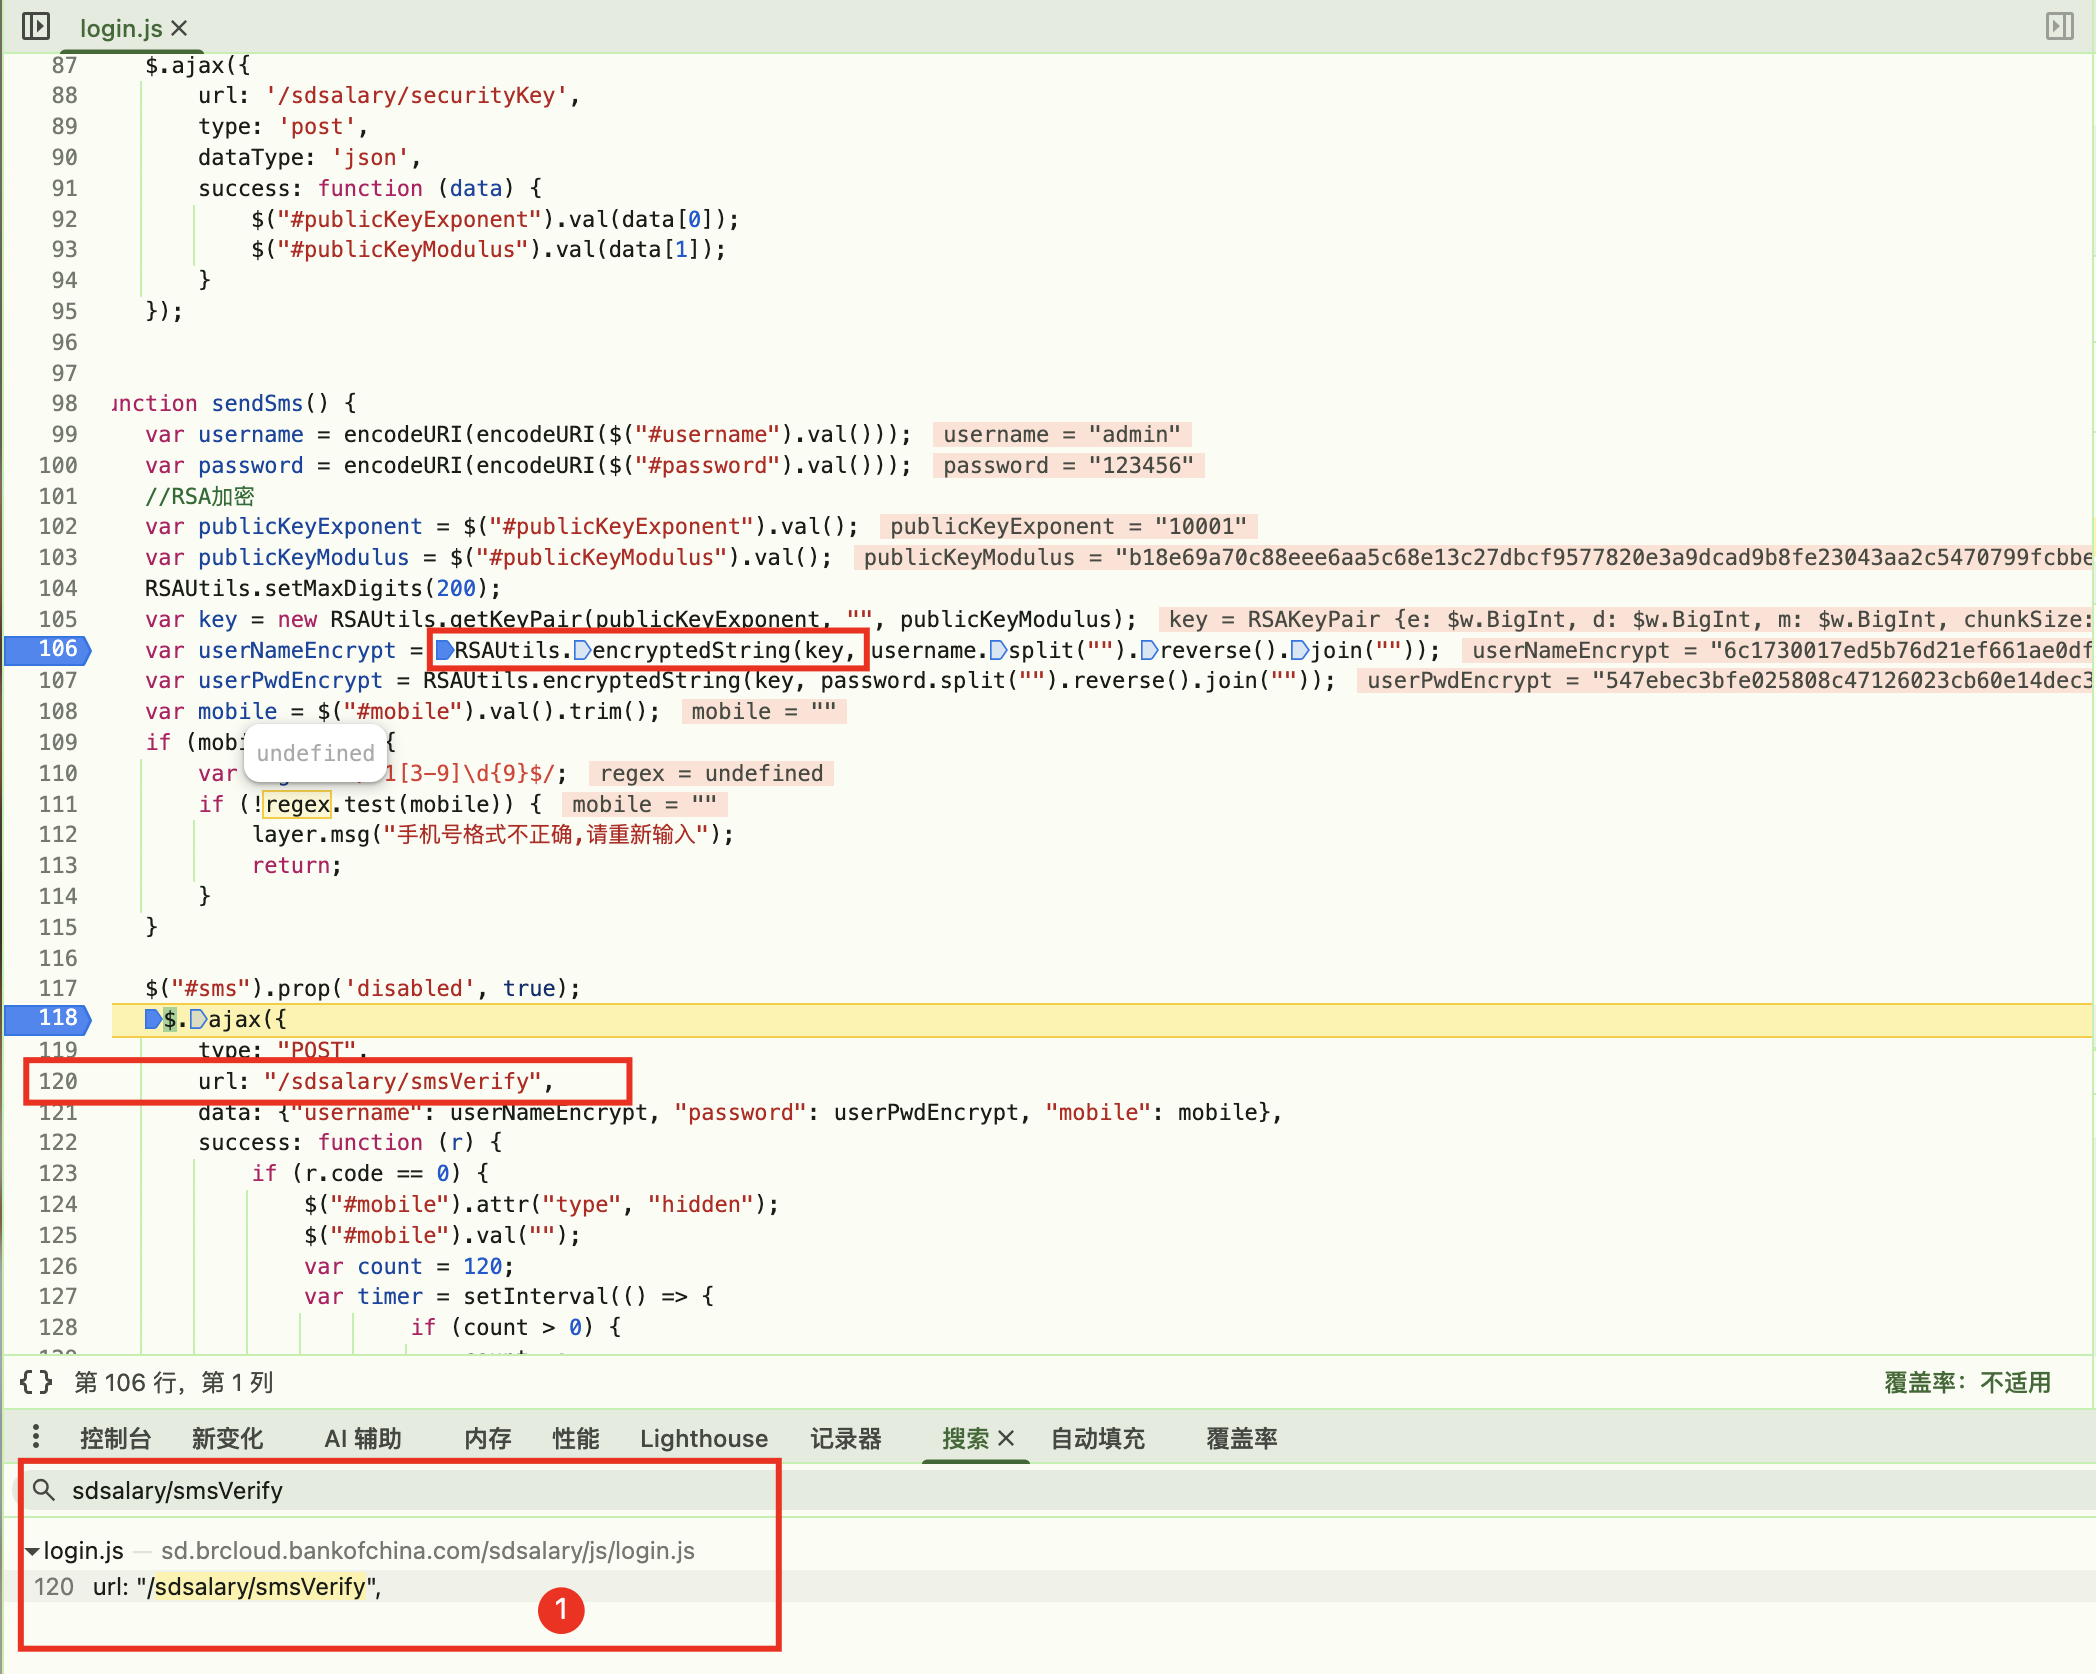
RSAUtils.encryptedString为加密函数
内存漫游(主推)
项目地址
https://github.com/JSREI/ast-hook-for-js-RE
安装
git clone https://github.com/CC11001100/ast-hook-for-js-RE.git   //windows用户建议用我的zip包,同时以管理员身份启动cmd/powershell
cd ast-hook-for-js-RE
nvm install v16.20.2
nvm use v16.20.2
npm config set strict-ssl false
npm install
npm install -g anyproxy
npm install anyproxy
npm install -g anyproxy express body-parser shelljs crypto cheerio @babel/core @babel/types @babel/generator
npx anyproxy-ca
安装上一步弹出的ca证书,受信任的根证书颁发机构


开俩窗口分别运行起来
node src/api-server/api-server.js
node src/proxy-server/proxy-server.js
浏览器流量代理到本地10086端口方法四-hook常见函数
项目地址
https://github.com/cilame/v_jstools
使用方法
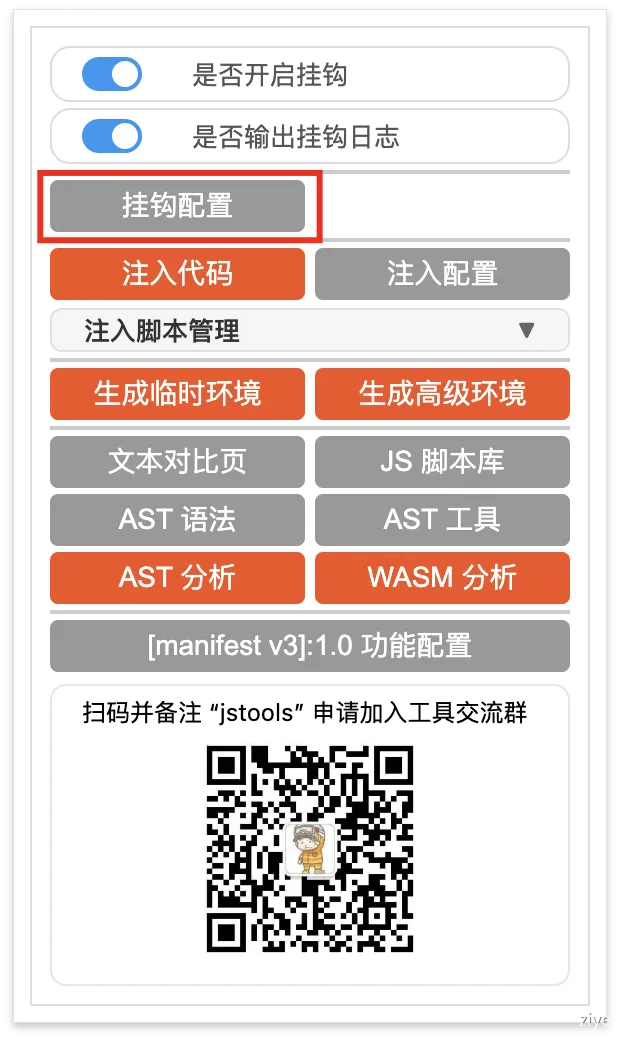
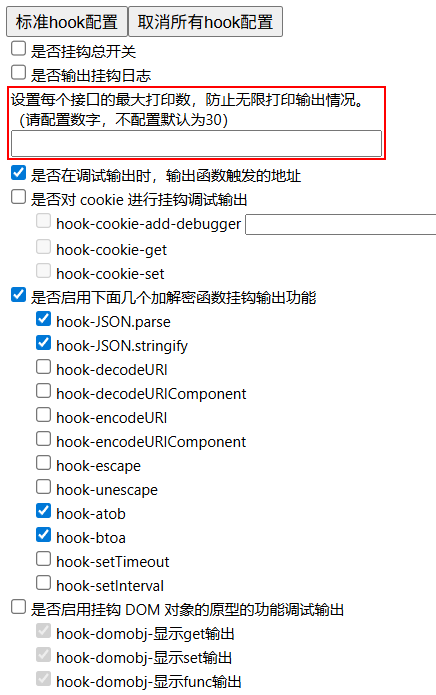
根据图中的勾选即可,由于网站开发者通常系统使用json进行数据传输,以及使用base64编码数据,这边勾上即可在编码时在浏览器控制台输出对应的加密点
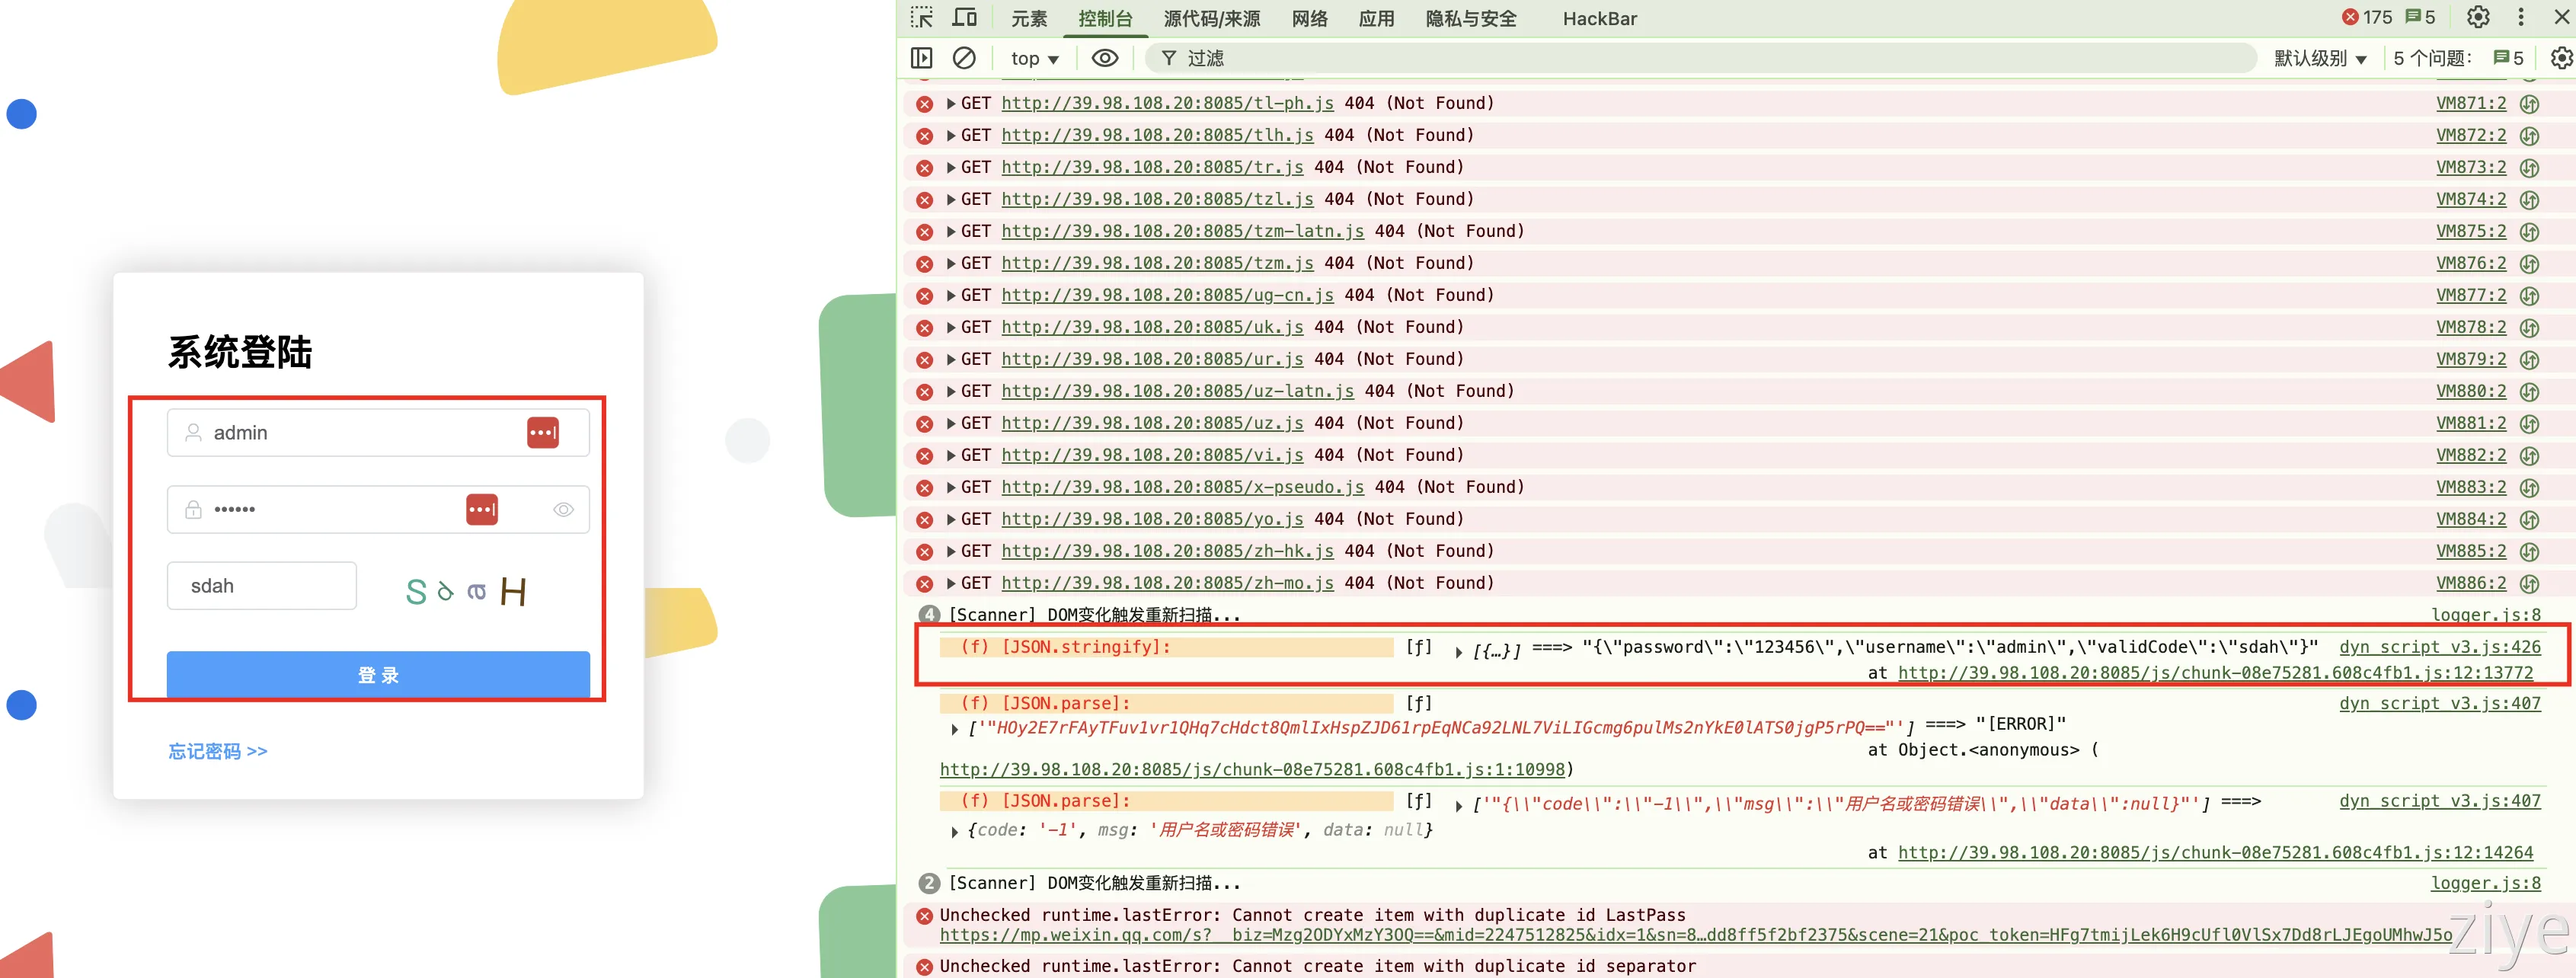
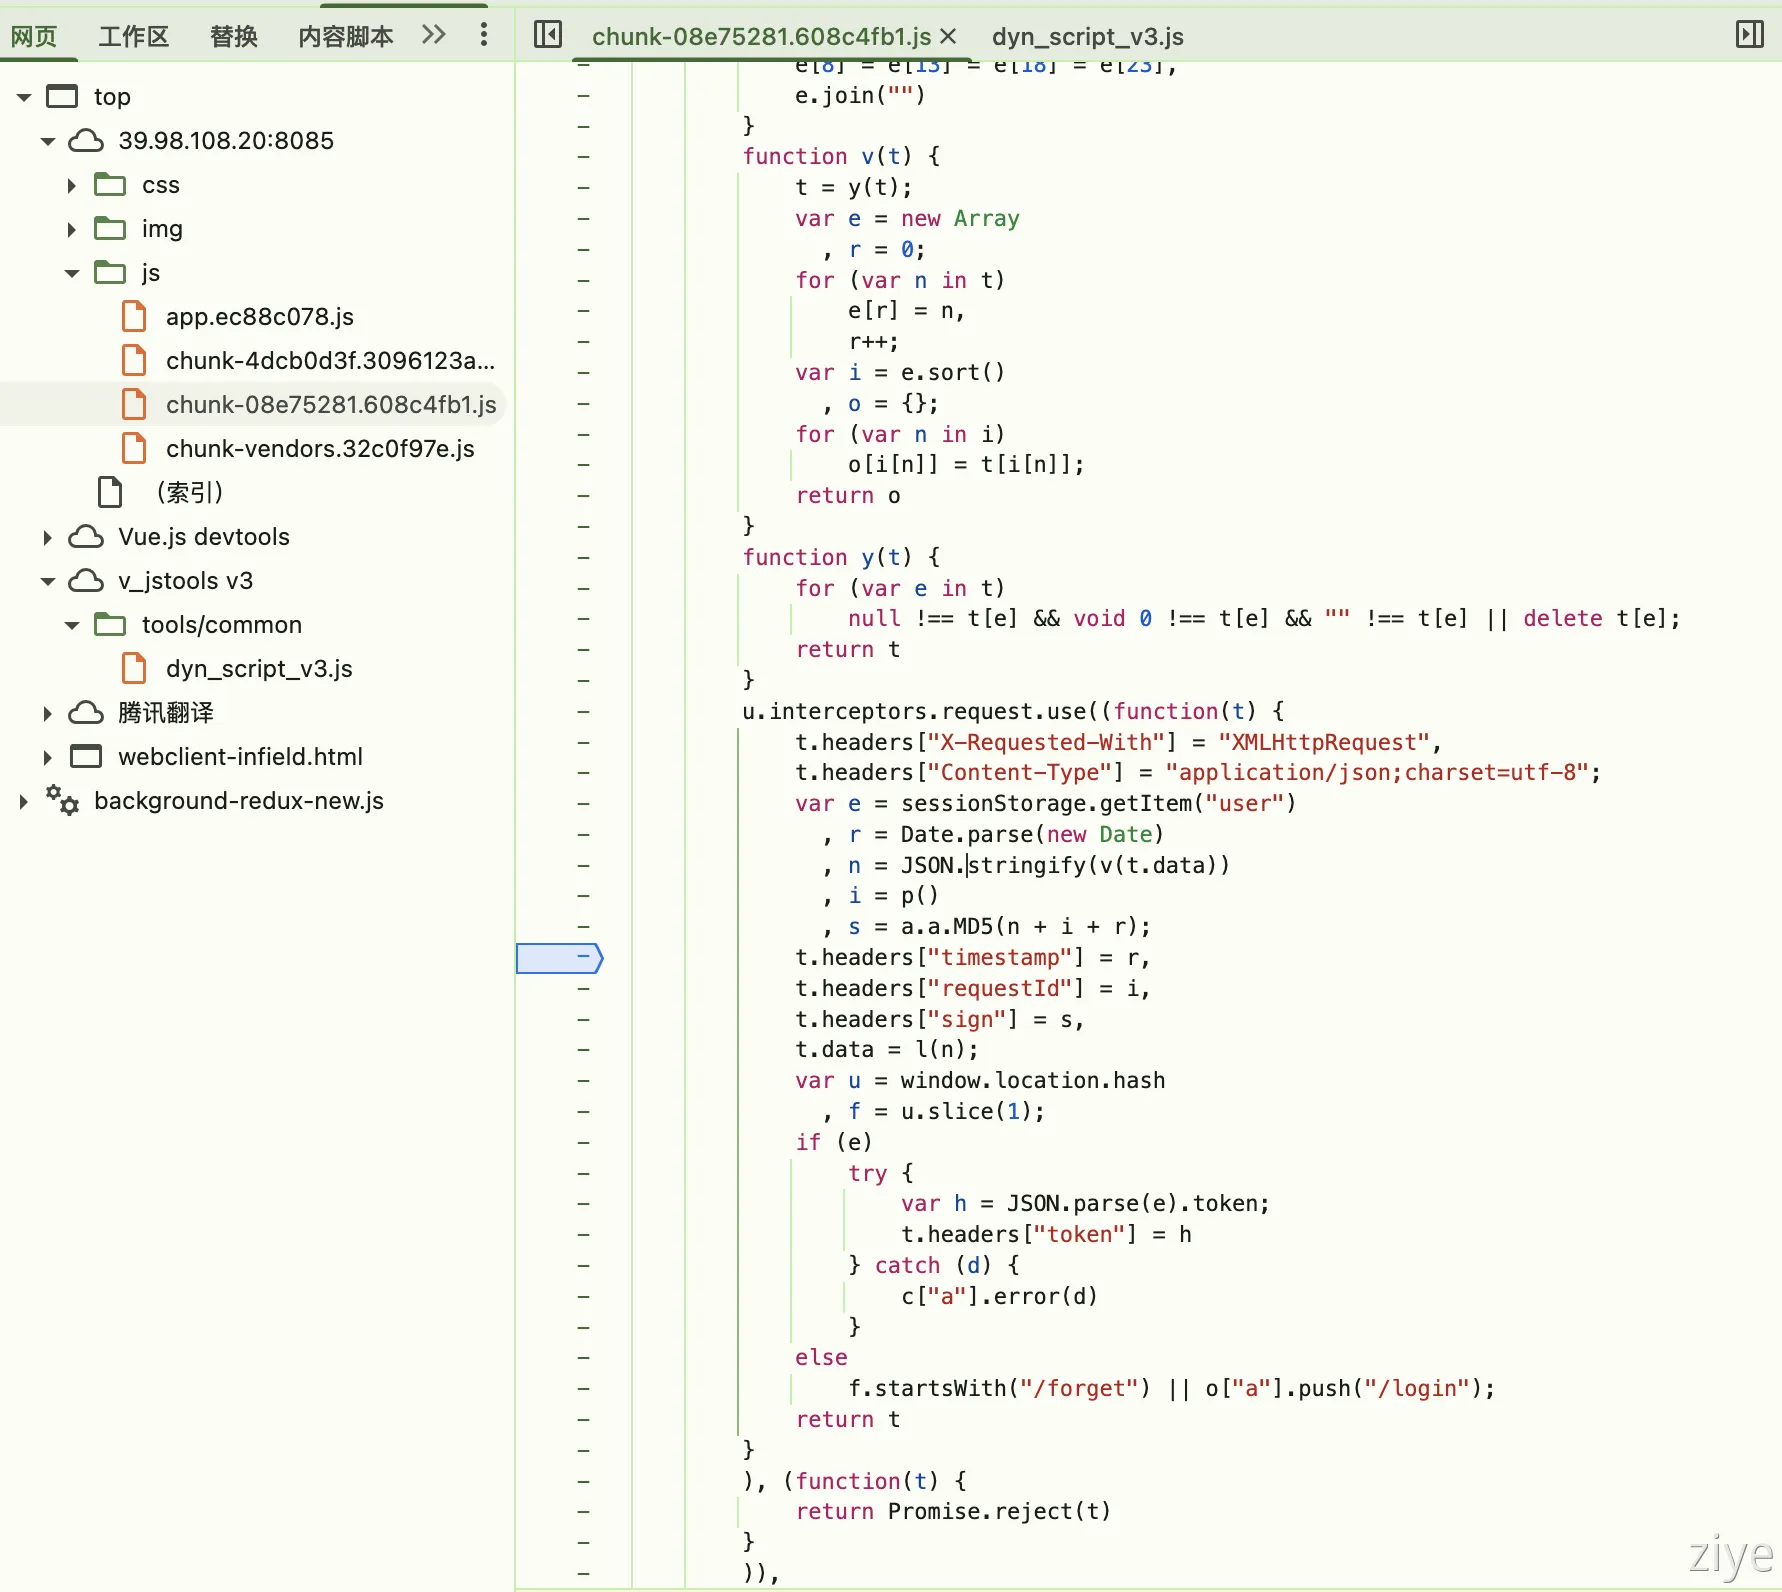
- 当提交登陆表单后,控制台打印如下内容,跟进
方案不足
- 默认只能处理最常见的编码,经常hook不到加密位置
站点案例
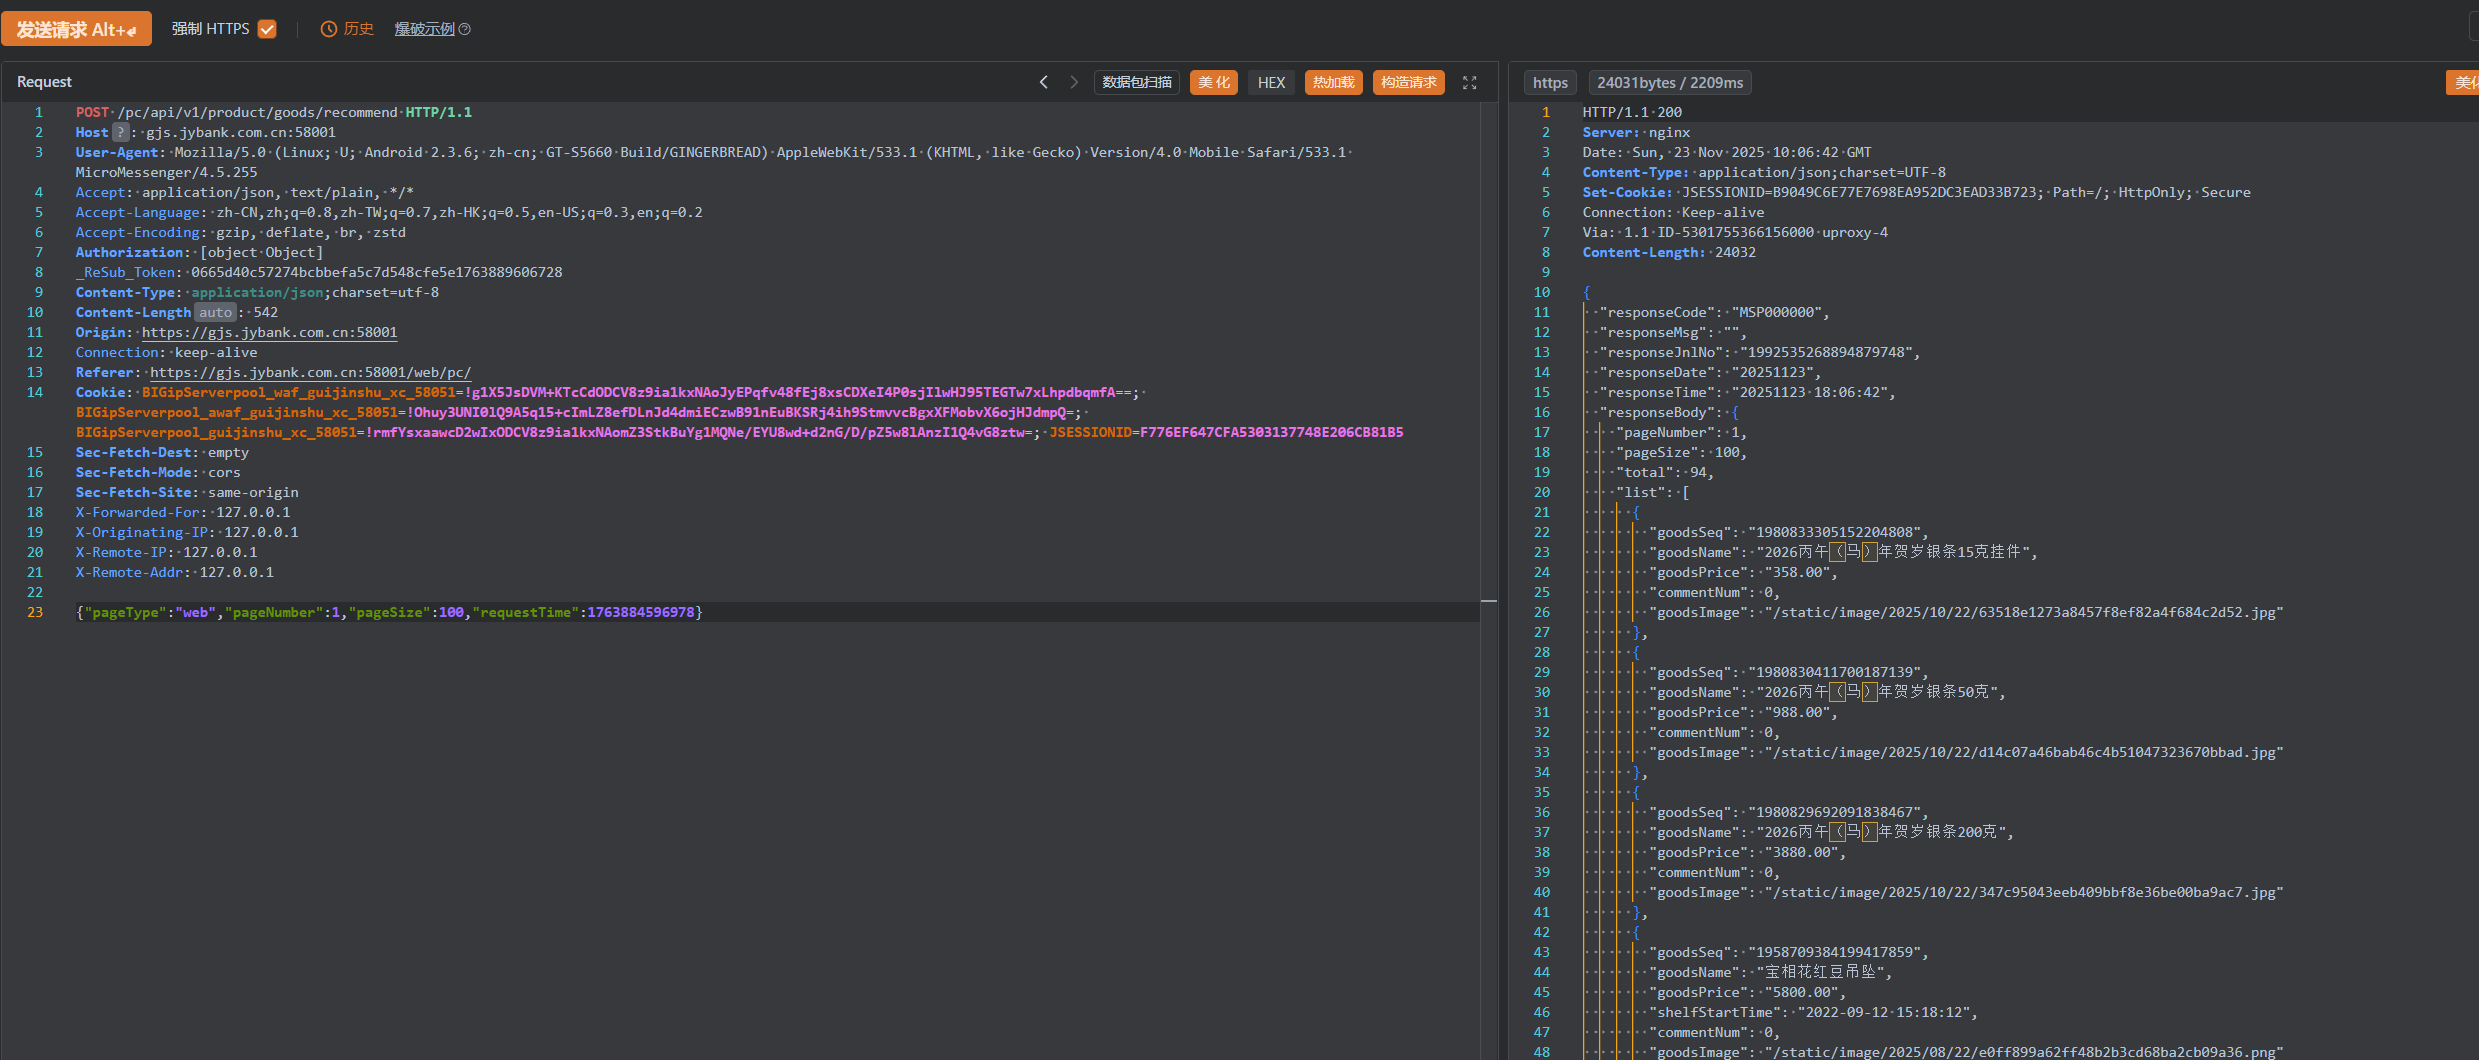
一、贵金属商城
https://gjs.jybank.com.cn:58001/web/pc/#/login
- 流量代理到本地的10086端口
- f12进入网络,刷新页面,获取一段密文
- 使用
hook.search("密文")进行搜索(),一般第一个就是,点击链接进入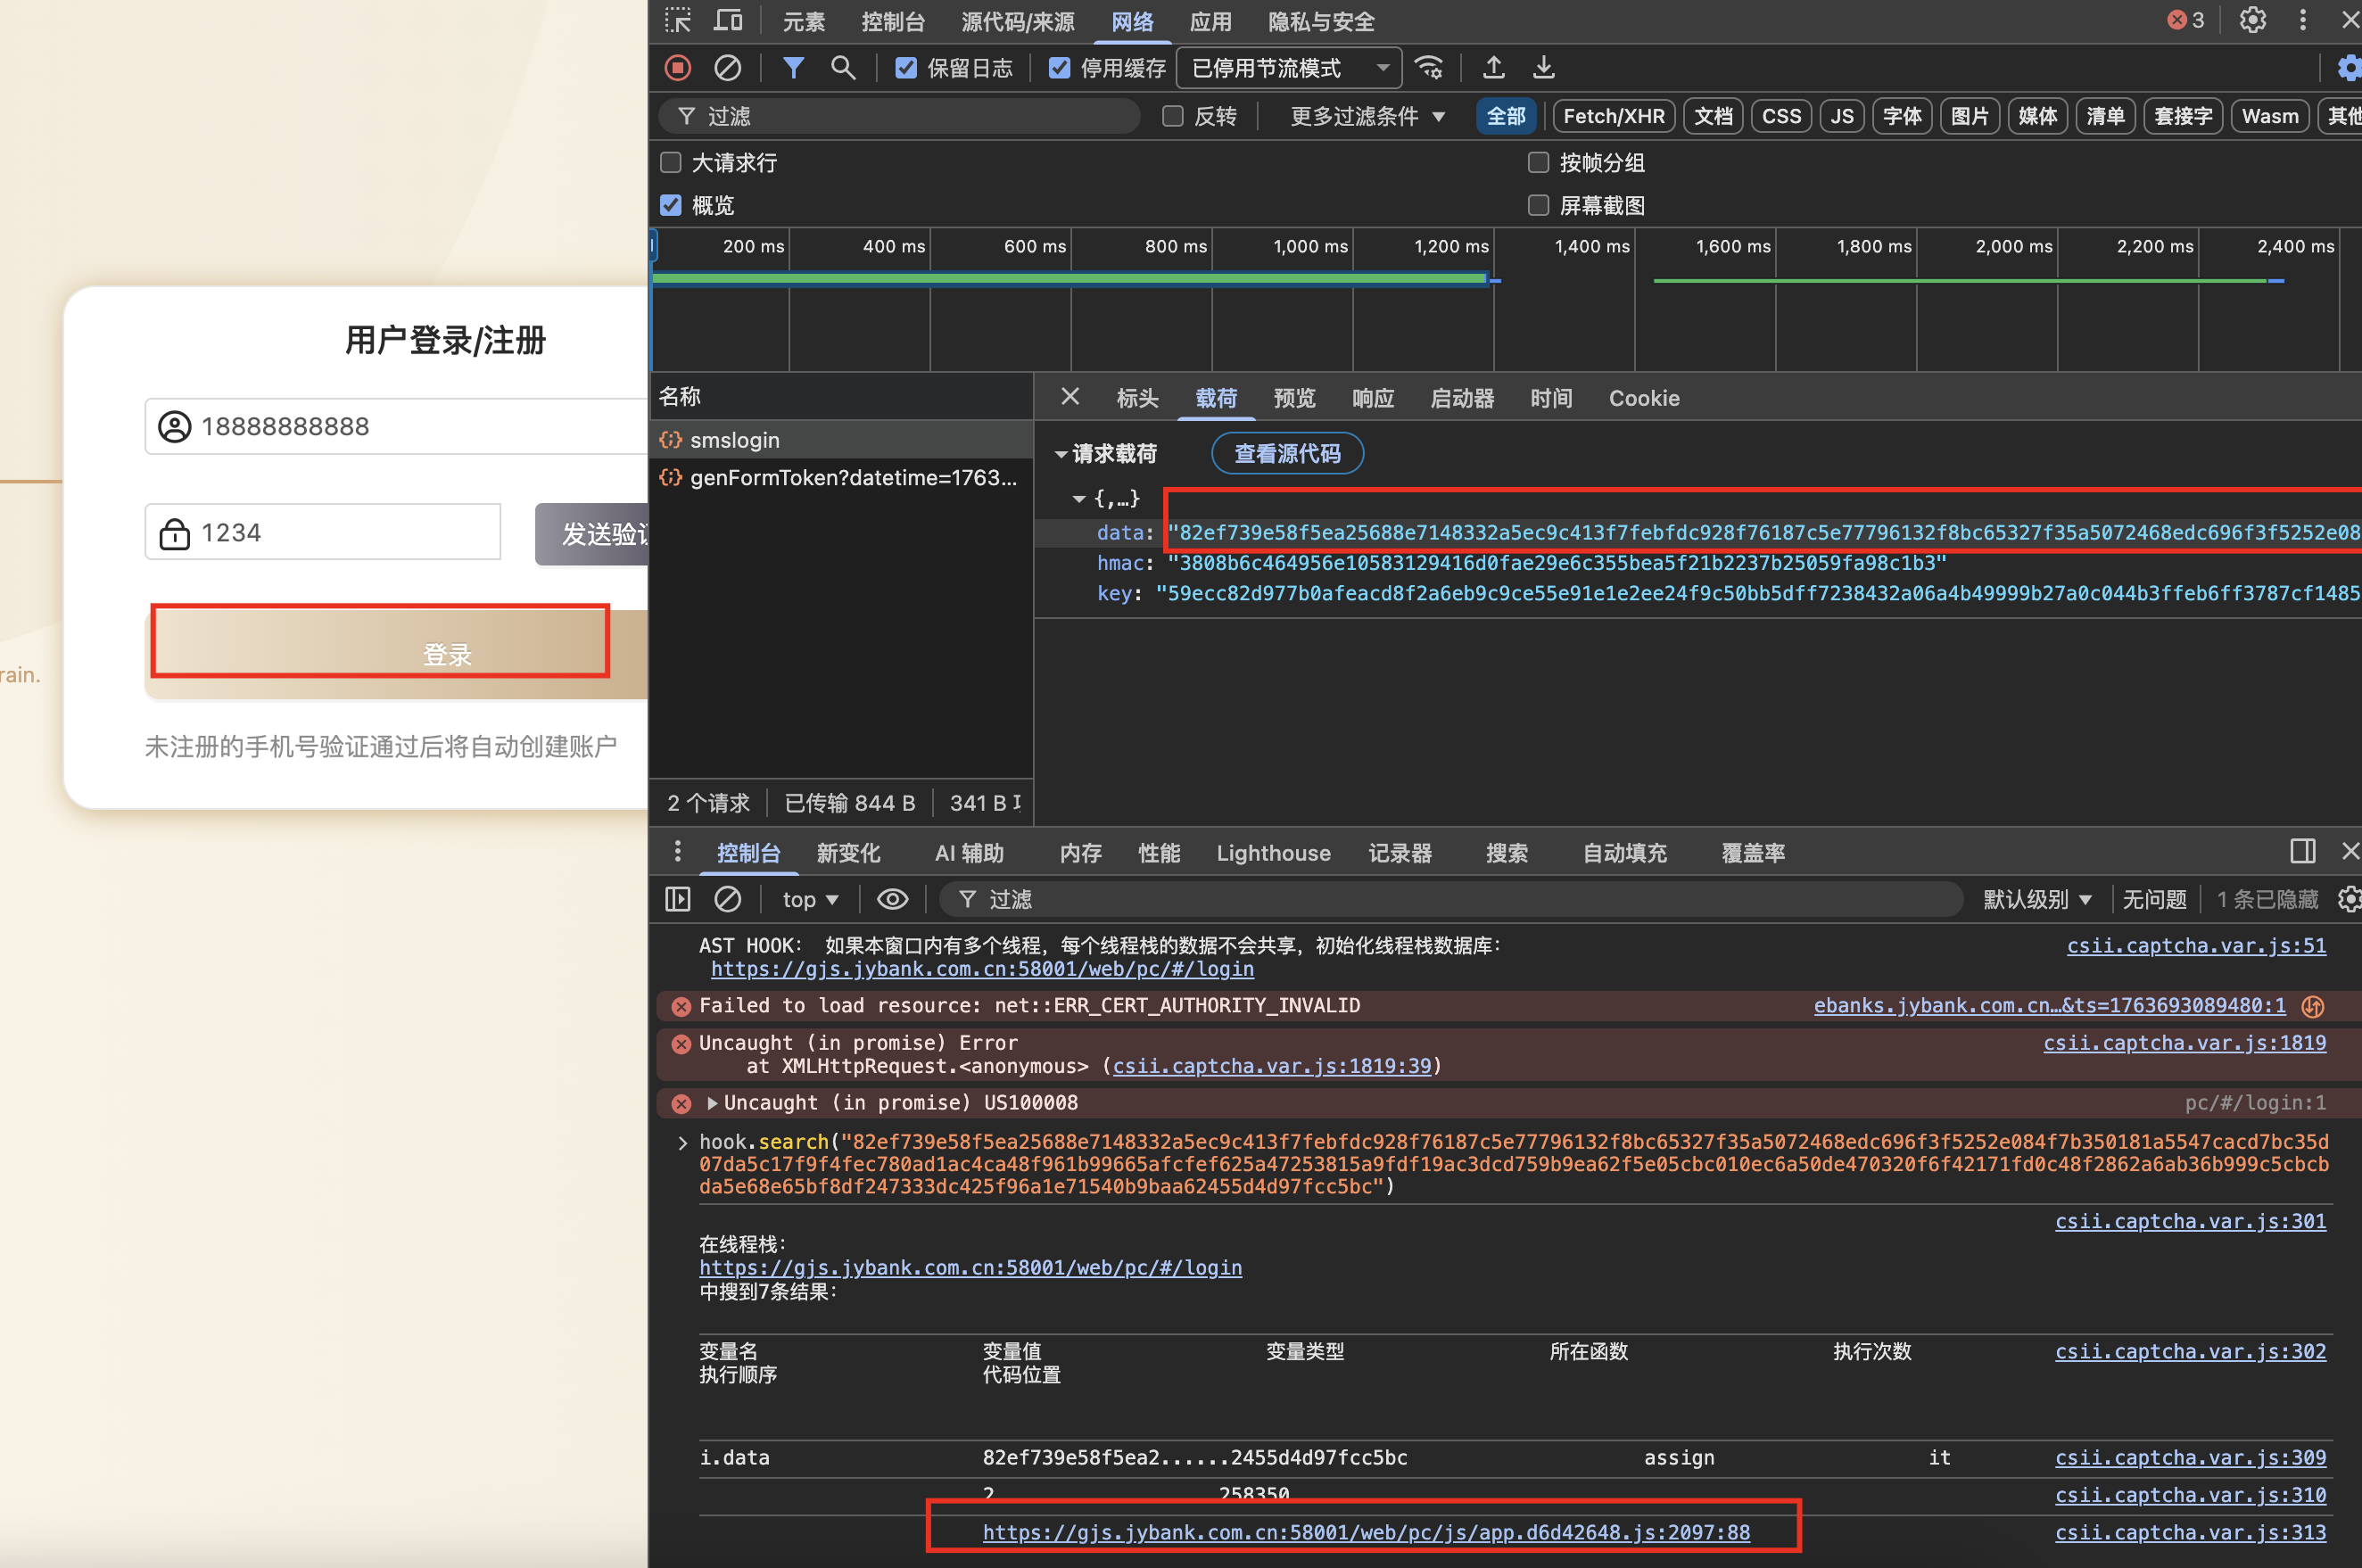
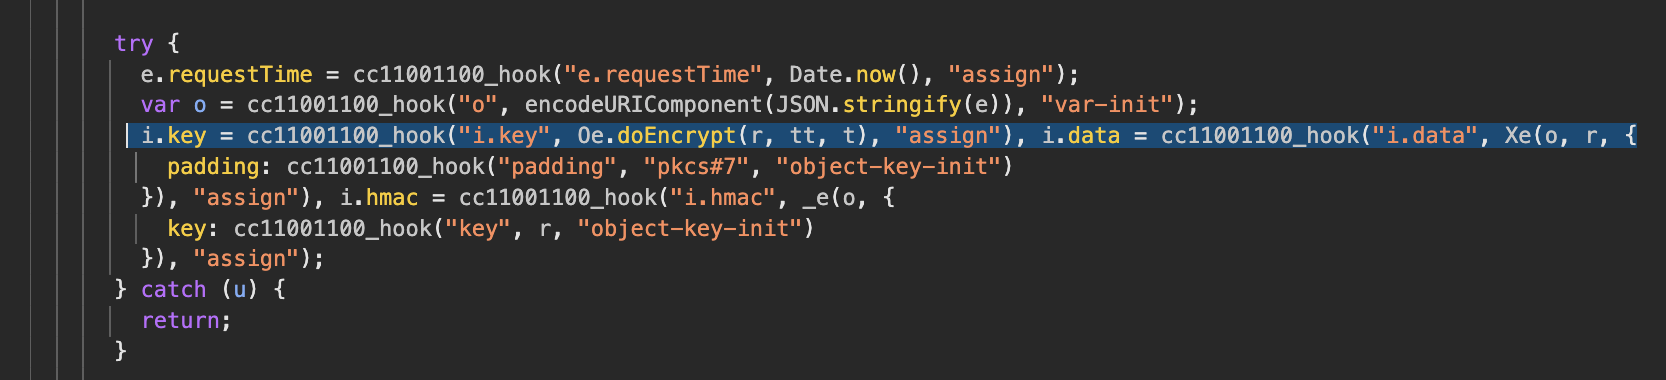
- 跳到入图,可以发现用的关键字是
1.key``Oe.doEncrypt
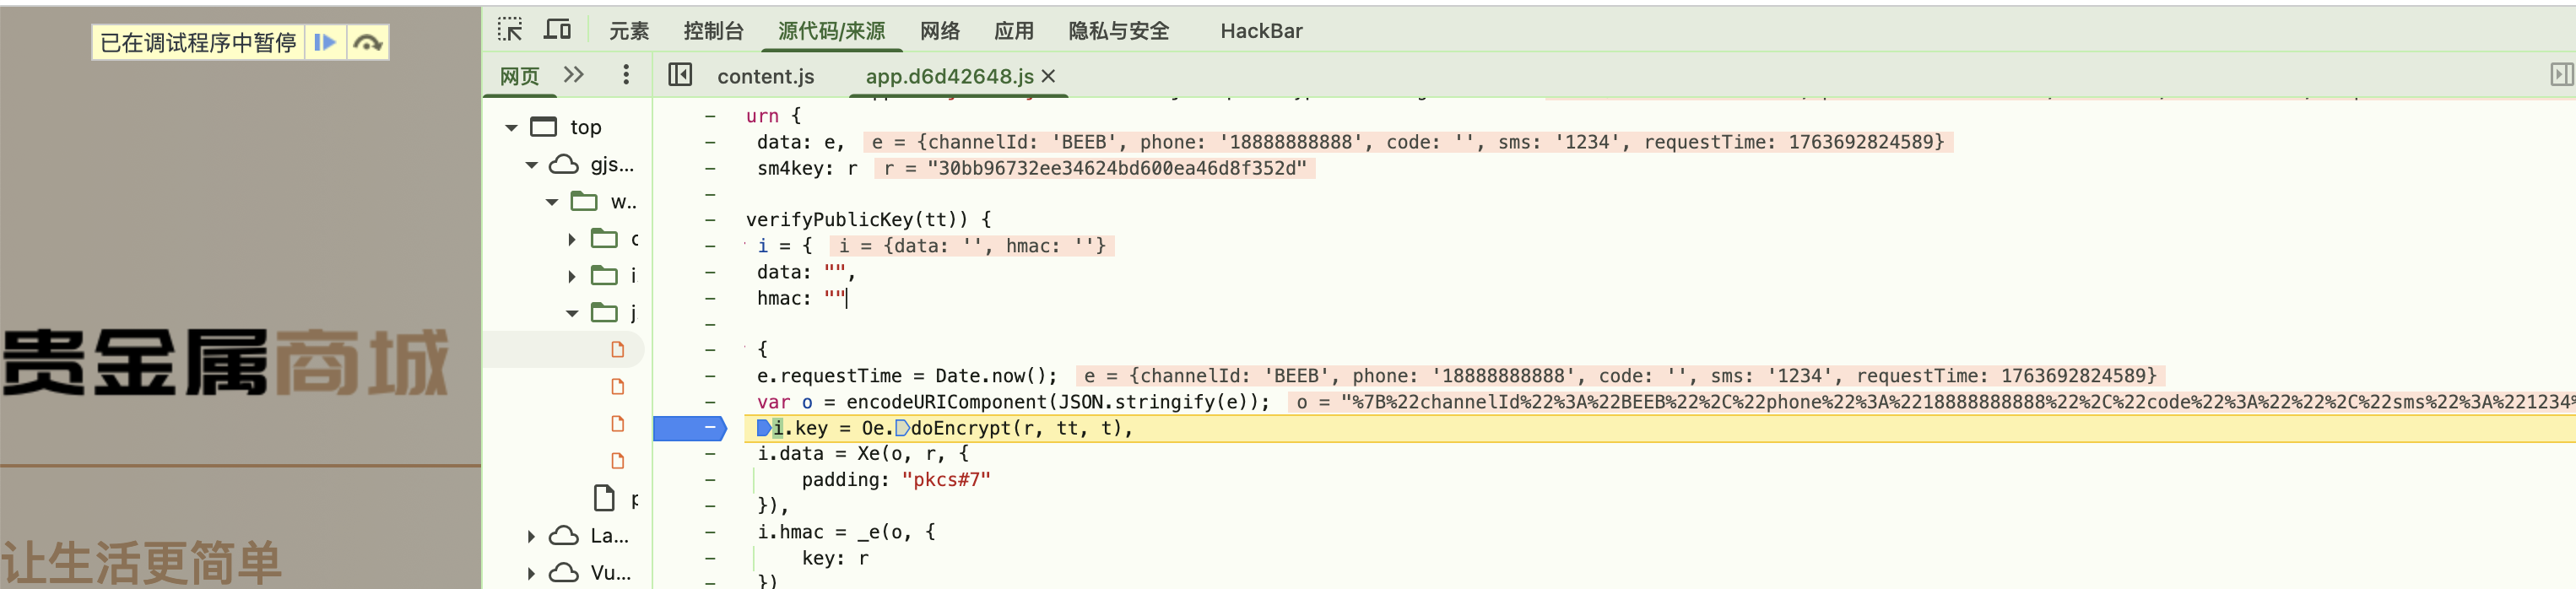
- 取消代理,正常访问,全局搜索,定位关键字,断点,发包,发现成功断到明文加密位置
二、集中采购管理系统

https://jzcg.sdrcu.com/ebidding/#/login
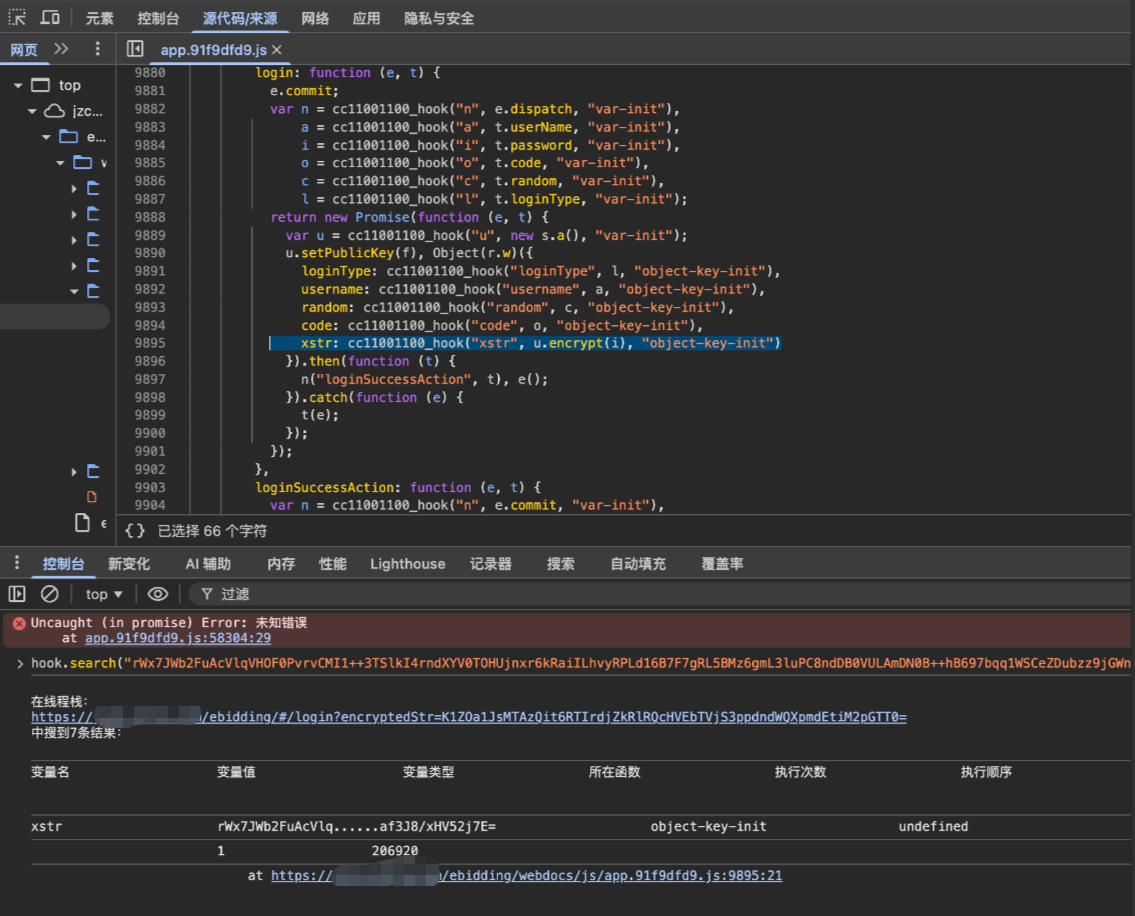
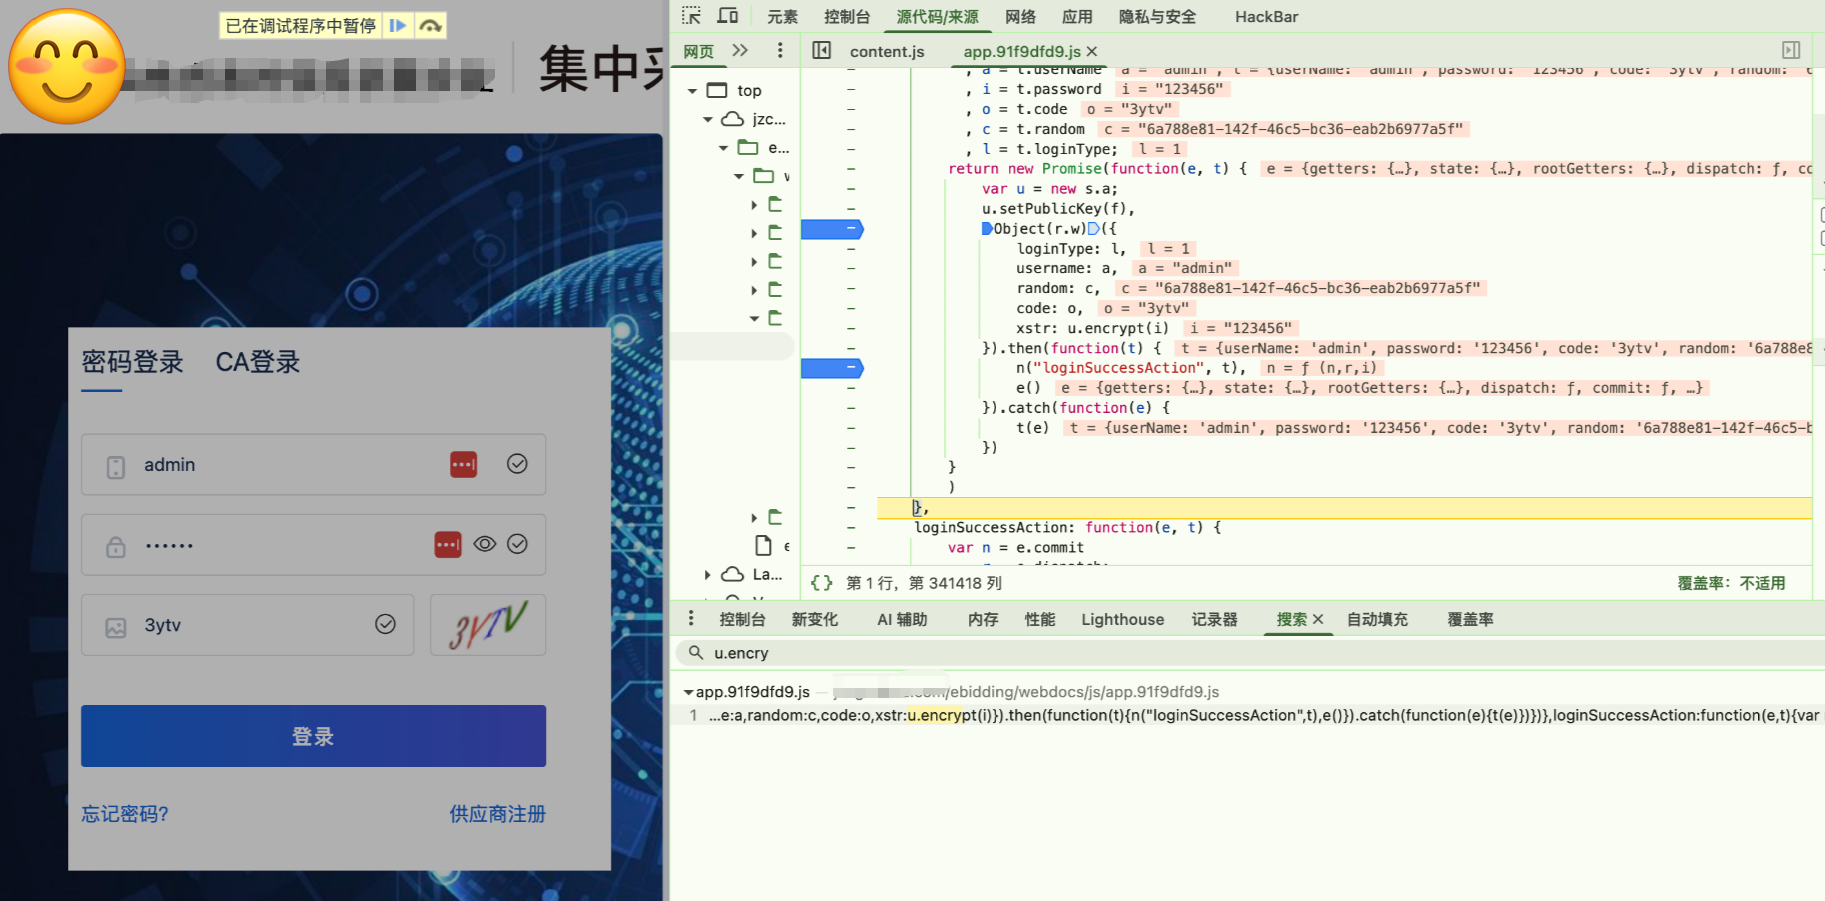
这个密码部分用的是rsa加密所以无法解密,但是可以伪造公钥<font style="color:rgb(78, 78, 78);background-color:rgb(243, 243, 243);">'MIGfMA0GCSqGSIb3DQEBAQUAA4GNADCBiQKBgQDEQvEppbMfrz7C9oL/hrb8r0PqYulc/SkgYf/e0oeS1NJXTbVORu95q+egZxzD8Hh2cx/s1BIPbcUPOzIZ0IodfJpznla422+RDQkXIuPyEuAyUQwIZqiCT7y0bFKxvN5xWyC5wFQp/9DOdTasE4Q0UzkERwzuUXF2hB73FQ46JQIDAQAB'</font>
三、后勤优管系统
https://thgbg.cn/manage/#/login


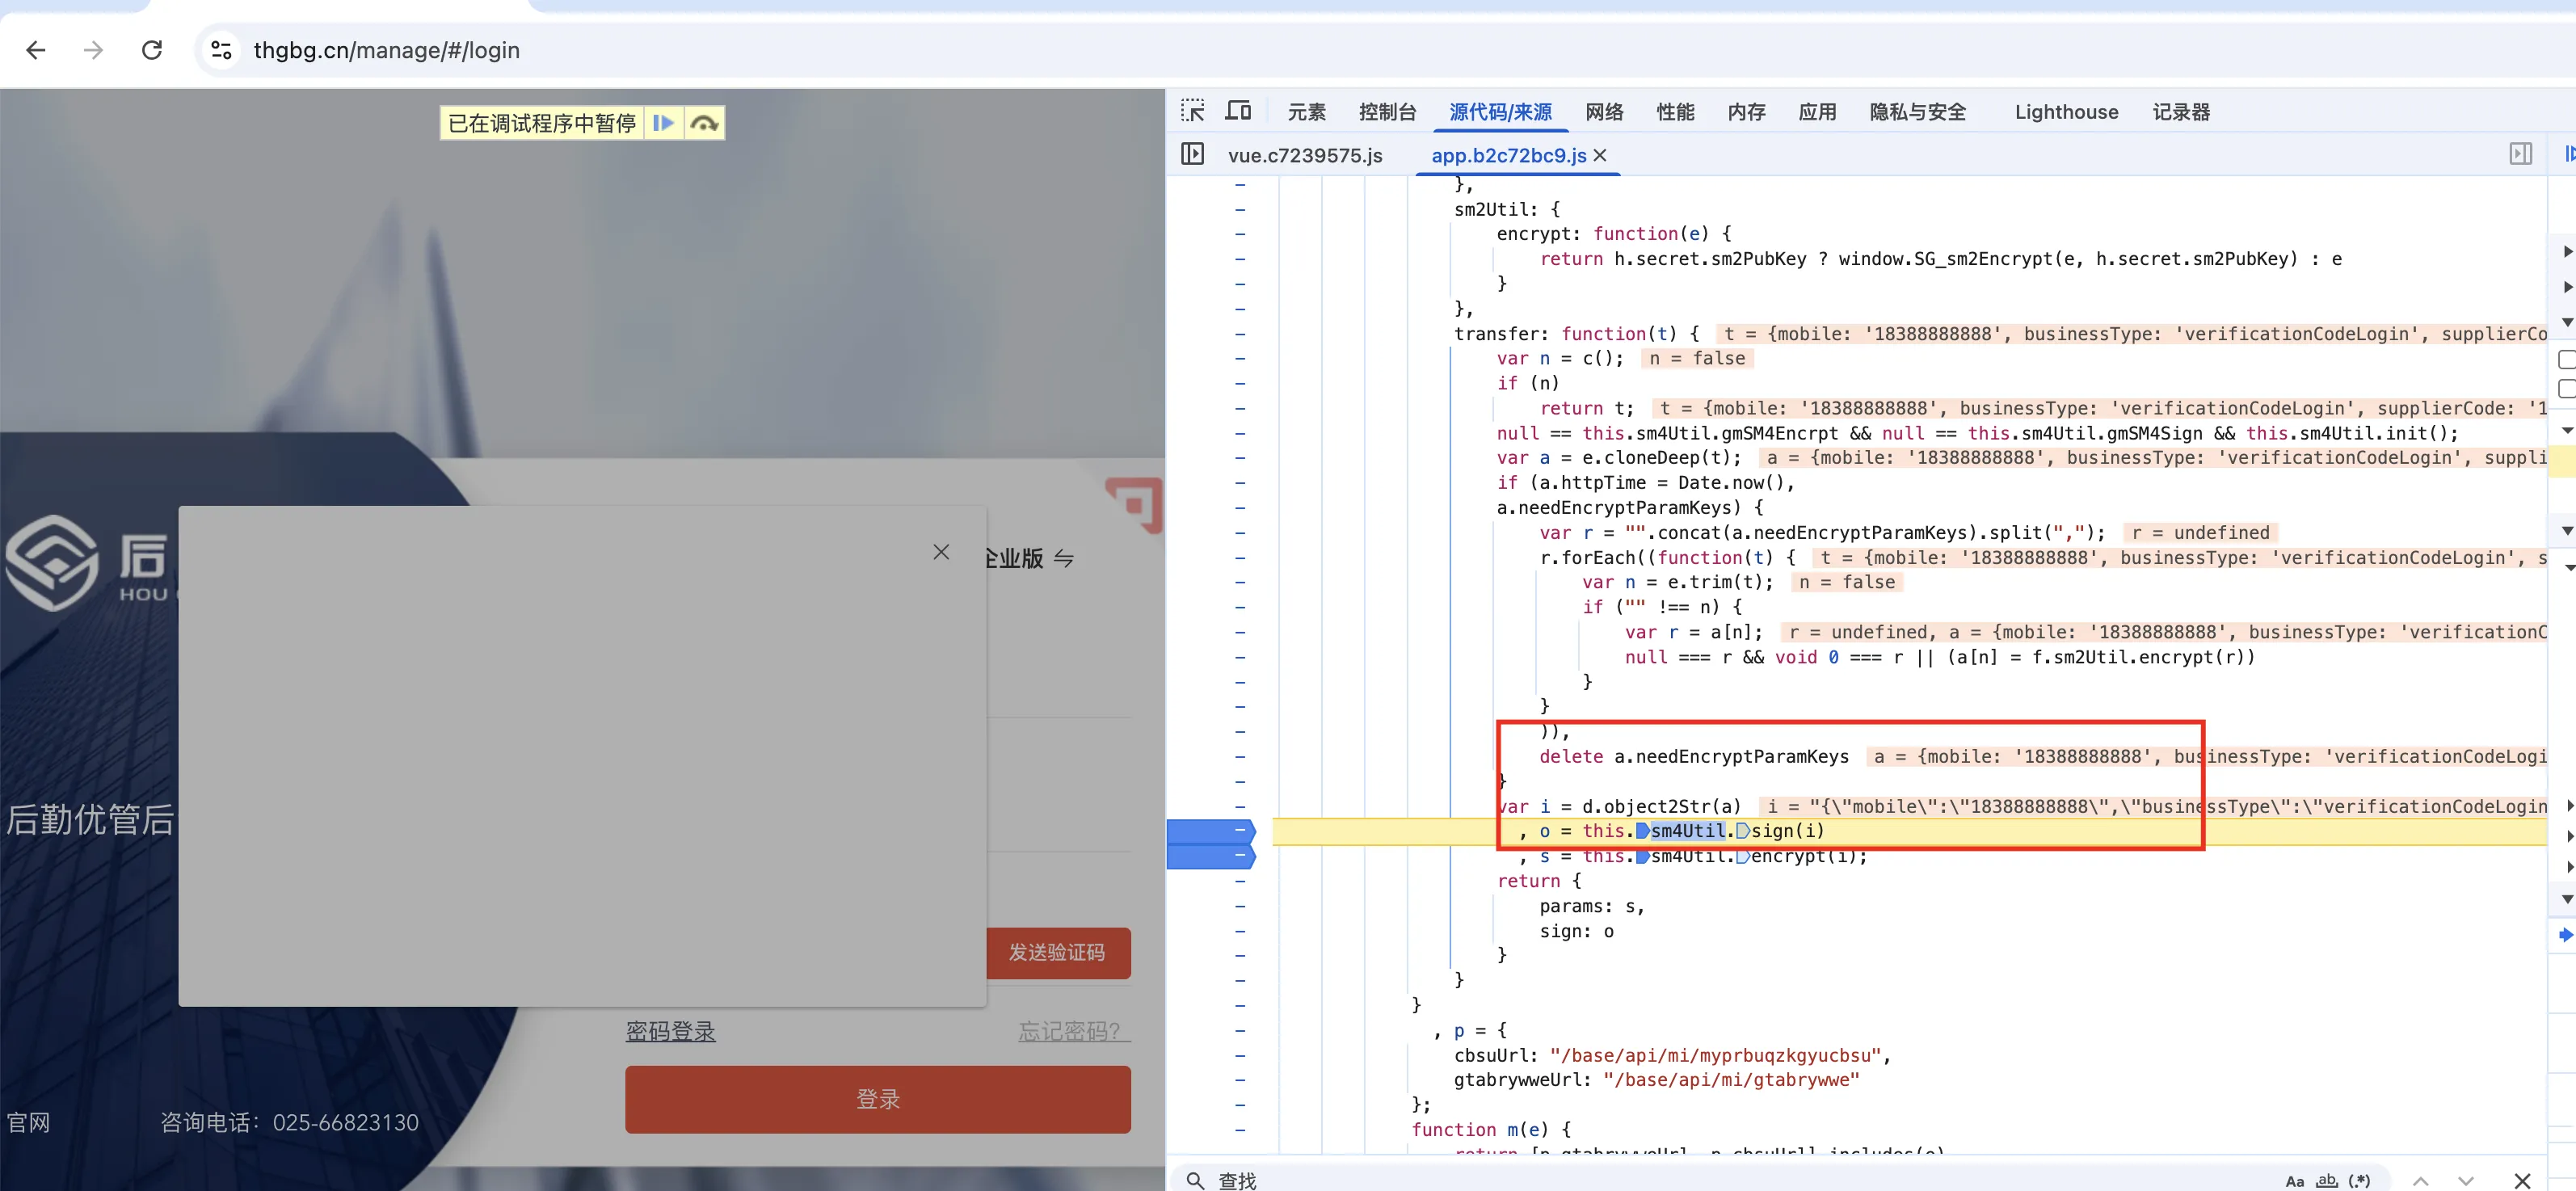
确定好加解密函数后,就可以进行jsrpc了
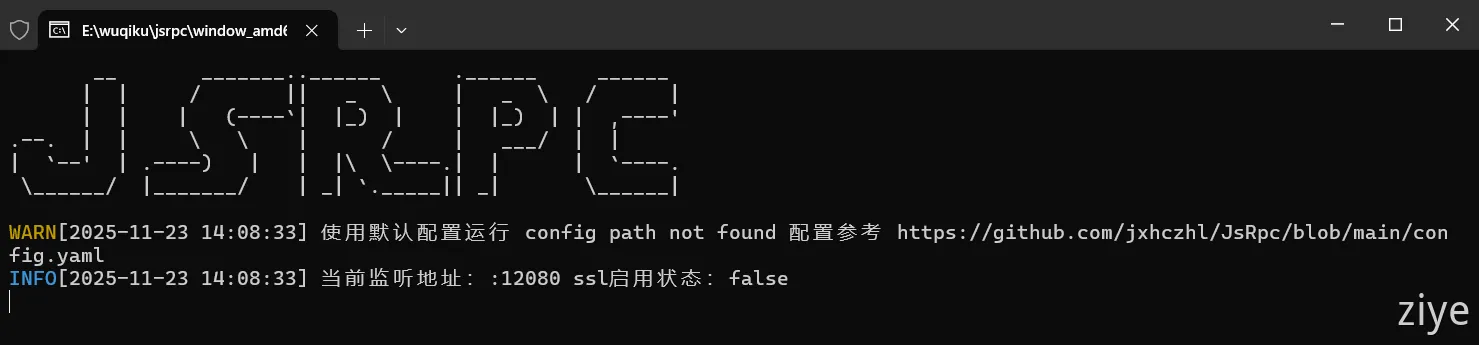
JsRpc
项目地址
https://github.com/jxhczhl/JsRpc
JSRPC 利用 RPC 的核心思想,通过 webSocket 协议将浏览器中的 JS 函数(如加密方法)暴露为远程接口,使外部程序无需逆向分析即可直接调用。其本质是让浏览器执行原生代码,通过接口 “透传” 参数与结果,既绕过了反调试机制,又避免了重写加密逻辑,可以大大降低逆向的工作量
使用方法-贵金属商城
启动jsrpc
jsrpc注入浏览器
- 放开断点
- 控制台cv代码并执行,代码不用变
var rpc_client_id, Hlclient = function (wsURL) {
  this.wsURL = wsURL;
  this.handlers = {
    _execjs: function (resolve, param) {
      var res = eval(param)
      if (!res) {
        resolve("没有返回值")
      } else {
        resolve(res)
      }
    }
  };
  this.socket = undefined;
  if (!wsURL) {
    throw new Error('wsURL can not be empty!!')
  }
  this.connect()
}
Hlclient.prototype.connect = function () {
  if (this.wsURL.indexOf("clientId=") === -1 && rpc_client_id) {
    this.wsURL += "&clientId=" + rpc_client_id
  }
  console.log('begin of connect to wsURL: ' + this.wsURL);
  var _this = this;
  try {
    this.socket = new WebSocket(this.wsURL);
    this.socket.onmessage = function (e) {
      _this.handlerRequest(e.data)
    }
  } catch (e) {
    console.log("connection failed,reconnect after 10s");
    setTimeout(function () {
      _this.connect()
    }, 10000)
  }
  this.socket.onclose = function () {
    console.log('rpc已关闭');
    setTimeout(function () {
      _this.connect()
    }, 10000)
  }
  this.socket.addEventListener('open', (event) => {
    console.log("rpc连接成功");
  });
  this.socket.addEventListener('error', (event) => {
    console.error('rpc连接出错,请检查是否打开服务端:', event.error);
  })
};
Hlclient.prototype.send = function (msg) {
  this.socket.send(msg)
}
Hlclient.prototype.regAction = function (func_name, func) {
  if (typeof func_name !== 'string') {
    throw new Error("an func_name must be string");
  }
  if (typeof func !== 'function') {
    throw new Error("must be function");
  }
  console.log("register func_name: " + func_name);
  this.handlers[func_name] = func;
  return true
}
Hlclient.prototype.handlerRequest = function (requestJson) {
  var _this = this;
  try {
    var result = JSON.parse(requestJson)
  } catch (error) {
    console.log("请求信息解析错误", requestJson);
    return
  }
  if (result["registerId"]) {
    rpc_client_id = result['registerId']
    return
  }
  if (!result['action'] || !result["message_id"]) {
    console.warn('没有方法或者消息id,不处理');
    return
  }
  var action = result["action"], message_id = result["message_id"]
  var theHandler = this.handlers[action];
  if (!theHandler) {
    this.sendResult(action, message_id, 'action没找到');
    return
  }
  try {
    if (!result["param"]) {
      theHandler(function (response) {
        _this.sendResult(action, message_id, response);
      })
      return
    }
    var param = result["param"]
    try {
      param = JSON.parse(param)
    } catch (e) {
    }
    theHandler(function (response) {
      _this.sendResult(action, message_id, response);
    }, param)
  } catch (e) {
    console.log("error: " + e);
    _this.sendResult(action, message_id, e);
  }
}
Hlclient.prototype.sendResult = function (action, message_id, e) {
  if (typeof e === 'object' && e !== null) {
    try {
      e = JSON.stringify(e)
    } catch (v) {
      console.log(v)//不是json无需操作
    }
  }
  this.send(JSON.stringify({"action": action, "message_id": message_id, "response_data": e}));
}
var demo = new Hlclient("ws://127.0.0.1:12080/ws?group=zzz");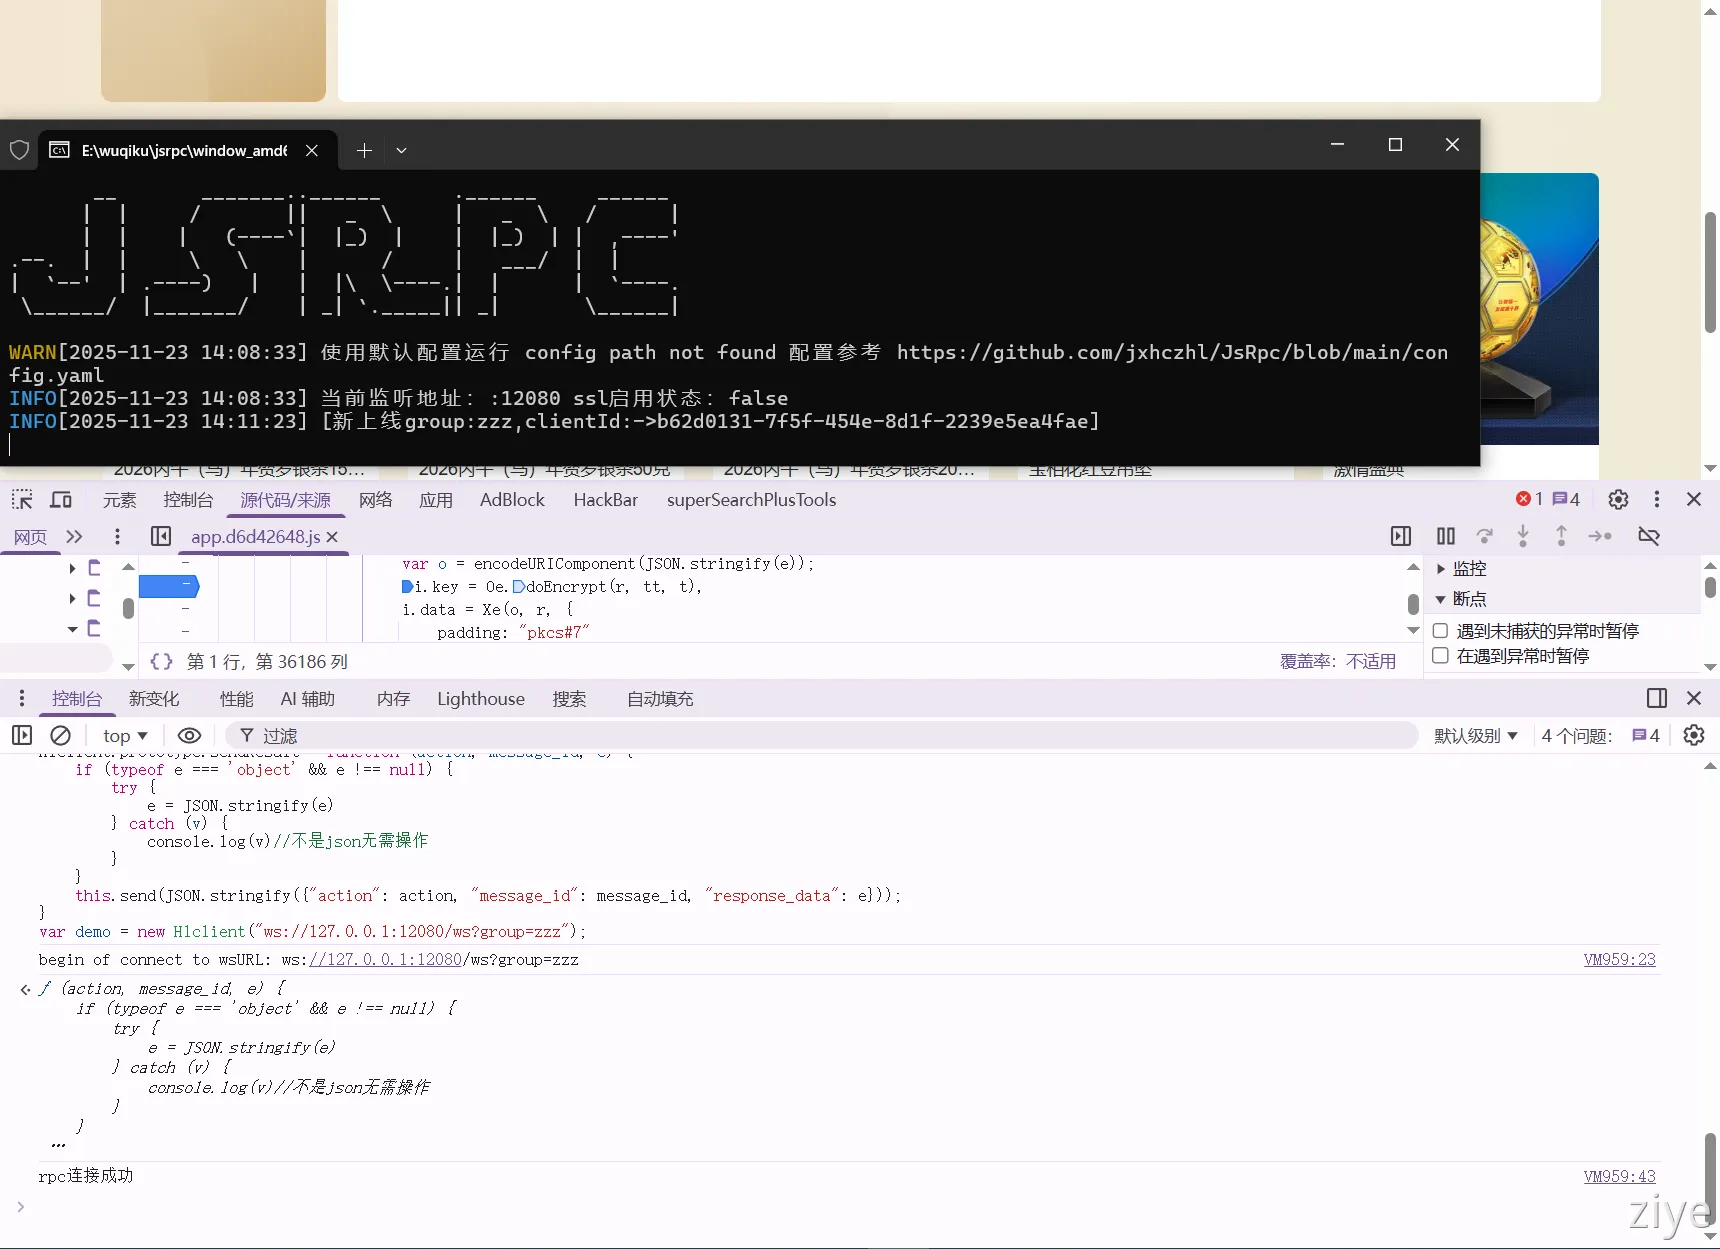
加密函数的验证

由于控制台在不断点的情况下,加密函数不存在,无法全局使用,Oe.doEncrypt是局部函数,我这边建议把他设置为全局函数,即在断点的情况下执行window.enc1=Oe.doEncrypt
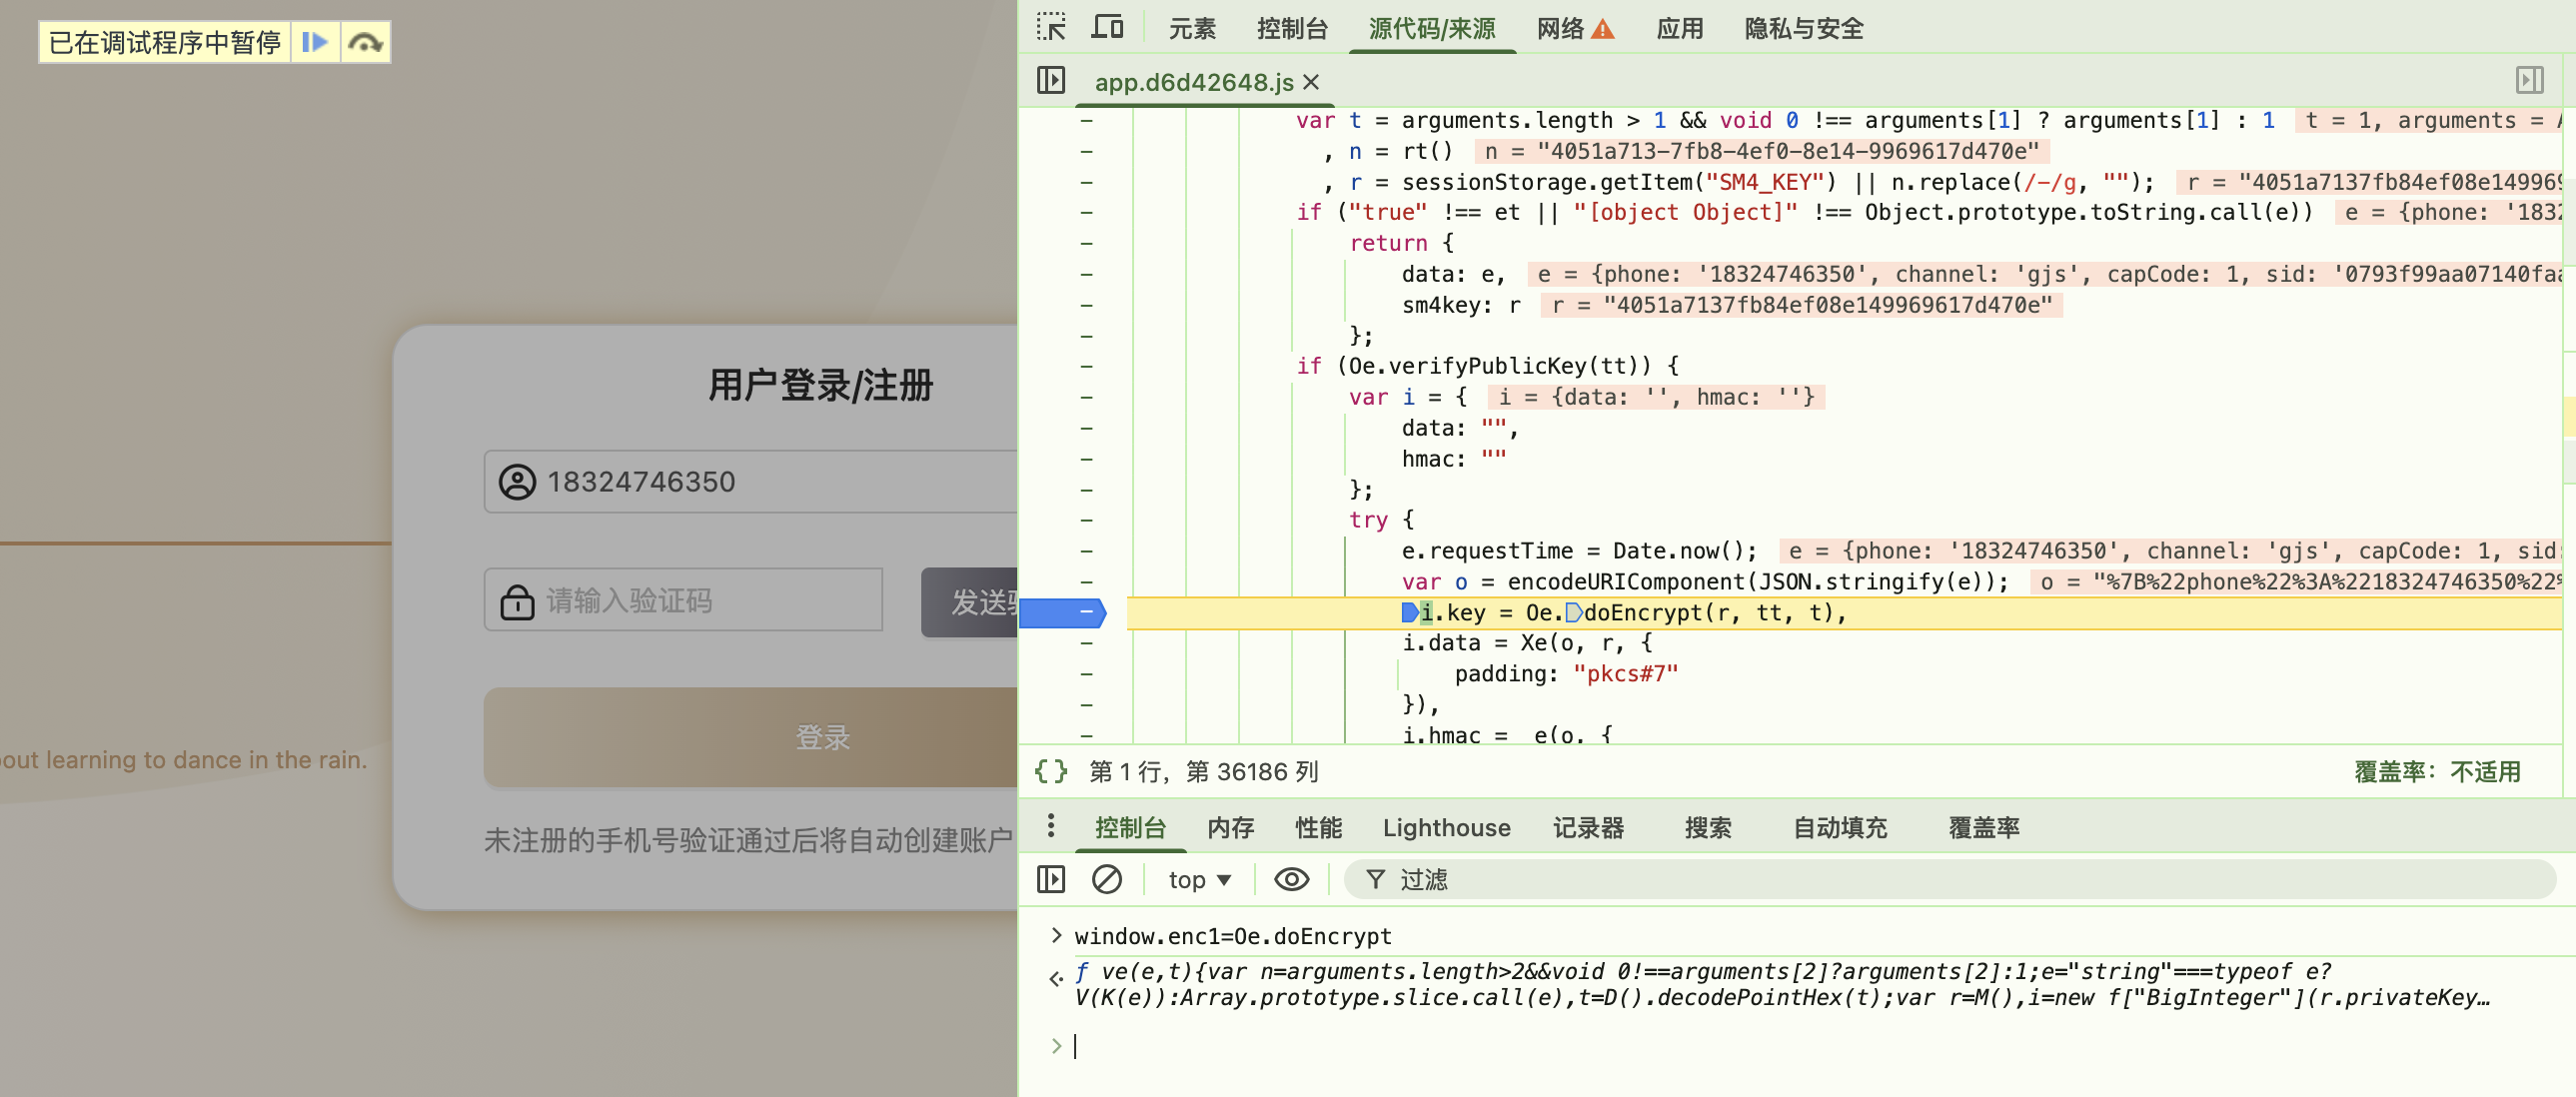
enc1是我取的全局函数名,即便不断点也可以调用,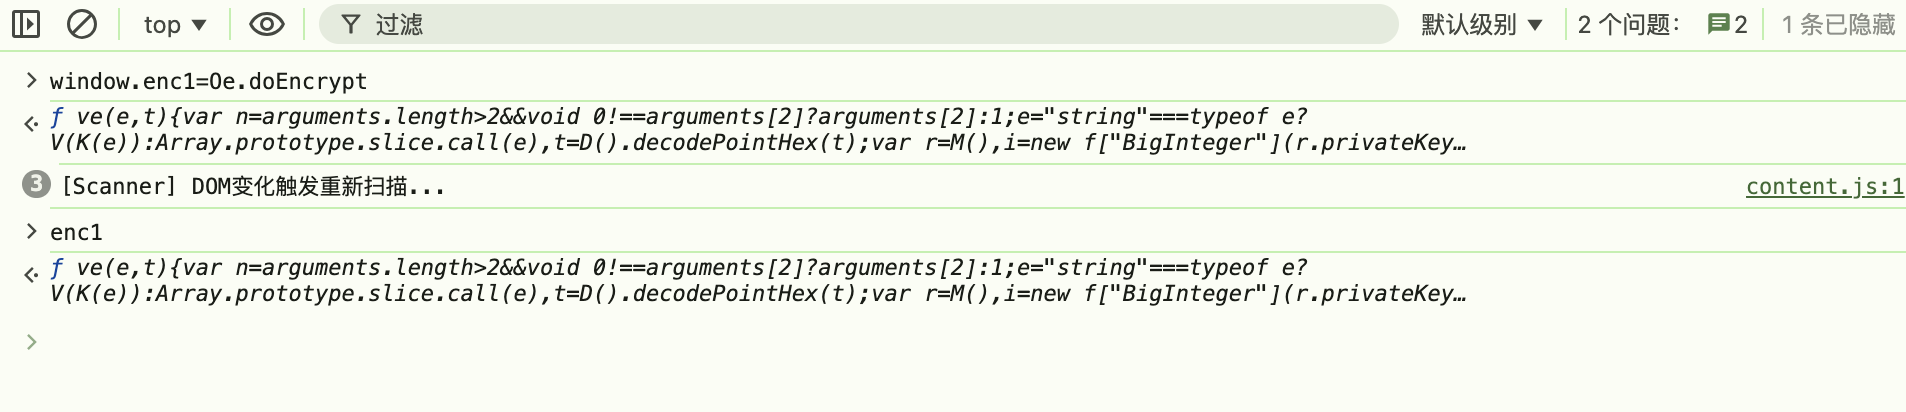
加密函数的分析
经典sm4传输数据,sm4密钥通过sm2加密,一次一密
由于没有对sm4密钥的签名校验,这边可以固定sm4密钥,即
r = 2802575829264a2e8a92fff5d8856936
tt是sm2公钥,常量
tt = 047695c4bf78806f2790c14176d8cfb94c6cf678a11c5aa4fcc3cf1dea8110e4e0e9f9419e167921f4d50068a5454d1437bcc9d310f5c1562a2567541d511b86f4
t = 1编写远程调用的函数
如何编写远程调用函数
- 确定加密函数
- 确定输入,输出内容
- 套用模版
demo.regAction("远程调用函数的函数名字", function (resolve,param) {
//由于o是需要传进来的内容,使用param["o"]接受参数
    res=加密函数(加密函数所需的参数);
    resolve(res);//res为输出的密文
})编写远程调用函数
涉及到的临时加密函数有Oe.doEncrypt、Xe、_e三个,为了全局调用这里赋值给自定义的全局变量,即
window.enc1=Oe.doEncrypt
window.data1=Xe
window.hmac1=_e
demo.regAction("getkey1", function (resolve,param) {
  r = "2802575829264a2e8a92fff5d8856936"
  tt = "047695c4bf78806f2790c14176d8cfb94c6cf678a11c5aa4fcc3cf1dea8110e4e0e9f9419e167921f4d50068a5454d1437bcc9d310f5c1562a2567541d511b86f4"
  t = "1"
  res= enc1(r, tt, t)
  resolve(res);
})
demo.regAction("getdata1", function (resolve,param) {
  //由于o是需要传进来的内容,使用param["o"]接受参数
  res=data1(JSON.stringify(param["o"]), '2802575829264a2e8a92fff5d8856936', {padding: "pkcs#7"})
  resolve(res);
})
demo.regAction("gethmac1", function (resolve,param) {
  //这里还是param参数 param里面的key 是先这里写,但到时候传接口就必须对应的上
  r = "2802575829264a2e8a92fff5d8856936"
  res=hmac1(JSON.stringify(param["o"]), {key: r})
  resolve(res);
})远程调用的函数可用性验证
POST /go HTTP/1.1
Host: 127.0.0.1:12080
User-Agent: Mozilla/5.0 (Windows NT 10.0; Win64; x64) AppleWebKit/537.36 (KHTML, like Gecko) Chrome/83.0.4103.116 Safari/537.36
Content-Type: application/x-www-form-urlencoded
Content-Length: 24

action=getkey1&group=zzz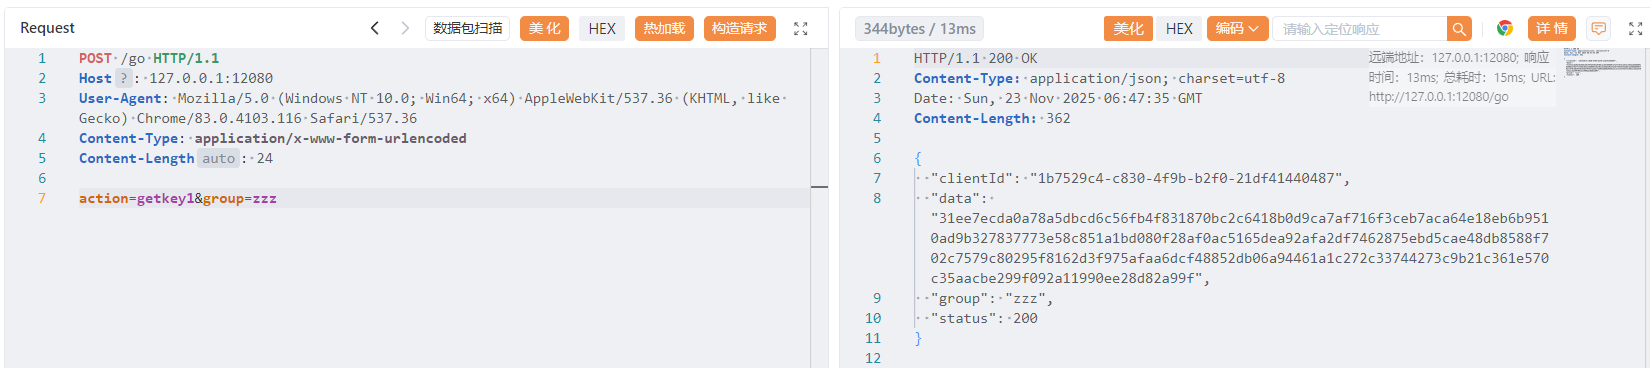
响应包中的data就是我们函数输出的密文,和浏览器端的密文保持一致就没问题
POST /go HTTP/1.1
Host: 127.0.0.1:12080
User-Agent: Mozilla/5.0 (Windows NT 10.0; Win64; x64) AppleWebKit/537.36 (KHTML, like Gecko) Chrome/83.0.4103.116 Safari/537.36
Content-Type: application/x-www-form-urlencoded
Content-Length: 24
action=gethmac1&group=zzz¶m={"o":{"requestTime":1763879406185}}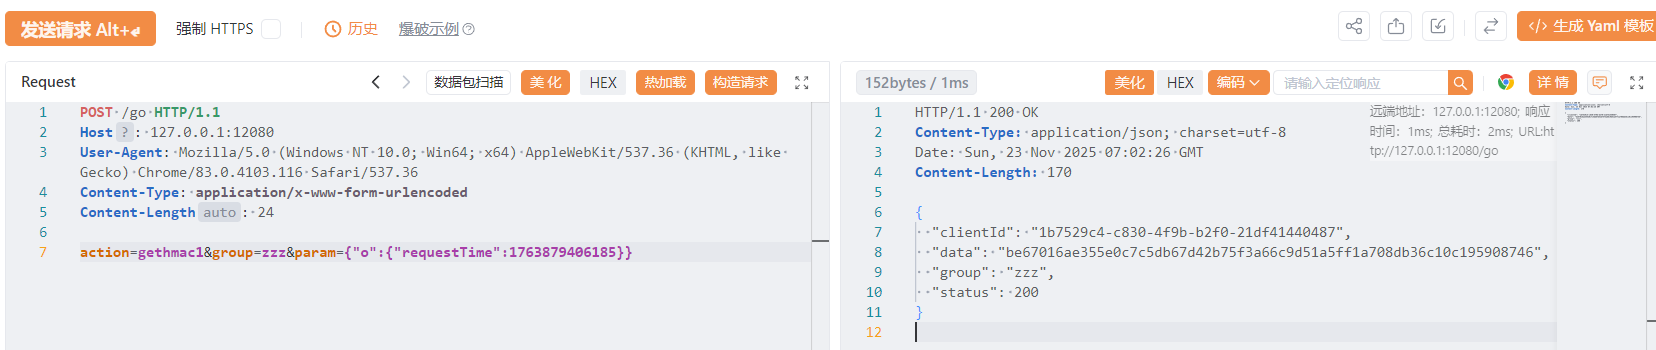
此时就可以用yakit热加载或者mitmdump进行加解密了
mitmdump
项目地址
https://github.com/mocobk/mitmdump
uv pip install <font style="color:rgb(31, 35, 40);background-color:rgba(129, 139, 152, 0.12);">mitmdump</font>
源码(php7)
<?php
// ================= 接口逻辑(POST,整体 Base64) =================
if ($_SERVER['REQUEST_METHOD'] === 'POST') {
    header('Content-Type: text/plain; charset=utf-8');

    $correctUser = 'admin';
    $correctPass = '123456';

    // 读取原始 body(只有一段 base64)
    $raw = file_get_contents('php://input');

    // Base64 解码
    $json = base64_decode($raw, true);
    if ($json === false) {
        echo base64_encode(json_encode([
            'success' => false,
            'code' => 400,
            'msg' => '请求 Base64 解码失败'
        ], JSON_UNESCAPED_UNICODE));
        exit;
    }

    // JSON 解码
    $data = json_decode($json, true);
    if (!is_array($data)) {
        echo base64_encode(json_encode([
            'success' => false,
            'code' => 400,
            'msg' => 'JSON 解析失败'
        ], JSON_UNESCAPED_UNICODE));
        exit;
    }

    $username = $data['username'] ?? '';
    $password = $data['password'] ?? '';

    if ($username === $correctUser && $password === $correctPass) {
        $resp = [
            'success' => true,
            'code' => 0,
            'msg' => '登录成功',
            'user' => $username
        ];
    } else {
        $resp = [
            'success' => false,
            'code' => 401,
            'msg' => '用户名或密码错误'
        ];
    }

    // 整体 Base64 返回
    echo base64_encode(json_encode($resp, JSON_UNESCAPED_UNICODE));
    exit;
}
?>

<!DOCTYPE html>
<html lang="zh-CN">
<head>
<meta charset="UTF-8">
<title>整体 Base64 登录</title>
<style>
body { font-family: Arial; background: #f5f5f5; }
.box {
    width: 320px;
    margin: 100px auto;
    padding: 20px;
    background: #fff;
    box-shadow: 0 0 10px rgba(0,0,0,.1);
}
input, button {
    width: 100%;
    padding: 8px;
    margin-top: 10px;
}
pre {
    background: #eee;
    padding: 10px;
    margin-top: 10px;
    white-space: pre-wrap;
}
</style>
</head>
<body>

<div class="box">
    <h3>整体 Base64 登录</h3>
    <input id="u" placeholder="用户名">
    <input id="p" type="password" placeholder="密码">
    <button onclick="login()">登录</button>
    <pre id="result"></pre>
</div>

<script>
function login() {
    const obj = {
        username: document.getElementById('u').value,
        password: document.getElementById('p').value
    };

    const json = JSON.stringify(obj);
    const b64 = btoa(json);

    fetch('', {
        method: 'POST',
        headers: {
            'Content-Type': 'text/plain'
        },
        body: b64
    })
    .then(r => r.text())
    .then(respB64 => {
        const respJson = atob(respB64);
        document.getElementById('result').innerText =
            '请求 Base64:\n' + b64 +
            '\n\n请求解码:\n' + json +
            '\n\n响应 Base64:\n' + respB64 +
            '\n\n响应解码:\n' + respJson;
    });
}
</script>

</body>
</html>分析

脚本编写
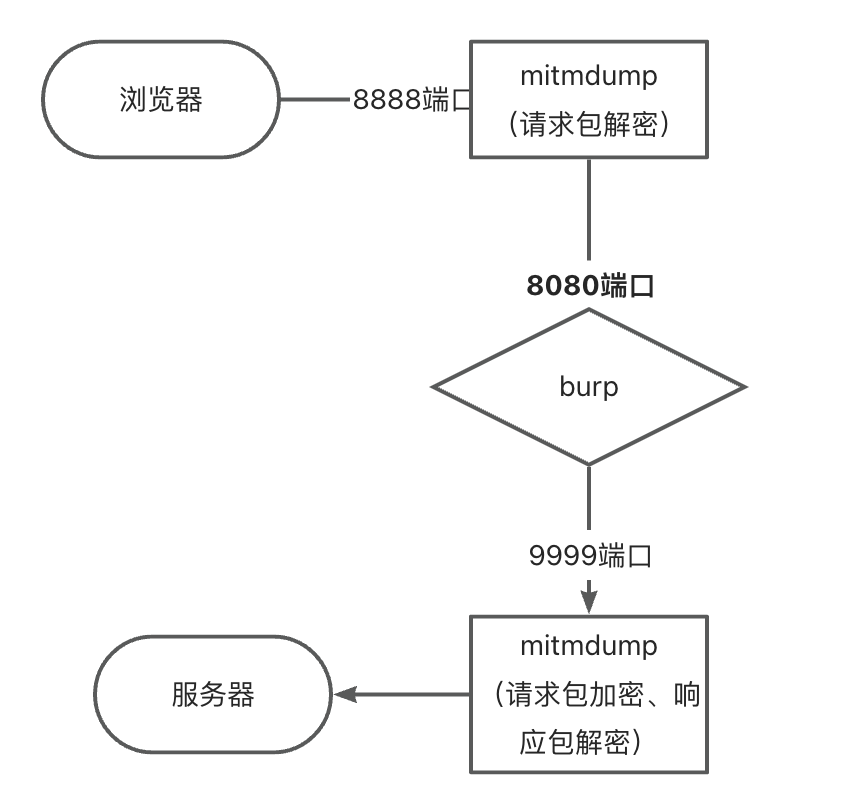
浏览器到bp端的(请求解密)
from mitmproxy import http
import base64

def request(flow: http.HTTPFlow) -> None:
    """
    拦截请求,对 base64 编码的 body 进行解码
    浏览器 → mitmdump → Burp
    """
    if flow.request.method == "POST" and "/test/" in flow.request.path:
        try:
            original_body = flow.request.content

            if original_body :
                decoded_body = base64.b64decode(original_body)

                # 替换请求体
                flow.request.content = decoded_body
                flow.request.headers["Content-Length"] = str(len(decoded_body))
                print(f"[请求] 原始 base64: {original_body.decode()}")
                print(f"[请求] 解码后: {decoded_body.decode()}")

        except Exception as e:
print(f"[!] 请求解码失败: {e}")mitmdump.exe -s 1.py --mode upstream:http://127.0.0.1:8080 -p 8888
服务器到bp的(bp明文加密以及响应解密)
from mitmproxy import http
import base64

def request(flow: http.HTTPFlow) -> None:
    """
    拦截请求,对 body 进行编码
    burp → mitmdump → 服务器
    """
    if flow.request.method == "POST" and "/test/" in flow.request.path:
        try:
            original_body = flow.request.content

            if original_body :
                encoded_body = base64.b64encode(original_body)

                # 替换请求体
                flow.request.content = encoded_body
                flow.request.headers["Content-Length"] = str(len(encoded_body))
                print(f"[请求] 原始: {original_body.decode()}")
                print(f"[请求] 编码后: {encoded_body.decode()}")

        except Exception as e:
            print(f"[!] 请求编码失败: {e}")

def response(flow: http.HTTPFlow) -> None:
    """
    拦截响应,对 body 进行解码
    服务器 → mitmdump → burp
    """
    try:
        original_body = flow.response.content

        # 检查 Content-Type 是否为 text/plain(根据你的响应头)
        content_type = flow.response.headers.get("Content-Type", "")

        if original_body and "text/plain" in content_type :
            # 响应体设置为utf-8
            original_body = original_body.decode('utf-8')
            decoded_body = base64.b64decode(original_body)
            # 替换响应体
            flow.response.content = decoded_body
            flow.response.headers["Content-Length"] = str(len(decoded_body))
            print(f"[响应] 原始 base64: {original_body}")
            print(f"[响应] 解码后: {decoded_body}")

    except Exception as e:
print(f"[!] 响应解码失败: {e}")mitmdump.exe -s test2.py -p 9999
bp设置
bp监听0.0.0.0:8080
bp出口走127.0.0.1:9999
实现bp全流程明文通信
yakit-热加载
使用案例-贵金属
jsrpcReq = func(a) {
group = "zzz"
action1 = "getkey1"
action2 = "getdata1"
action3 = "gethmac1"
param1 = "{\"o\":" + a + "}"
rsp, rep = poc.Post(
"http://127.0.0.1:12080/go",
poc.replaceBody(
"group=" + group + "&action=" + action2 + "¶m=" + param1,
false,
),
poc.appendHeader("Content-Type", "application/x-www-form-urlencoded"),
)~
rsp1, rep1 = poc.Post(
"http://127.0.0.1:12080/go",
poc.replaceBody(
"group=" + group + "&action=" + action3 + "¶m=" + param1,
false,
),
poc.appendHeader("Content-Type", "application/x-www-form-urlencoded"),
)~
rsp2, rep2 = poc.Post(
"http://127.0.0.1:12080/go",
poc.replaceBody(
"group=" + group + "&action=" + action1,
false,
),
poc.appendHeader("Content-Type", "application/x-www-form-urlencoded"),
)~
o = {
"data": json.loads(rsp.GetBody()).data,
"hmac": json.loads(rsp1.GetBody()).data,
"key": json.loads(rsp2.GetBody()).data
}
b = json.dumps(o)
return b
}
// beforeRequest 允许在每次发送数据包前对请求做昀后的处理
beforeRequest = func(https, originReq, req) {
body = poc.GetHTTPPacketBody(req)
// 如果请求体不为空且长度大于0,则进行处理
if body != nil && len(body) > 0 {
encryptedParam = jsrpcReq(string(body))
// 将结果添加到请求头中的"si"字段
req = poc.ReplaceBody(req, encryptedParam, false)
}
// 返回修改后的请求
return []byte(req)
}
afterRequest = func(https, originReq, req, originRsp, rsp) {
body = poc.GetHTTPPacketBody(rsp)
if body != nil && len(body) > 0 {
parsed = json.loads(string(body))
encData = parsed["data"]
key = codec.DecodeHex("2802575829264a2e8a92fff5d8856936")~
decData = codec.Sm4ECBDecryptWithPKCSPadding(key, codec.DecodeHex(encData)~, nil)~
parsed["data"] = string(decData)
newBody = []byte(json.dumps(parsed))
rsp = poc.ReplaceBody(rsp, newBody, false)
}
return []byte(rsp)
}
至于mitm模块的热加载需要改一下,懒得写了,感觉不如mitmdump方便
js加解密入门-微信内置浏览器/小程序
环境配置
微信4.0以上(暂时没找到开内置浏览器的方案,只有开小程序的)
- 微信下载地址https://github.com/cscnk52/wechat-windows-versions/releases/download/v4.1.5.15/weixin_4.1.5.15.exe
- 安装好微信
- 配置fnm环境
https://github.com/Schniz/fnm/releases/download/v1.38.1/fnm-windows.zip
下载下来,并配置系统环境变量path

$env:FNM_NODE_DIST_MIRROR = "https://mirrors.tencent.com/nodejs-release"
$env:NVM_NODEJS_ORG_MIRROR = "https://mirrors.tencent.com/nodejs-release"
fnm install 24
Set-ExecutionPolicy Unrestricted -Scope CurrentUser
New-Item -Type File -Path $PROFILE -Force
notepad $PROFILE
输入下面这一行内容,并保存
fnm env --use-on-cd | Out-String | Invoke-Expression
重新开一个powershell- 下载并运行项目
下载https://github.com/evi0s/WMPFDebugger/archive/refs/heads/main.zip
进入项目

fnm use 24
npm install -g yarn
yarn install
npx ts-node src/index.ts
出现以下两行且没有退出就可以了
[server] debug server running on ws://localhost:9421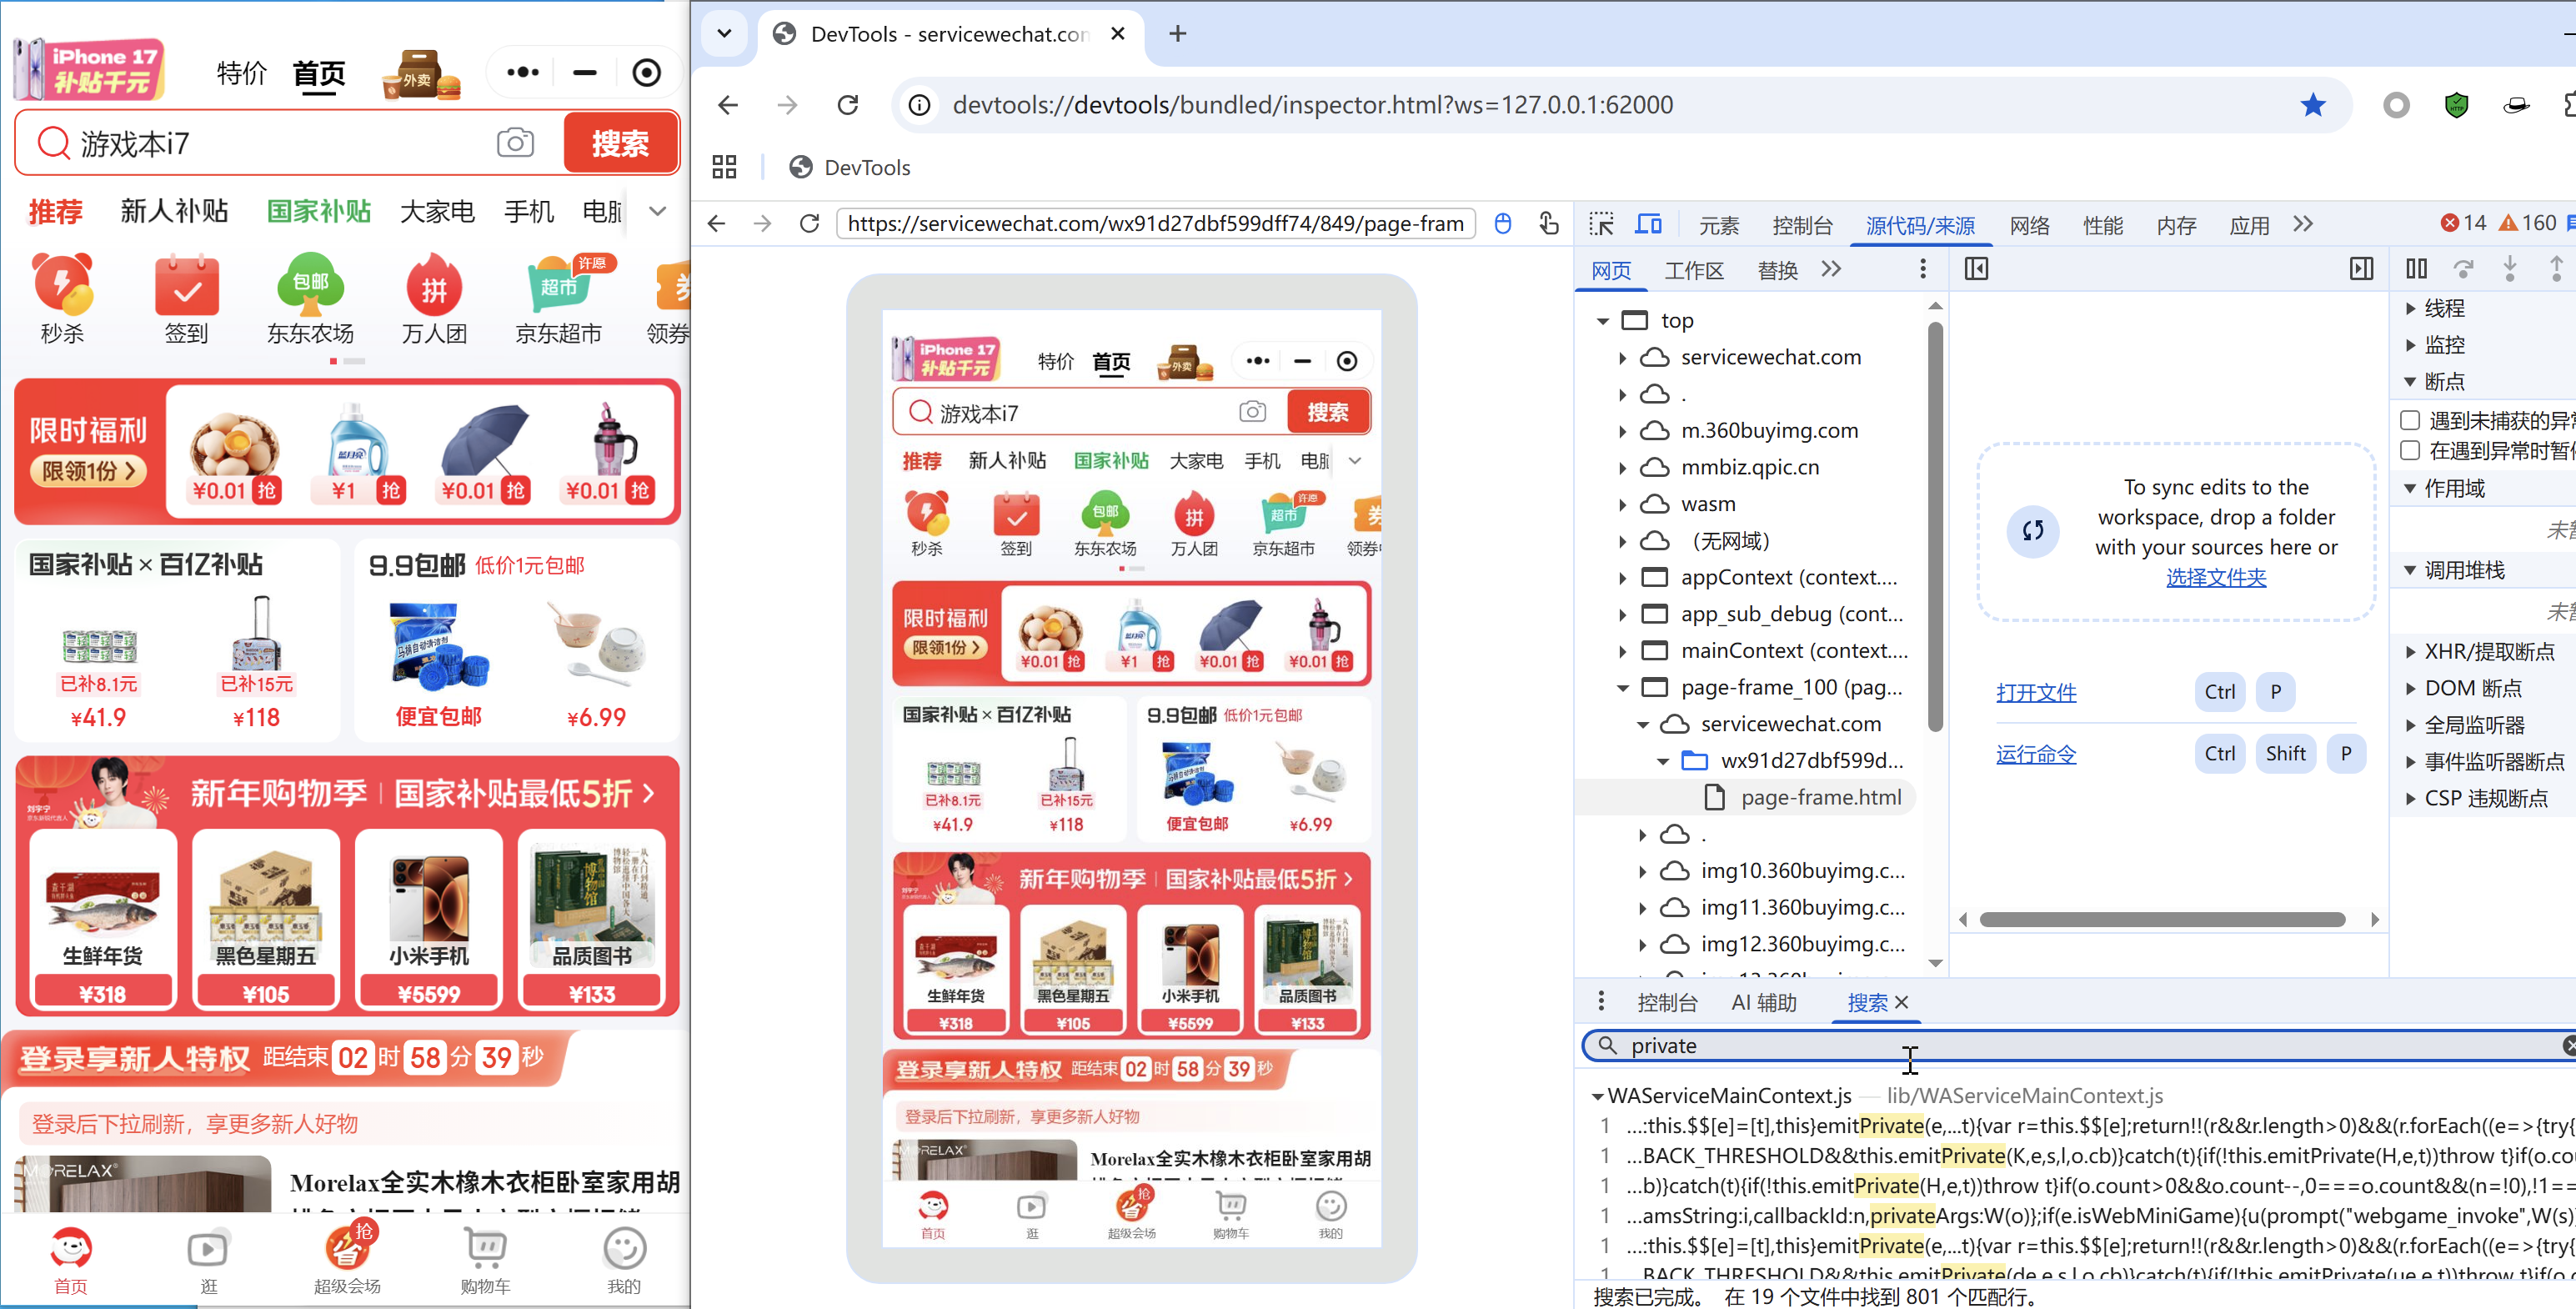
[server] proxy server running on ws://localhost:62000- 打开小程序
- 打开浏览器访问
devtools://devtools/bundled/inspector.html?ws=127.0.0.1:62000即可
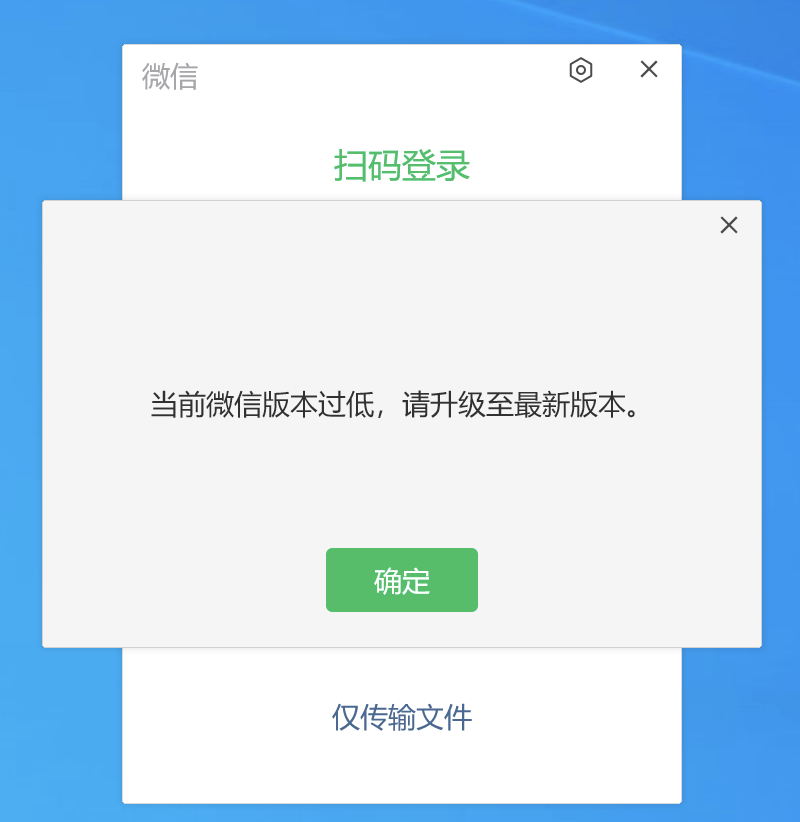
报错
第四步出现以下两行但是退出了
- 安装文章中用到的微信版本
- 如果已经是文章中的微信版本还是退出了,打开
C:\Users\Administrator\AppData\Roaming\Tencent\xwechat\XPlugin\Plugins\RadiumWMPF目录删除名为18151目录,重试

出现这个原因主要是WMPFDebugger项目,展示没有更新到18151版本,只更新到了18055
微信4.0以下
准备
一键开f12项目
因为采用https://github.com/JaveleyQAQ/WeChatOpenDevTools-Python这个项目,WechatOpenDevTools-Python (1).zip
低版本微信
该项目只支持3.9.10.19版本我建议采用3.9.10.19,该版本微
https://github.com/tom-snow/wechat-windows-versions/releases/tag/v3.9.10.19
CE修改器
微信小号(最好没啥聊天记录的,记录多会导致报错)
低版本微信登陆流程
启动微信和ce

ce修改内存版本
修改前
微信版本 3.9.8.25 → 十六进制 0x63090819 → 只要63090819
微信版本 3.9.10.19 → 十六进制 0x63090A13→只要 63090A13
vx登錄.exe.zip<-以管理员身份双击即可,扫码两次登陆目前只适配3.9.10.19和3.9.8.25
0xf2593210将其识别为无效或特殊版本,从而绕过正常的版本校验逻辑,具体操作如下
需要注意的是扫码记得扫两次,第一次失败是正常的,记得点x,而不是确定
低版本vx开f12流程
- 进入
WechatOpenDevTools-Python所在文件夹 .\WechatOpenDevTools-Python.exe -all,这时会启动一个vx扫码登陆页- 通过上面的低版本微信登陆流程,即可进入微信
- 打开
内置浏览器或者小程序f12即可打开
报错-无法全局搜索
https://mp.weixin.qq.com/s/vA35tVd0Ag2J-p0xjY5ZyA
或者在appcontext/usr目录下的app-service.js中进行搜索
微信jsrpc
function createRpcClient(wsURL) {
  let rpc_client_id = wx.getStorageSync('rpc_client_id');
  let socket = null;
  const handlers = {};

  if (rpc_client_id && wsURL.indexOf("clientId=") === -1) {
    wsURL += "&clientId=" + rpc_client_id;
  }

  function connect() {
    console.log("开始连接:", wsURL);
    socket = wx.connectSocket({
      url: wsURL,
      success() { console.log("连接成功"); },
      fail(err) {
        console.error("连接失败:", err);
        reconnect();
      }
    });

    wx.onSocketOpen(() => console.log("Socket 打开"));
    wx.onSocketError(err => console.error("Socket 错误:", err));
    wx.onSocketClose(() => {
      console.log("Socket 关闭");
      reconnect();
    });

    wx.onSocketMessage(res => handleRequest(res.data));
  }

  function reconnect() {
    console.log("10秒后重连...");
    setTimeout(connect, 10000);
  }

  function send(msg) {
    if (socket && socket.readyState === 1) {
      wx.sendSocketMessage({
        data: msg,
        fail(err) {
          console.error("发送失败:", err);
        }
      });
    }
  }

  function sendResult(action, message_id, data) {
    if (typeof data === 'object') {
      try { data = JSON.stringify(data); } catch (e) {}
    }
    const response = JSON.stringify({
      action, message_id, response_data: data
    });
    send(response);
  }

  function handleRequest(raw) {
    try {
      const msg = JSON.parse(raw);

      if (msg.registerId) {
        rpc_client_id = msg.registerId;
        wx.setStorageSync('rpc_client_id', rpc_client_id);
        return;
      }

      const { action, message_id, param } = msg;
      if (!action || !message_id) return;

      const handler = handlers[action];
      let parsedParam = param;
      try { parsedParam = JSON.parse(param); } catch (e) {}

      if (!handler) {
        sendResult(action, message_id, "Handler not found");
        return;
      }

      handler(res => {
        sendResult(action, message_id, res);
      }, parsedParam);

    } catch (err) {
      console.error("解析消息失败:", err);
    }
  }

  function regAction(name, func) {
    handlers[name] = func;
  }

  // 默认注册 execjs 方法
  regAction("_execjs", (resolve, param) => {
    try {
      const result = eval(param);
      resolve(result || "没有返回值");
    } catch (e) {
      resolve("执行错误:" + e.message);
    }
  });

  connect();

  return {
    regAction,
    send
  };
}

var demo = createRpcClient("ws://127.0.0.1:12080/ws?group=zzz");
globalThis.wx = wx
globalThis.test = n

demo.regAction("getData", function (resolve,param) {
    //这里还是param参数 param里面的key 是先这里写,但到时候传接口就必须对应的上
    resolve(test.encrypt(param["t"], "347830335063457247244E55686E5266"));
})// 1. 微信小程序环境适配
const isWechatMiniProgram = typeof wx !== 'undefined' && wx.connectSocket;
// 全局变量直接挂载到globalThis
globalThis.rpc_client_id = wx && wx.getStorageSync ? wx.getStorageSync('rpc_client_id') || '' : '';
// 2. 构造函数 - 适配小程序API
globalThis.Hlclient = function (wsURL) {
if (!wsURL) thrownewError('wsURL can not be empty!!');
this.wsURL = wsURL;
this.handlers = {
_execjs: function (resolve, param) {
try {
let res = eval(param);
resolve(res || "没有返回值");
} catch (e) {
resolve(`执行错误: ${e.message}`);
}
}
};
this.socket = null;
this.isWechat = isWechatMiniProgram;
this.connected = false;
// 小程序环境初始化
if (this.isWechat) {
this.initWechatEvents();
}
this.connect();
};
// 3. 小程序专用事件初始化
globalThis.Hlclient.prototype.initWechatEvents = function() {
let _this = this;
// 监听WebSocket打开
wx.onSocketOpen(function(res) {
console.log('微信WebSocket连接已打开');
_this.connected = true;
// 发送注册消息
if (globalThis.rpc_client_id) {
_this.send(JSON.stringify({
action: 'register',
clientId: globalThis.rpc_client_id
}));
}
});
// 监听消息
wx.onSocketMessage(function(res) {
console.log('收到微信WebSocket消息:', res.data);
_this.handlerRequest(res.data);
});
// 监听错误
wx.onSocketError(function(err) {
console.error('微信WebSocket错误:', err);
_this.connected = false;
_this.reconnect();
});
// 监听关闭
wx.onSocketClose(function(res) {
console.log('微信WebSocket连接关闭');
_this.connected = false;
_this.reconnect();
});
};
// 4. 连接方法 - 小程序适配
globalThis.Hlclient.prototype.connect = function () {
let _this = this;
// 处理URL,添加clientId
let connectURL = this.wsURL;
if (connectURL.indexOf("clientId=") === -1 && globalThis.rpc_client_id) {
connectURL += (connectURL.indexOf('?') === -1 ? '?' : '&') +
"clientId=" + encodeURIComponent(globalThis.rpc_client_id);
}
console.log('开始连接到:', connectURL);
if (this.isWechat) {
// 微信小程序环境
if (this.socket) {
try {
wx.closeSocket();
} catch (e) {}
}
wx.connectSocket({
url: connectURL,
success: function() {
console.log('微信WebSocket连接请求已发送');
},
fail: function(err) {
console.error('微信WebSocket连接失败:', err);
setTimeout(function() {
_this.reconnect();
}, 3000);
}
});
this.socket = true; // 微信环境下,socket是一个状态标识
} else {
// 浏览器环境
try {
this.socket = new WebSocket(connectURL);
this.socket.onopen = function() {
console.log("WebSocket连接成功");
_this.connected = true;
};
this.socket.onmessage = function(e) {
_this.handlerRequest(e.data);
};
this.socket.onclose = function() {
console.log('WebSocket连接关闭');
_this.connected = false;
_this.reconnect();
};
this.socket.onerror = function(err) {
console.error('WebSocket错误:', err);
_this.connected = false;
};
} catch (e) {
console.error("连接失败:", e);
this.reconnect();
}
}
};
// 5. 重连方法
globalThis.Hlclient.prototype.reconnect = function () {
let _this = this;
console.log("5秒后尝试重连...");
setTimeout(function() {
_this.connect();
}, 5000);
};
// 6. 发送消息方法
globalThis.Hlclient.prototype.send = function (msg) {
if (this.isWechat) {
if (this.connected) {
wx.sendSocketMessage({
data: msg,
success: function() {
console.log('消息发送成功');
},
fail: function(err) {
console.error('消息发送失败:', err);
}
});
} else {
console.warn('连接未就绪,无法发送消息');
setTimeout(() => {
this.send(msg);
}, 1000);
}
} else {
if (this.socket && this.socket.readyState === WebSocket.OPEN) {
this.socket.send(msg);
}
}
};
// 7. 其他方法保持不变,但需要适配globalThis.rpc_client_id
globalThis.Hlclient.prototype.regAction = function (func_name, func) {
if (typeof func_name !== 'string') thrownewError("func_name must be string");
if (typeof func !== 'function') thrownewError("must be function");
console.log("注册函数:", func_name);
this.handlers[func_name] = func;
returntrue;
};
globalThis.Hlclient.prototype.handlerRequest = function (requestJson) {
let _this = this;
try {
console.log('处理请求:', requestJson);
let result = JSON.parse(requestJson);
// 处理注册ID
if (result["registerId"] || result["clientId"]) {
globalThis.rpc_client_id = result["registerId"] || result["clientId"];
console.log('收到clientId:', globalThis.rpc_client_id);
// 小程序环境保存到storage
if (this.isWechat && wx.setStorageSync) {
wx.setStorageSync('rpc_client_id', globalThis.rpc_client_id);
}
// 发送确认消息
_this.send(JSON.stringify({
action: 'register_ack',
clientId: globalThis.rpc_client_id,
status: 'success'
}));
return;
}
// 处理常规请求
if (!result['action'] || !result["message_id"]) {
console.warn('无效的请求:', result);
return;
}
let action = result["action"],
message_id = result["message_id"],
param = result["param"];
try {
if (typeof param === 'string') {
param = JSON.parse(param);
}
} catch (e) { }
let handler = this.handlers[action];
if (!handler) {
console.warn('未找到处理函数:', action);
returnthis.sendResult(action, message_id, 'Action not found');
}
// 执行处理函数
try {
handler(function (response) {
_this.sendResult(action, message_id, response);
}, param);
} catch (e) {
console.error('执行处理函数出错:', e);
_this.sendResult(action, message_id, `执行错误: ${e.message}`);
}
} catch (error) {
console.error("处理请求出错:", error);
if (result && result.message_id) {
this.sendResult(result.action || '', result.message_id, error.message);
}
}
};
globalThis.Hlclient.prototype.sendResult = function (action, message_id, data) {
let response;
if (typeof data === 'object') {
try {
response = JSON.stringify(data);
} catch (e) {
response = String(data);
}
} else {
response = String(data);
}
let resultMsg = JSON.stringify({
action: action,
message_id: message_id,
response_data: response
});
console.log('发送响应:', resultMsg);
this.send(resultMsg);
};
globalThis.socket = new Hlclient("ws://127.0.0.1:12080/ws?group=two");
globalThis.one = this.sm2Encode; // globalThis.【第一次无需变化】 = 要注入的方法名
globalThis.socket.regAction("two", function (resolve, param) {
try {
let result = globalThis.one(param['data']); // param 部分 填参数
resolve(result);
} catch (e) {
resolve(`调用失败: ${e.message}`);
}
});
// 第一次注册可以使用上述代码直接复制粘贴, 第二次往后需要单独注册
globalThis.two = this.tempKey; // globalThis.【需要变化】 = 要注入的方法名
globalThis.socket.regAction("one", function (resolve, param) { // 注册的第一个参数名称不能与之前相同.
try {
let result = globalThis.two(); // globalThis.two 与之前注册的一样, param 部分 填参数
resolve(result);
} catch (e) {
resolve(`调用失败: ${e.message}`);
}
});如果不能用就参考https://github.com/jxhczhl/JsRpc/issues/25
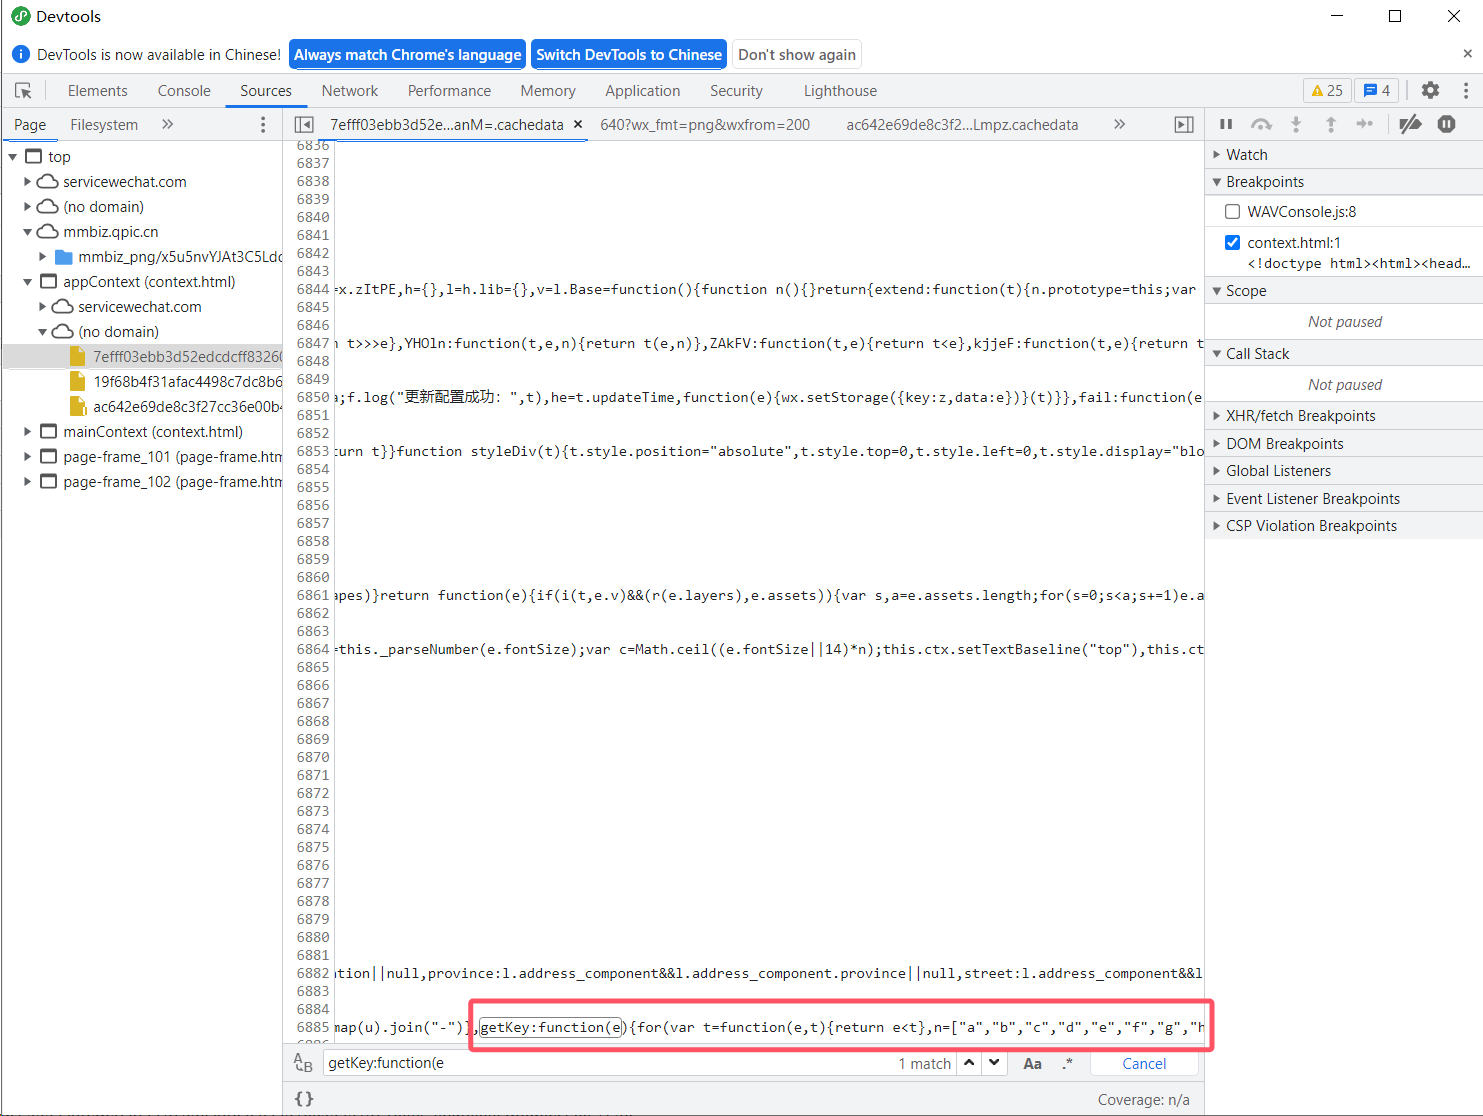
案例-南京银行鑫微厅
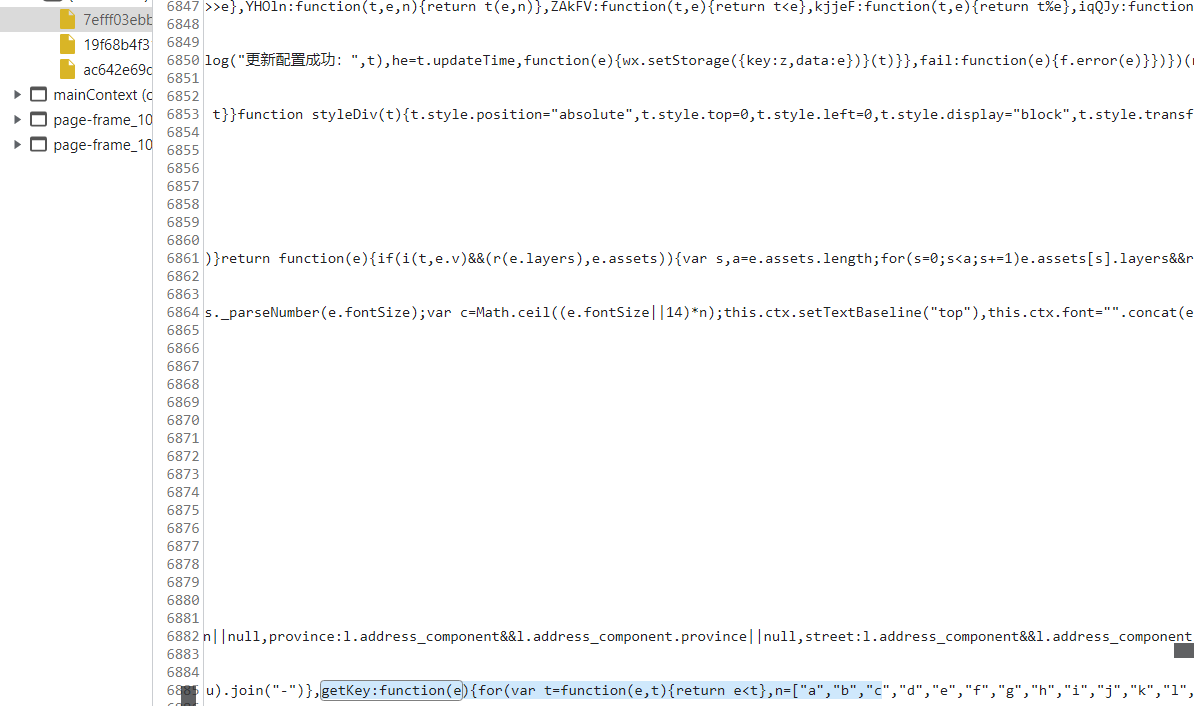
- 定位加密位置
方法一:ce改内存
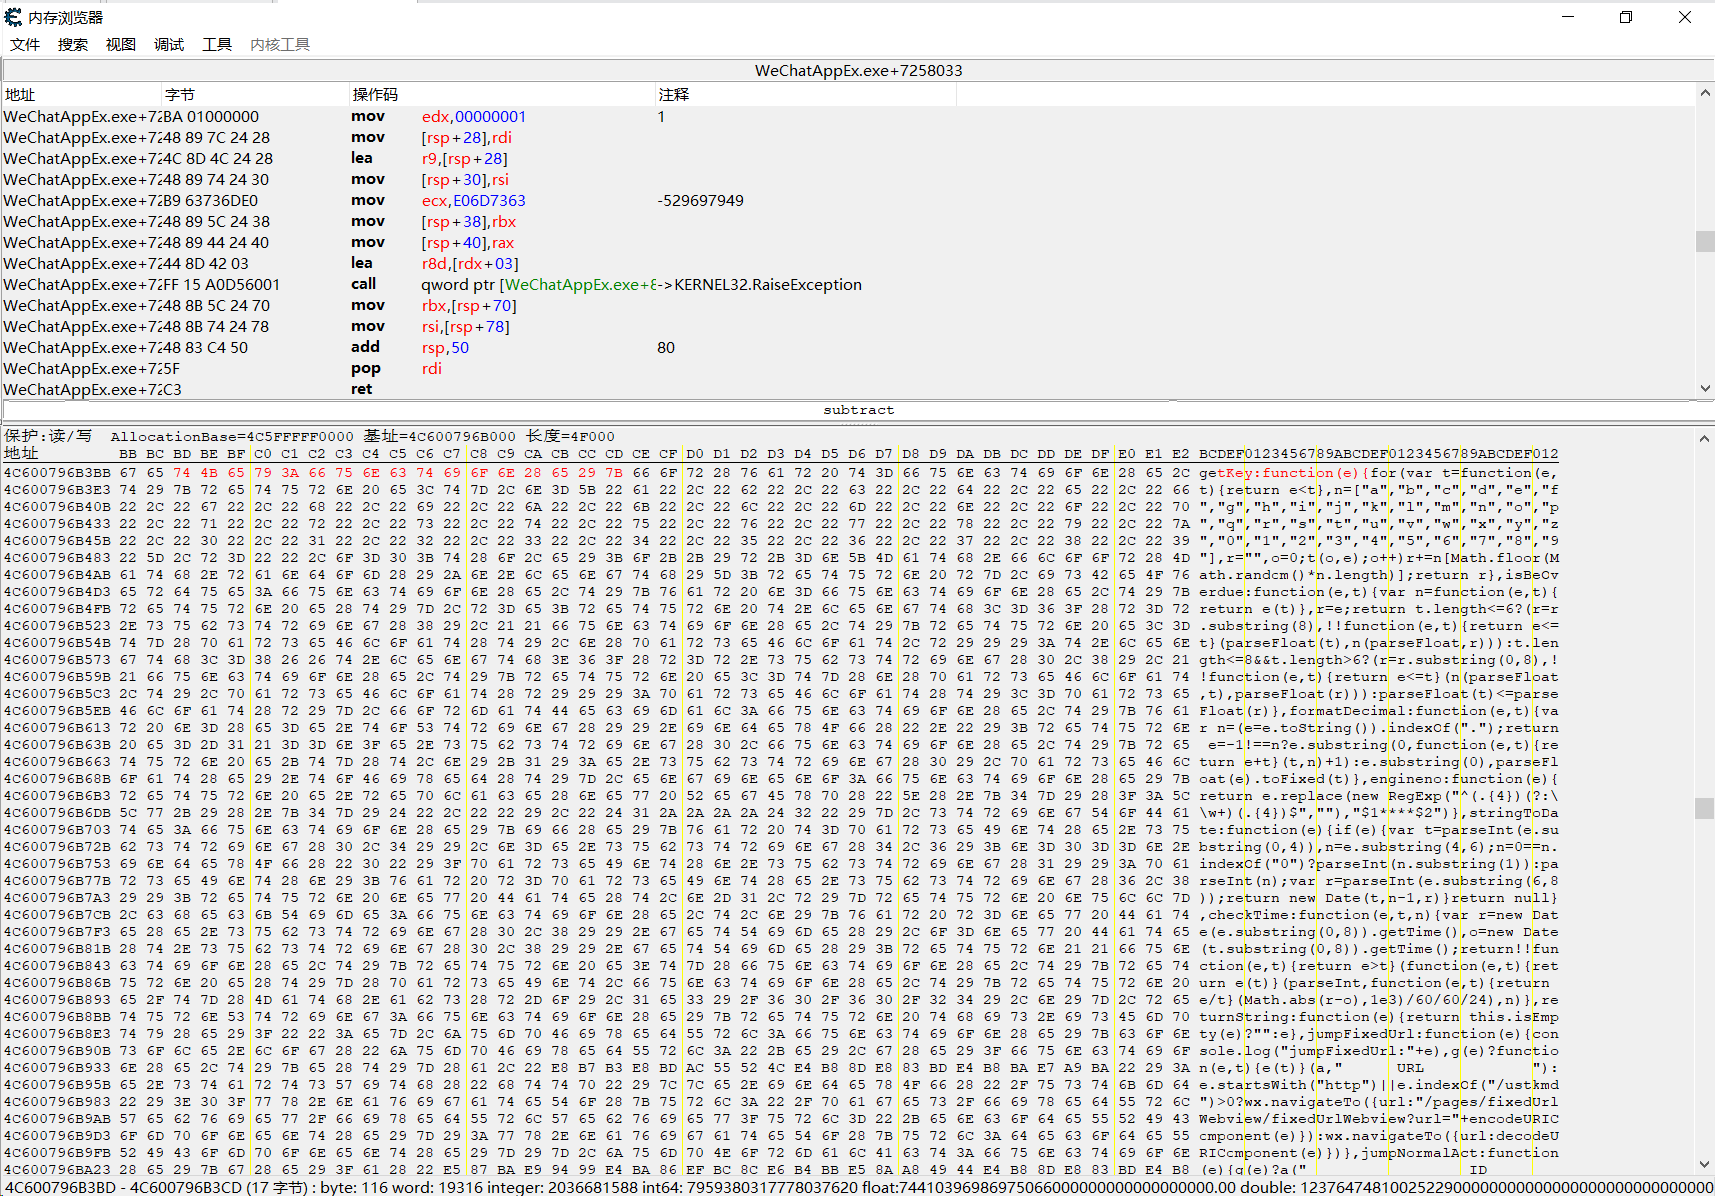
原
for(var t=function(e,t){return e<t},n=["a","b","c","d","e","f","g","h","i","j","k","l","m","n","o","p","q","r","s","t","u","v","w","x"
改成
for(var t=function(e,t){return "123123123123"/*11111111111111111111111111111111111*/

不好操作不写了,记得字符数对上,不然会报错方法二:改js(主推)
- 清理掉本地所有小程序相关文件
- bp抓包,在加密的js出现时,响应中加入固定的key,使本地保存的js是修改后的js,后面小程序优先调用本地js就可以固定密钥了
js加解密入门-app
前置
app测试的核心在于frida以及脱壳
root后的手机(推荐谷歌机、小米、一加)
adb(电脑连手机的)
frida(hook的)
https://github.com/frida/frida
抓包(小黄鸟)
jadx(反编译apk看源码的)
https://github.com/skylot/jadx
r0capture(代理检测绕过的、单/双向证书绕过)
https://github.com/r0ysue/r0capture
脱壳
环境配置
frida安装
frida分为客户端和服务端,手机上放的是服务端,电脑上放的是客户端
frida我个人比较推荐的版本有,适配低版本的12.8.0,以及适配一加手机的16.1.4
https://github.com/frida/frida/releases/tag/16.1.4
服务端配置

解压,手机连电脑,并选择文件数据传输
adb push .\frida-server-16.1.4-android-arm64 /data/local/fs16.1.4这里我为了辨识度我改成了adb push .\frida-server-16.1.4-android-arm64 /data/local/tmp/fs16.1.4这样frida就在这个/data/local/tmp/fs16.1.4路径
客户端配置
这里我用习惯了uv
uv venv
.venv\Scripts\activate
uv pip install frida==16.1.4 frida-tools
frida --version //显示16.1.4就说明安装成功了jadx安装
https://github.com/skylot/jadx/releases
下载这个就行

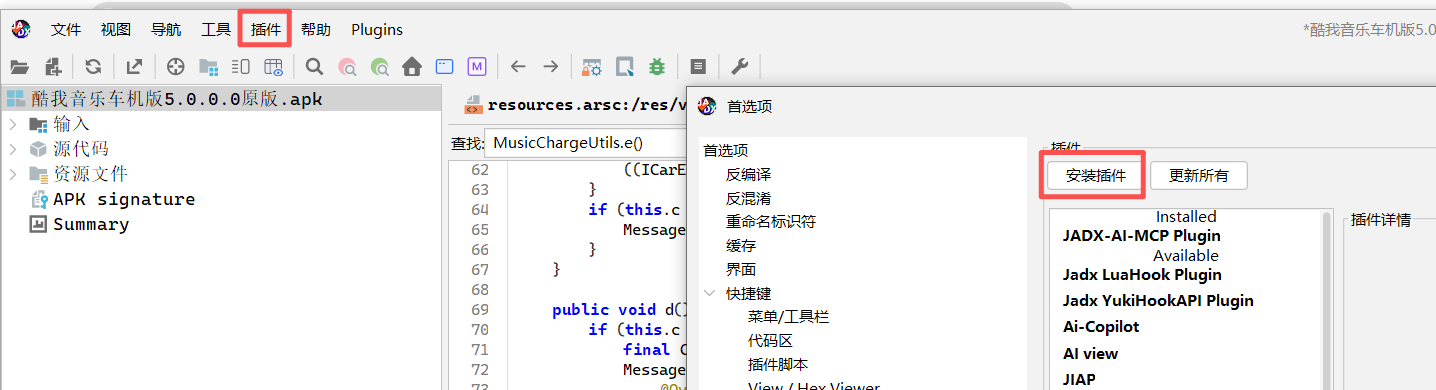
jadx-mcp配置
https://github.com/zinja-coder/jadx-ai-mcp/releases/tag/v6.1.0

两个都下载
服务端
打开jadx
选择刚刚下载的jadx-ai-mcp-6.1.0.jar确认,重启jadx
mcp配置
进入到<font style="color:rgb(9, 105, 218);">jadx-mcp-server-v6.1.0.zip</font>解压后的目录
uv venv
.venv\Scripts\activate
uv pip install -r .\requirements.txt在一个支持mcp的软件中配置,这里用的trae
{
  "mcpServers": {
    "jadx-mcp-server": {
      "command": "uv",
      "args": [
        "--directory",
        "E:\\code\\mcp_code\\jadx-mcp-server",
        "run",
        "jadx_mcp_server.py"
      ]
    }
  }
}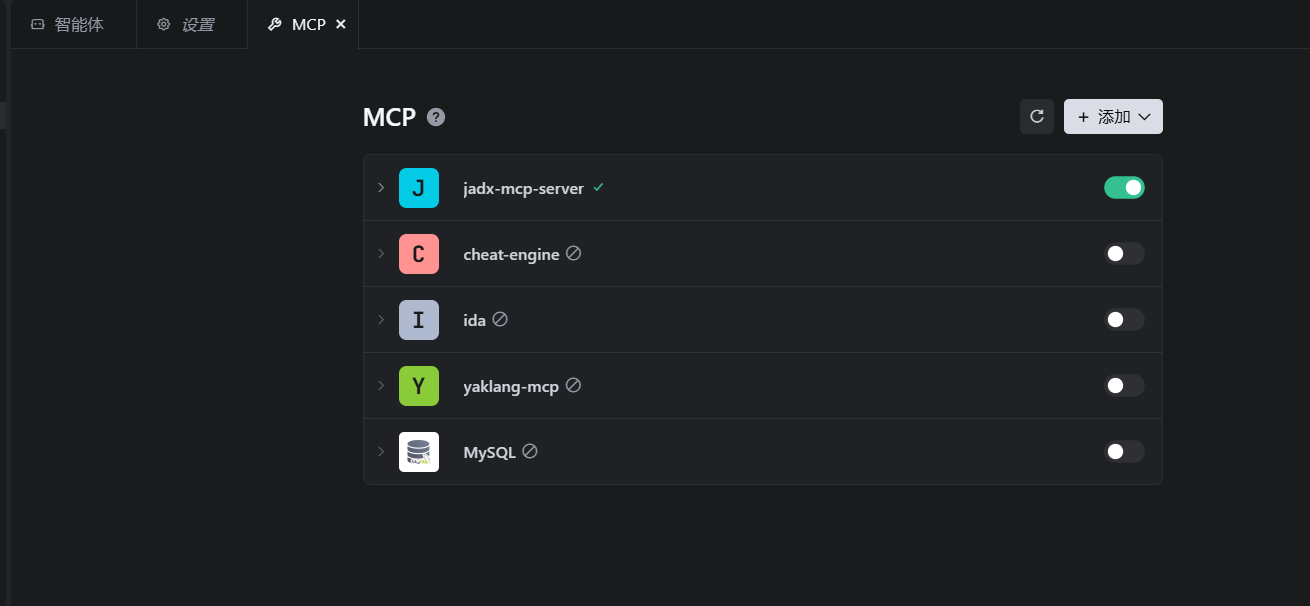
确认打勾就是没问题了,创建一个智能体,给智能体赋予mcp调用的功能
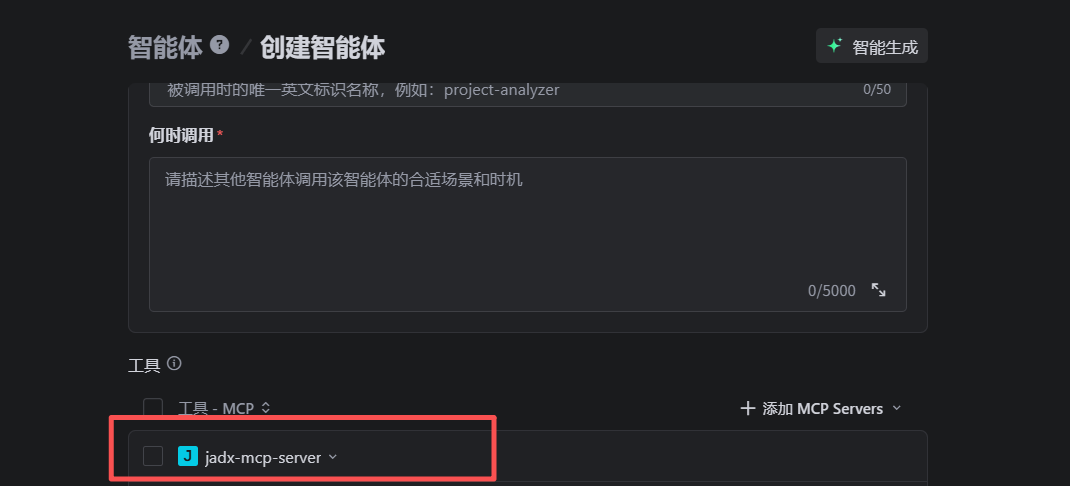
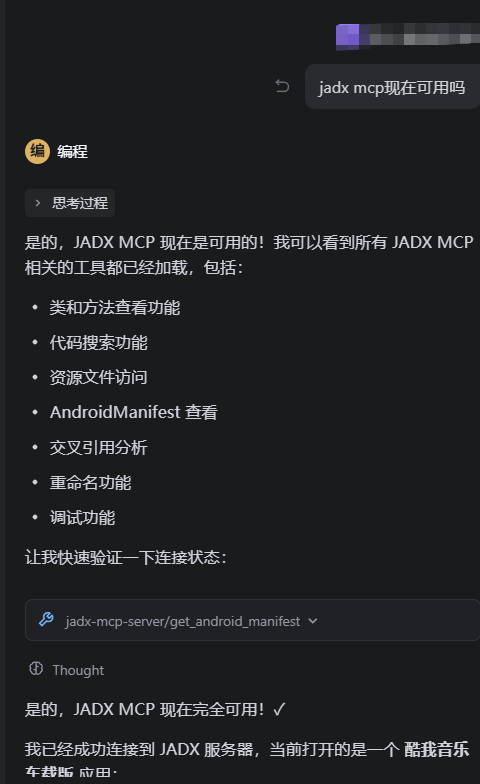
向ai提问jadx mcp 现在可用吗,得到肯定回复就说明配置完毕了
frida使用
服务端
adb shell
su
setenforce 0
chmod +x /data/local/tmp/fs16.1.4
/data/local/tmp/fs16.1.4客户端
frida --version
frida-ps -Uai //显示当前安装的程序
frida -U -f 包名 -l l 1.js    //重启app并注入1.js

frida-ps -U  //显示当前运行的程序
frida -U -l 1.js [进程ID]     //将1.js注入到对应的进程中

frida -UF -l .\1.js //将1.js注入到当前打开的页面中案例一
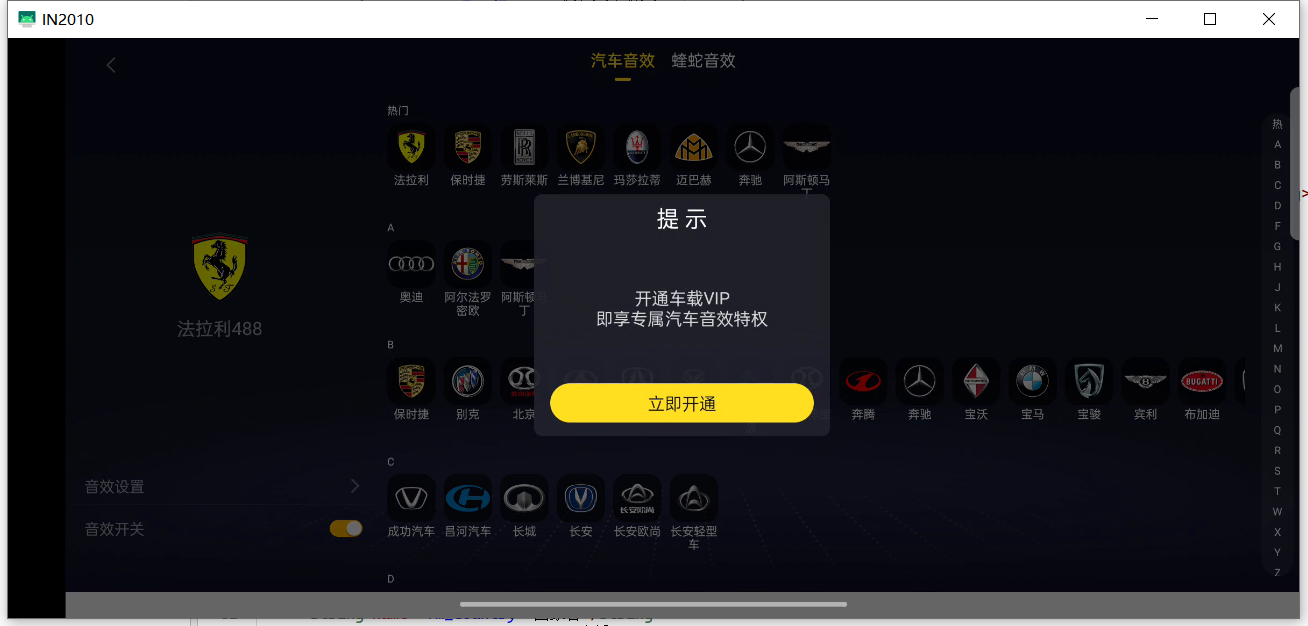
酷我音乐车机版5.0.0.0原版
目的
越过车载vip校验
确定有没有壳
这里用app messenger pro进行查壳
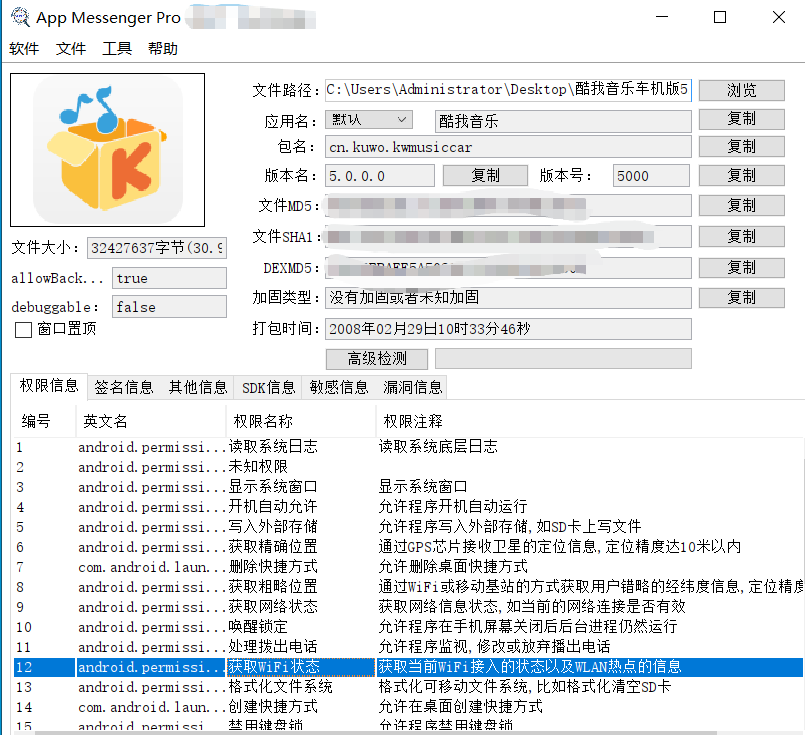
确定没有壳
jadx源码查看
jadx打开并搜索关键字
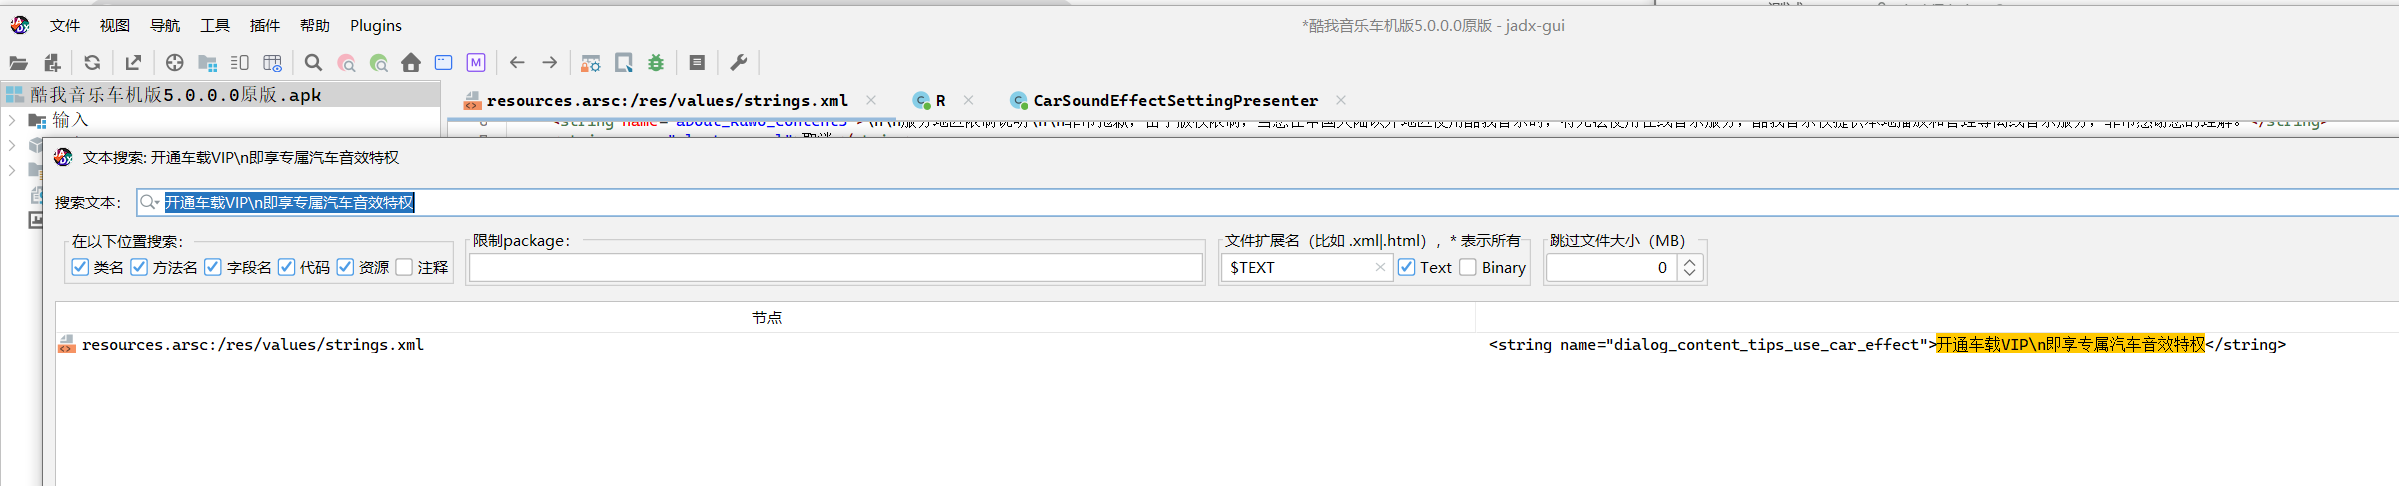
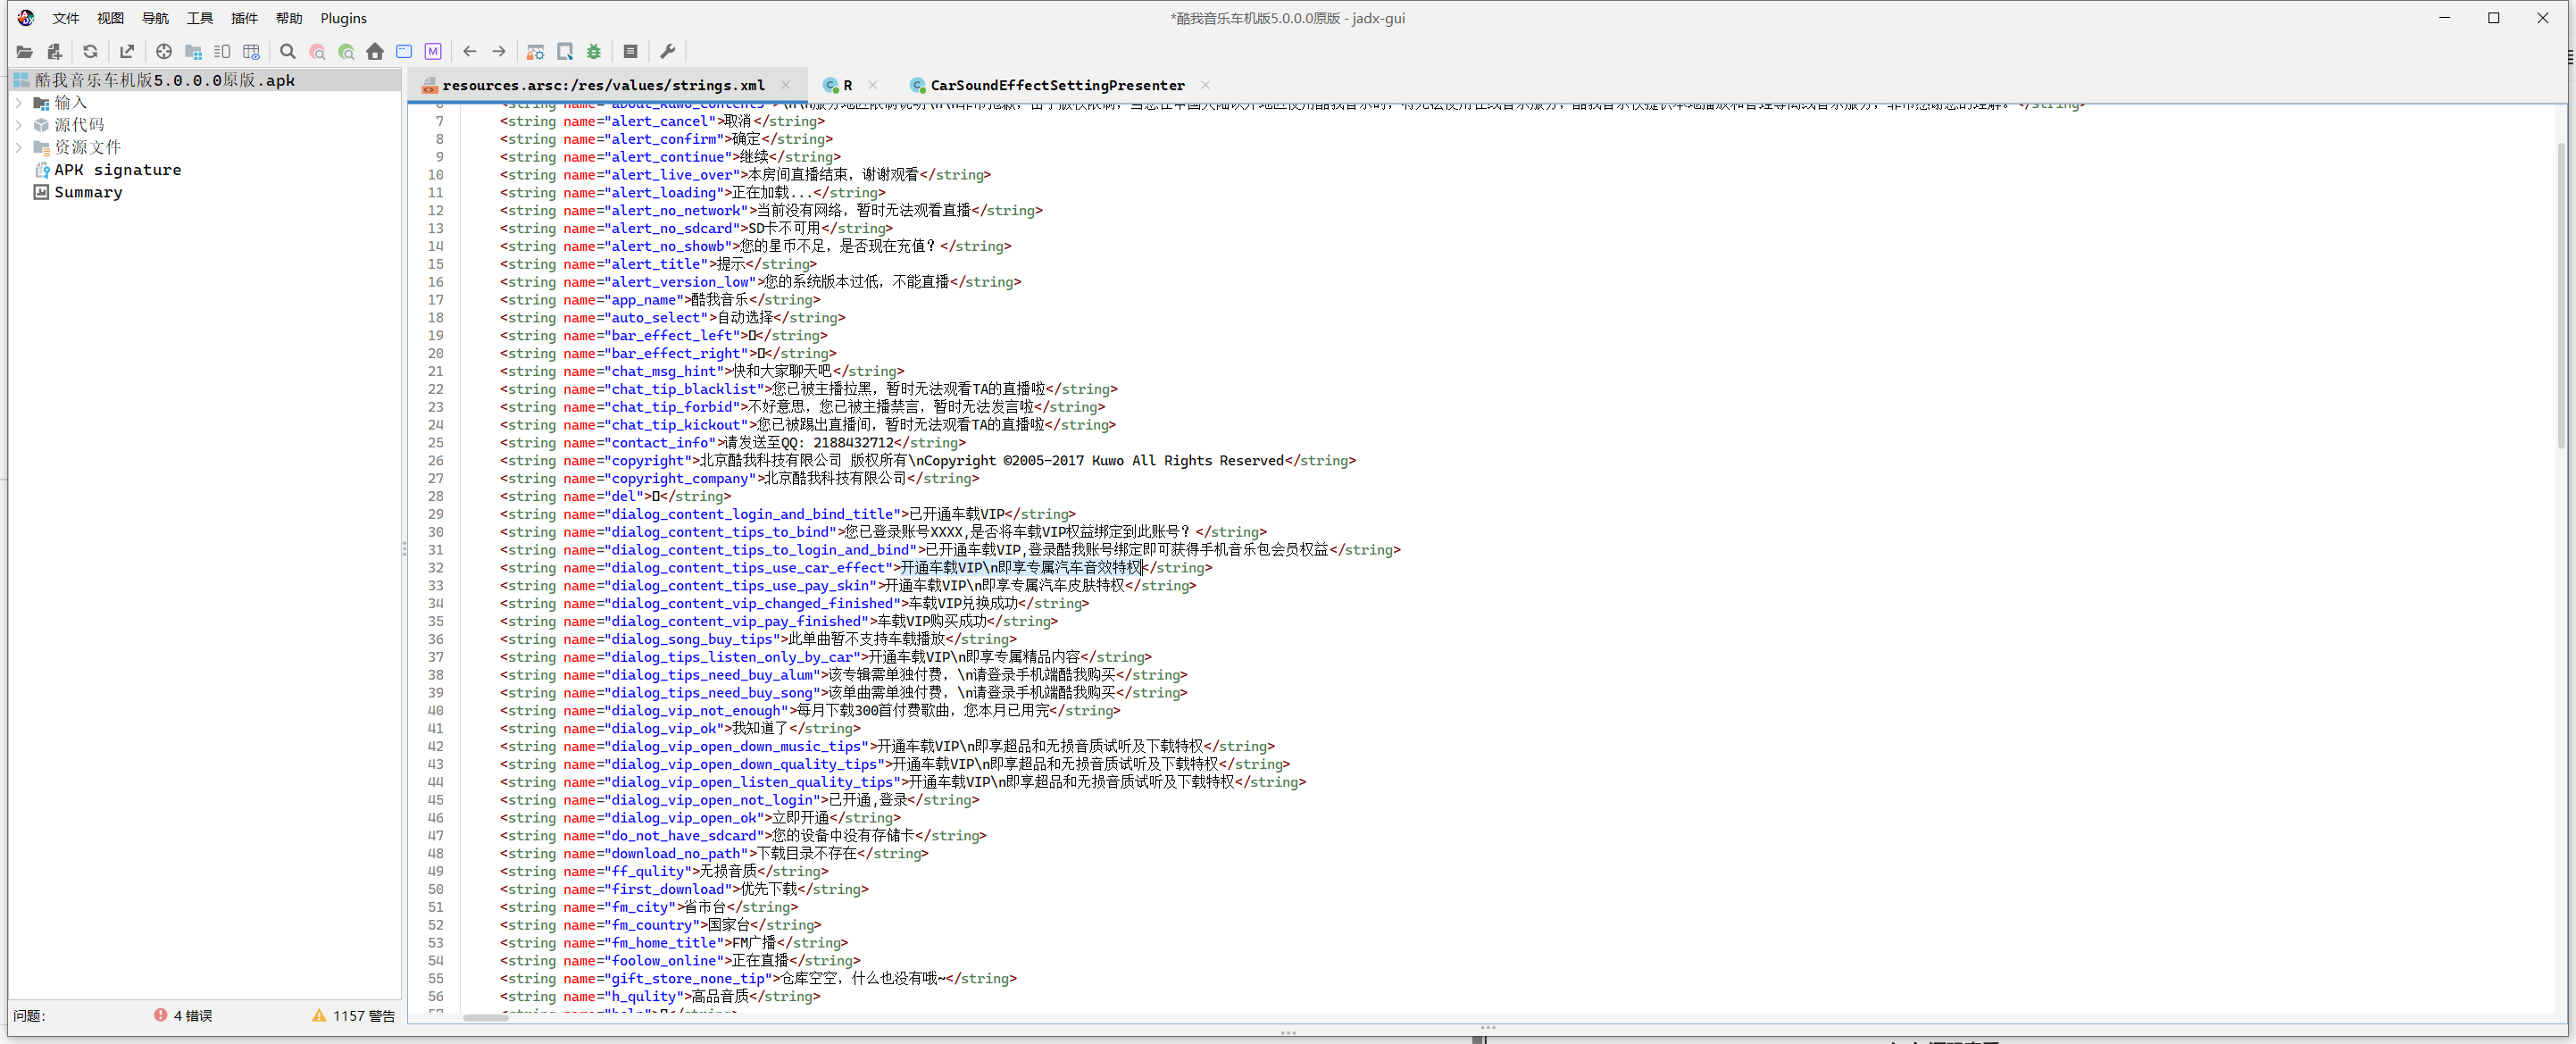
发现dialog_content_tips_use_car_effect是关于他的,进一步搜索

依次查看
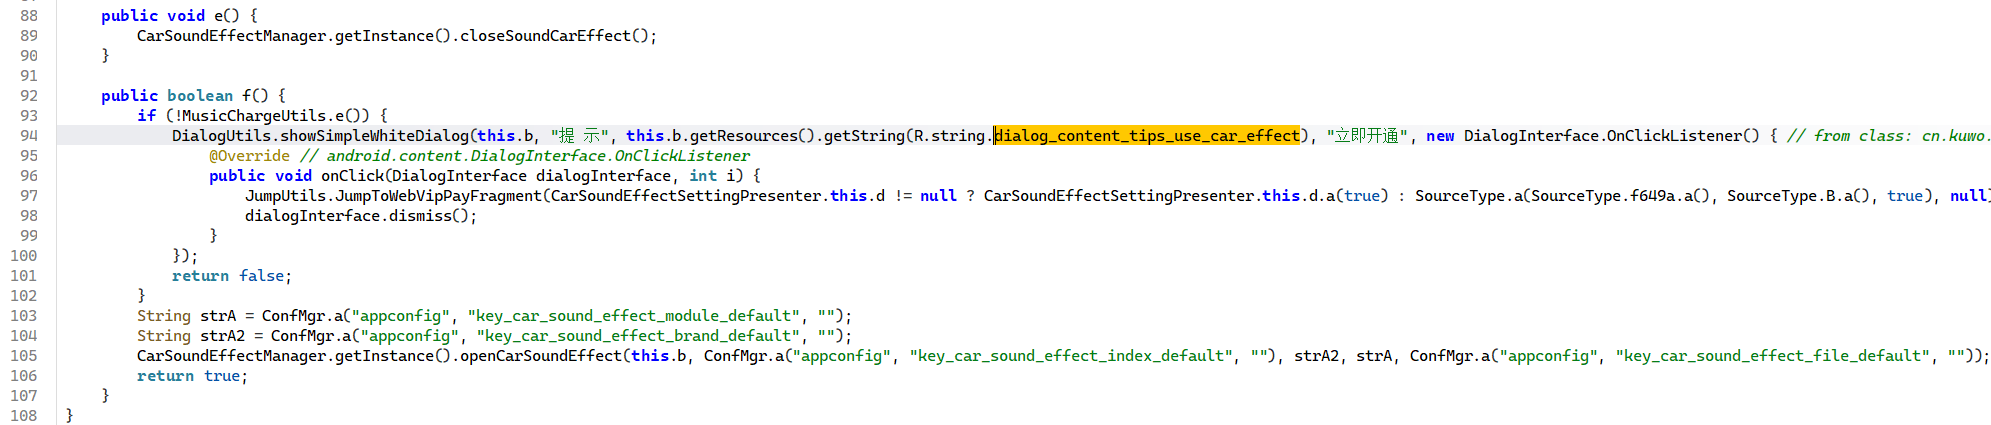
确认这个位置是关于车载vip判断的
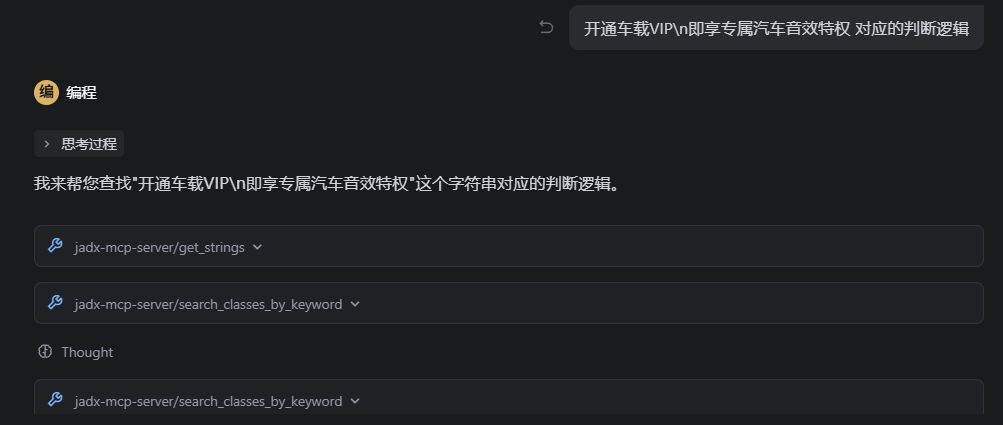
使用ai进一步确认
提问开通车载VIP\n即享专属汽车音效特权 对应的判断逻辑
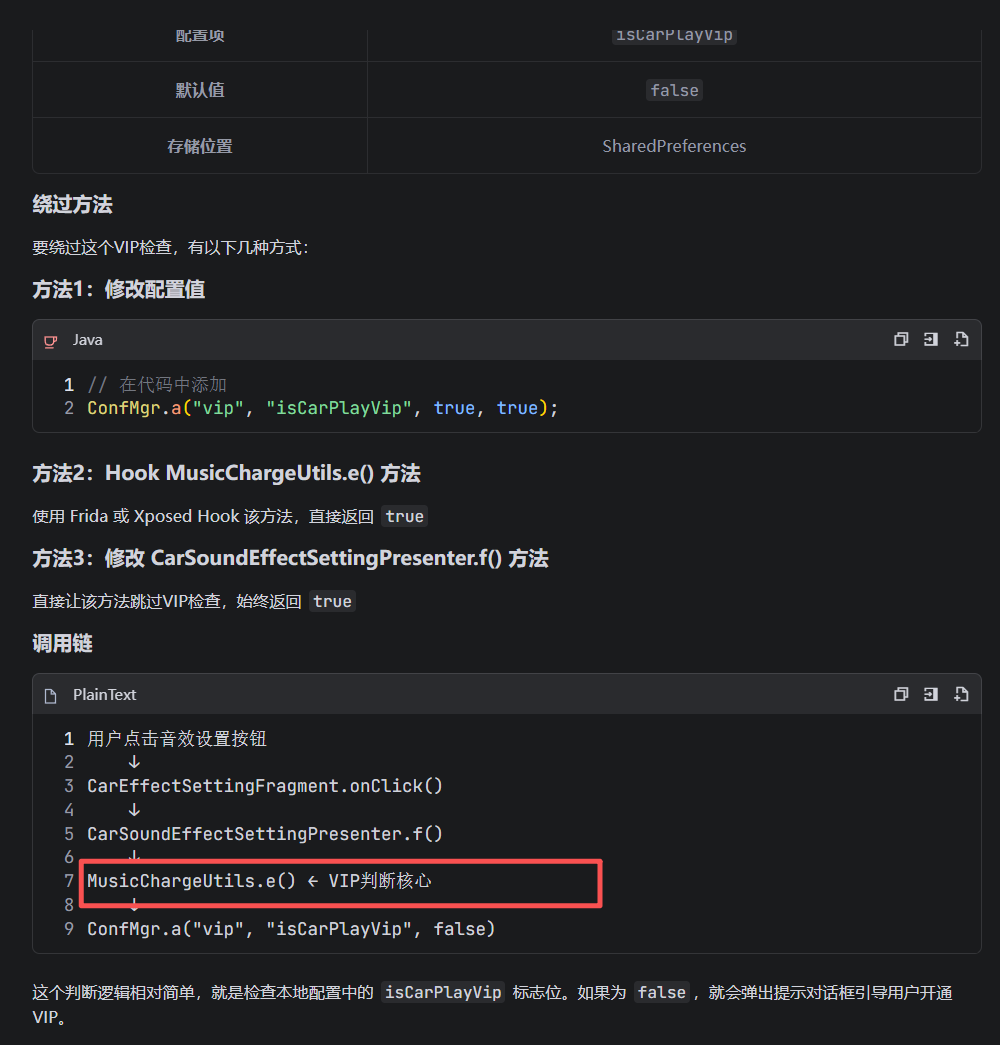
!MusicChargeUtils.e()是vip判断的关键逻辑
编写js注入脚本
- 选中并复制为frida脚本
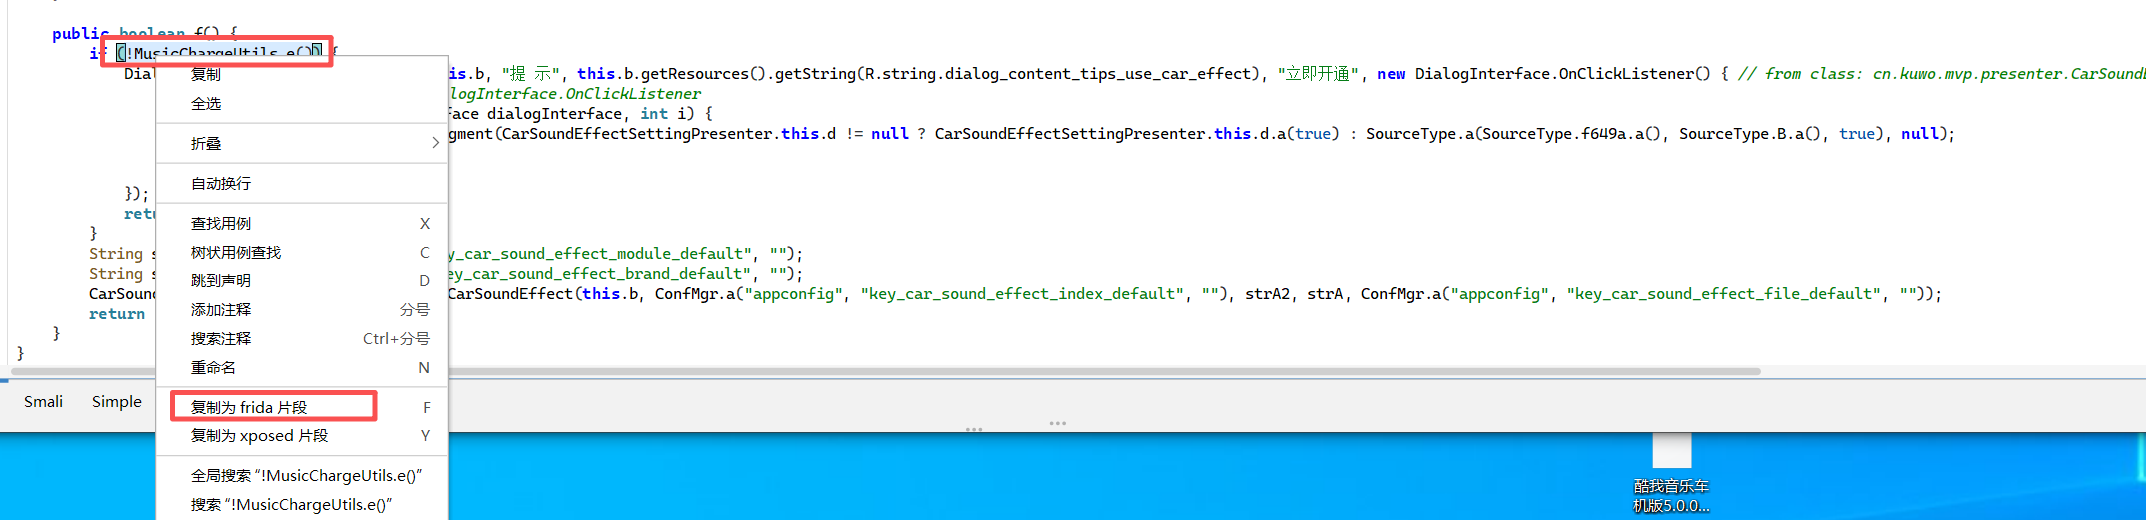
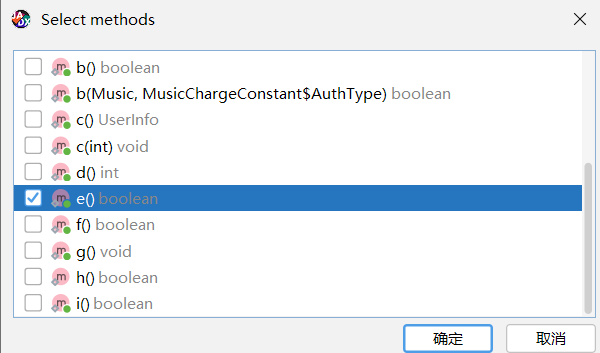
- 编写js注入代码
function main() {
    Java.perform(function () {
        let MusicChargeUtils = Java.use("cn.kuwo.mod.vipnew.MusicChargeUtils");
        MusicChargeUtils["e"].implementation = function () {
            console.log(`MusicChargeUtils.e is called`);
            let result = this["e"]();
            console.log(`MusicChargeUtils.e result=${result}`);
            result = true //添加我们的逻辑修改,让他判断为真
            console.log(`MusicChargeUtils.e result=${result}`);
            return result;
        };
    })
}
setTimeout(main)注入
frida -UF -l .\1.js
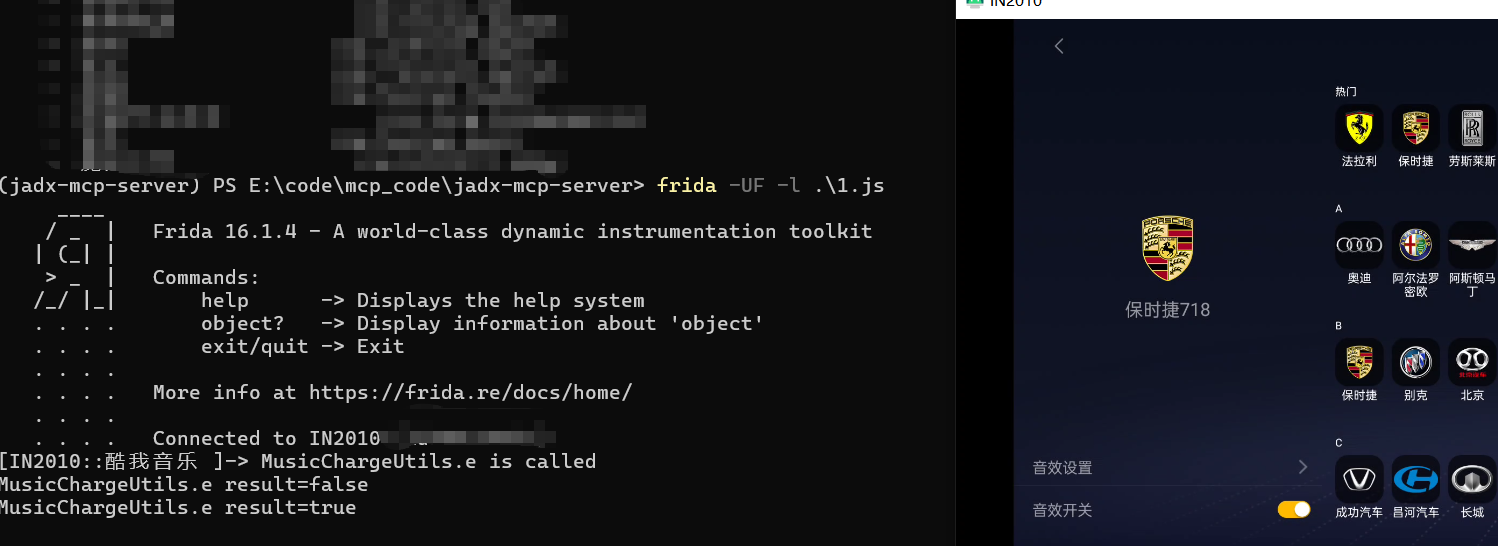
成功绕过vip检测